1. Introduction
The SWIFT EC5R Digital Microscope Eyepiece Camera transforms traditional microscopes into digital imaging systems. This 5-megapixel camera connects to your computer via USB 2.0, allowing for real-time viewing, image capture, and video recording of microscopic observations. It is designed for compatibility with various operating systems, including Windows and Mac OS, and supports multiple eyepiece tube diameters.

Image 1.1: The SWIFT EC5R Digital Microscope Eyepiece Camera installed on a microscope, connected to a laptop for digital viewing.
2. Package Contents
Verify that all items listed below are included in your package:
- 1x SWIFT EC5R 5MP Digital Eyepiece Camera
- 1x USB 2.0 Cable
- 1x Software USB Memory Stick
- 1x 30mm Eyepiece Tube Adapter
- 1x 30.5mm Eyepiece Tube Adapter

Image 2.1: The SWIFT EC5R camera and its included accessories within the packaging.
3. Setup Instructions
Follow these steps to set up your SWIFT EC5R digital microscope eyepiece camera:
- Software Installation: Insert the provided USB memory stick into your computer. Locate and install the Swift Imaging 3.0 application. Alternatively, download the software from the official SWIFT website. Ensure you select the correct version for your operating system (Windows or Mac OS).

Image 3.1: The included USB memory stick containing the Swift Imaging 3.0 software.
- Select Eyepiece Adapter: Choose the appropriate adapter (30mm or 30.5mm) that matches the diameter of your microscope's eyepiece tube. The camera itself has a 23.2mm diameter.

Image 3.2: The SWIFT EC5R camera shown with various eyepiece adapters for different microscope types.
- Install Camera on Microscope: Remove the existing eyepiece from your microscope. Attach the selected adapter to the SWIFT EC5R camera, then insert the camera with the adapter into the microscope's eyepiece tube.
- Connect to Computer: Connect the USB 2.0 cable to the camera and then to an available USB port on your computer.
- Launch Software: Open the Swift Imaging 3.0 application on your computer. The camera feed should appear on your screen.

Image 3.3: A visual guide illustrating the installation process of the digital eyepiece camera.

Image 3.4: The SWIFT EC5R camera is compatible with Windows, Mac OS, and Linux operating systems.
4. Operating Instructions
Once the camera is set up and the software is running, you can begin capturing images and videos:
- Live View: The software displays a live feed from the microscope. Adjust your microscope's focus and illumination for a clear image.
- Image Capture: To take a still image, locate the "Capture" or "Photo" button within the Swift Imaging 3.0 software interface and click it. Images will be saved to your designated folder.
- Video Recording: To record video, find the "Record" or "Video" button in the software. Click once to start recording and again to stop. Videos will be saved to your designated folder.
- Software Settings: The Swift Imaging 3.0 software provides various settings for image adjustment, including exposure time, white balance, and gain. Adjust these parameters to optimize image quality for different samples and lighting conditions. Refer to the software's help documentation for detailed information on each setting.

Image 4.1: The SWIFT EC5R camera enabling both video recording and still image capture on a computer.
5. Specifications
Technical specifications for the SWIFT EC5R Digital Microscope Eyepiece Camera:
| Feature | Specification |
|---|---|
| Brand | SWIFT |
| Model Number | EC5R |
| Sensor Type | CMOS |
| Sensor Size | 1/2.5" |
| Maximum Resolution | 2592x1944 (5MP) |
| Frame Rate | 30fps @ 2592x1944, 1280x960, 640x480 |
| Pixel Size | 2.2 µm x 2.2 µm |
| Exposure Time | 0.1~1000 ms |
| Data Transfer | USB 2.0 |
| Compatible OS | Windows XP/Vista/7/8/10 (32 & 64 bit), Mac OS X, Linux |
| Software | Swift Imaging 3.0 |
| Eyepiece Tube Diameter | 23.2mm (with 30mm and 30.5mm adapters included) |
| Material | Metal |
| Color | Black, Silver |
| Camera Body Dimensions | Approx. φ27.2 x 40 mm |
| Weight | Approx. 137 g |
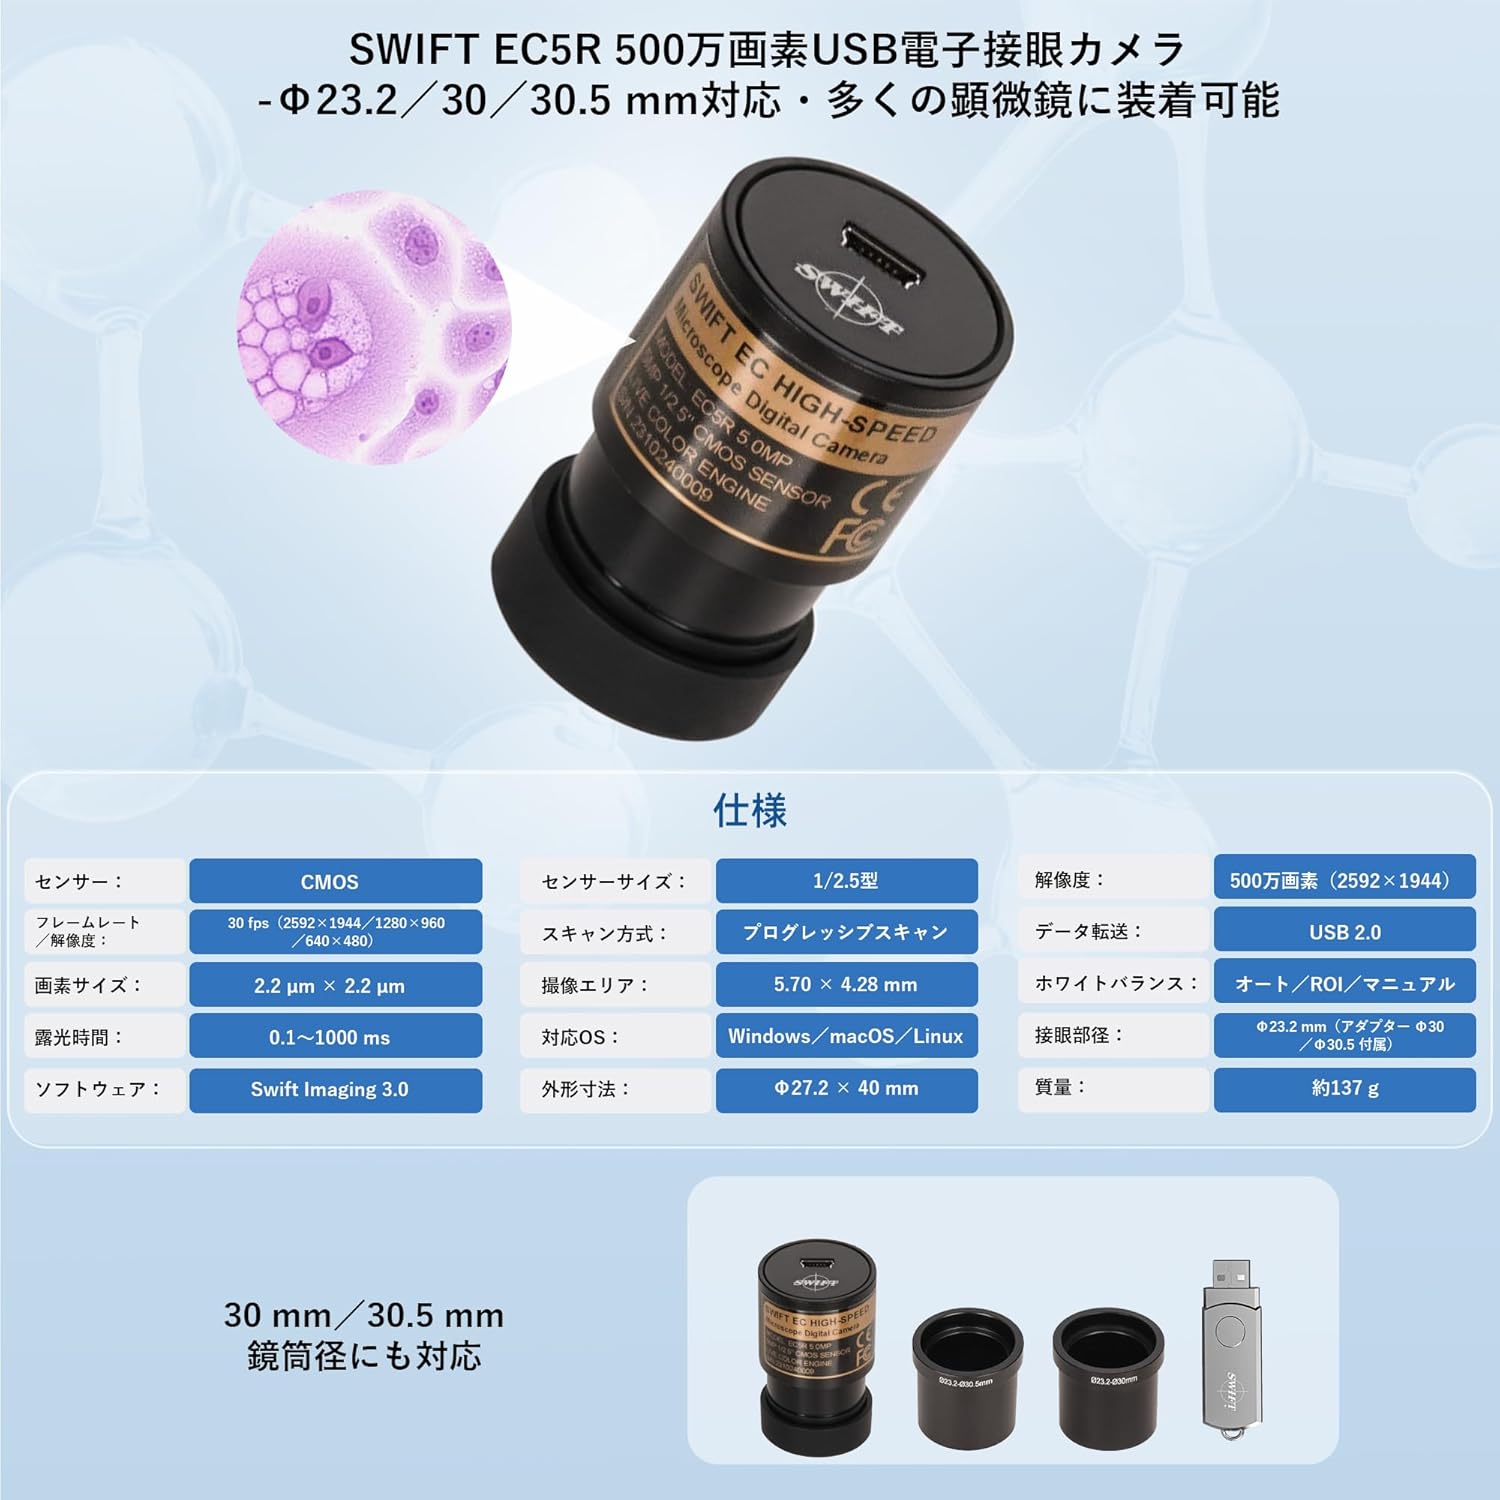
Image 5.1: A visual representation of the technical specifications for the SWIFT EC5R.
6. Troubleshooting
- No Image on Screen:
- Ensure the USB cable is securely connected to both the camera and the computer.
- Verify that the Swift Imaging 3.0 software is open and the correct camera device is selected.
- Check your computer's device manager to confirm the camera is recognized.
- Image is Too Dark or Too Bright:
- Adjust the microscope's illumination source.
- Within the Swift Imaging 3.0 software, adjust the "Exposure Time" and "Gain" settings. If the image is completely dark or white upon initial launch, try disabling automatic exposure and manually adjusting the exposure time.
- Image is Blurry:
- Adjust the focus knob on your microscope.
- Ensure the camera is fully seated in the microscope's eyepiece tube.
- Software Not Installing or Running:
- Confirm your computer meets the minimum system requirements (CPU: Intel Core2 2.8GHz or higher, Memory: 2GB or higher, USB2.0 port).
- Ensure your operating system (Windows XP/Vista/7/8/10, Mac OS X, Linux) is supported and you have downloaded the correct software version.
- Temporarily disable antivirus software during installation if issues persist.
- Image Orientation is Incorrect (Flipped/Mirrored):
- The Swift Imaging 3.0 software typically includes options to flip or mirror the image horizontally or vertically. Locate these settings within the software interface to correct the orientation.
7. Maintenance
Proper care and maintenance will ensure the longevity and optimal performance of your SWIFT EC5R camera:
- Cleaning the Lens: Use a soft, lint-free cloth specifically designed for optical lenses to gently wipe the camera's lens. For stubborn spots, a small amount of lens cleaning solution can be applied to the cloth (not directly to the lens).
- Storage: When not in use, store the camera in a dry, dust-free environment. Use the provided lens cap to protect the lens from dust and scratches.

Image 7.1: The SWIFT EC5R camera with its protective cap, ready for storage.
- Handling: Avoid dropping or subjecting the camera to strong impacts. Handle with care to prevent damage to internal components.
- Environmental Conditions: Do not expose the camera to extreme temperatures, high humidity, or corrosive chemicals.
8. Warranty and Support
For warranty information or technical support, please refer to the documentation included with your product or visit the official SWIFT website. Contact details for customer service are typically provided on the manufacturer's website or in the product packaging.
You can find more information and support resources on the SWIFT Brand Store.


