
DEKO DKUS-MIG135M
DEKO 135Amp MIG/MMA Welder User Manual
Model: DKUS-MIG135M
1. Product Overview
The DEKO 135Amp MIG/MMA Welder is a versatile 3-in-1 welding machine designed for various welding applications, including Gas/Solid Wire MIG (GMAW), Gasless Flux Core MIG (FCAW), and Stick/MMA welding. It incorporates IGBT intelligent inverter technology for efficient and reliable performance. This manual provides essential information for safe and effective operation, setup, maintenance, and troubleshooting.
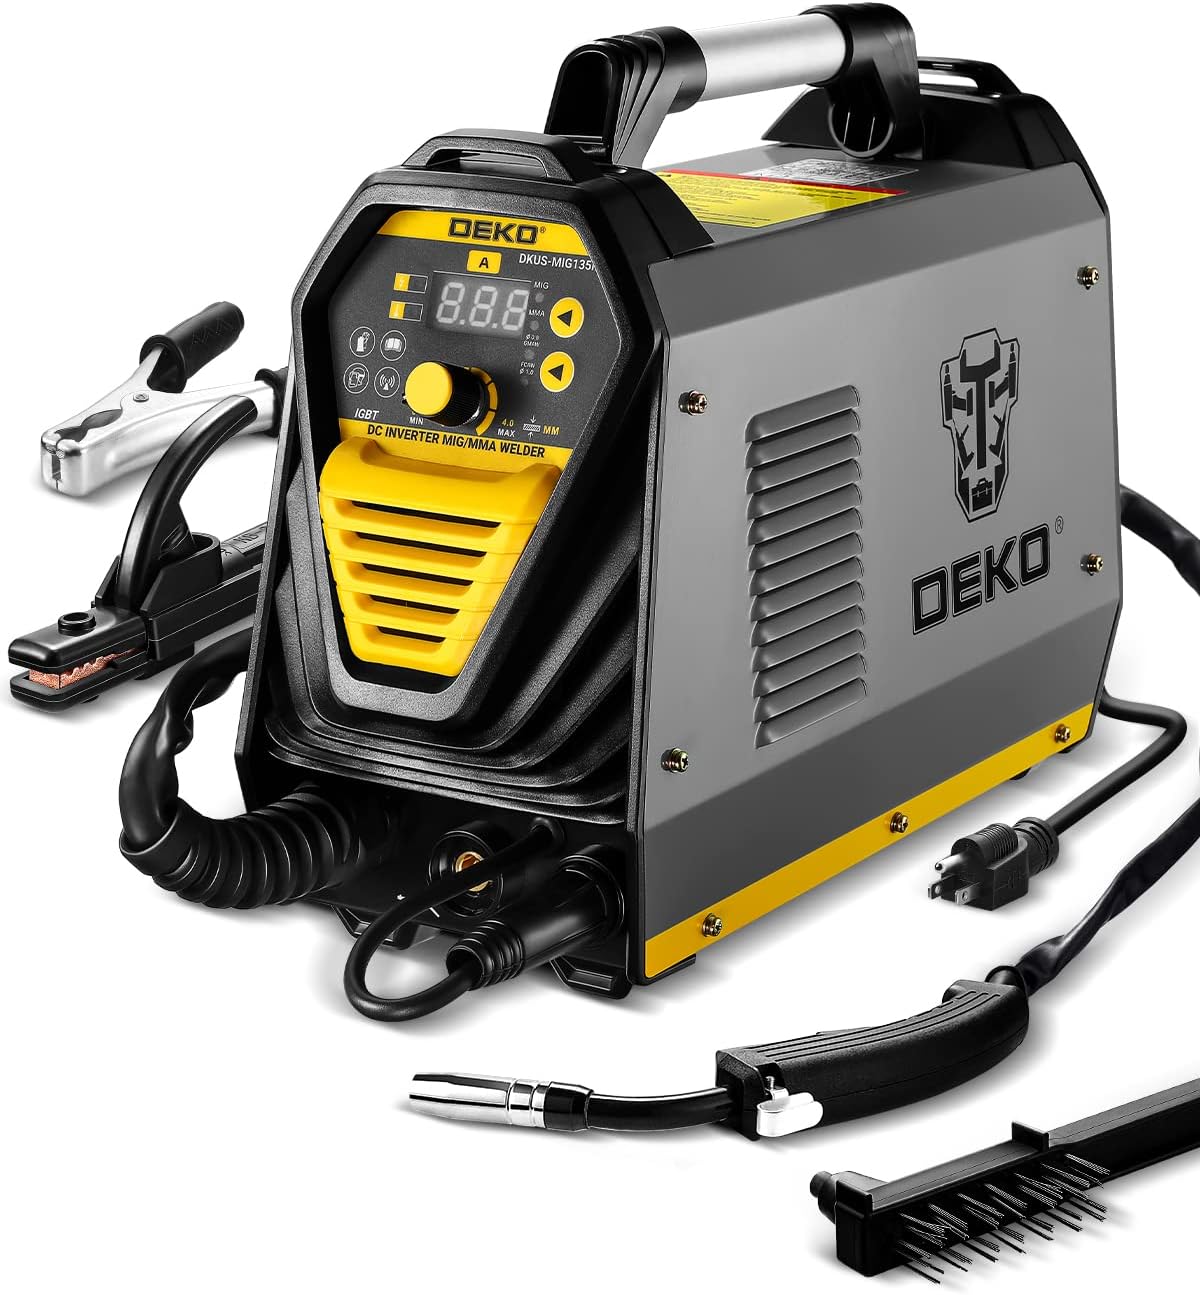
Figure 1.1: DEKO 135Amp MIG/MMA Welder, showcasing its compact design and integrated handle.
Components and Control Panel

Figure 1.2: Detailed view of the welder's front and rear panels, highlighting key components and controls.
- Welding Power Control: Adjusts the output power for welding.
- Wire Selection: Selects the type of welding wire.
- MMA-MIG Transfer Switch: Switches between MMA (Stick) and MIG welding modes.
- Digital Display Meter: Shows current welding parameters.
- Power Indicator Light: Illuminates when the machine is powered on.
- Overheating Indicator Light: Illuminates if the machine overheats, indicating a need for cool-down.
- Conversion Interface: Connection point for various welding accessories.
- Welding Gun: The primary tool for MIG welding.
- Earthing Cable: Connects to the workpiece for grounding.
- Electrode Holder Connector: For connecting the electrode holder in MMA mode.
- Main Switch: Powers the unit on or off.
- Shielding Gas Hose Connector: For connecting the gas cylinder in Gas MIG mode.
- Supply Voltage Cable: Connects the welder to the power source.
2. Safety Instructions
Always prioritize safety when operating welding equipment. Failure to follow safety guidelines can result in serious injury or damage to the equipment. Ensure you wear appropriate personal protective equipment (PPE), including a welding helmet, gloves, and protective clothing.
- Electrical Safety: Ensure the power supply matches the welder's requirements. Do not operate in wet conditions. Always connect the earthing cable properly.
- Fume and Gas Safety: Weld in a well-ventilated area to avoid inhaling hazardous fumes. Use local exhaust ventilation if necessary.
- Fire Prevention: Keep flammable materials away from the welding area. Have a fire extinguisher readily available.
- Arc Ray Safety: The welding arc emits intense UV and IR radiation. Always use a proper welding helmet with the correct shade filter to protect your eyes and face.
- Burn Prevention: Hot metal and equipment can cause severe burns. Allow welded materials to cool before handling.
- Machine Protection: The welder is equipped with safety features to prevent damage from overheating, overload, overcurrent, and overvoltage. If an indicator light illuminates, cease operation and allow the machine to cool or address the issue.

Figure 2.1: Overview of the welder's built-in safety features, including protection against overheating, overload, overcurrent, and overvoltage.
3. Setup
Proper setup is crucial for safe and effective welding. Follow these steps to prepare your DEKO 135Amp MIG/MMA Welder for operation.
3.1 Installing Welding Wire (MIG Mode)
For MIG welding, you will need to install the appropriate filler wire. The machine is delivered ready for operation with 0.8 mm diameter filler wire. It also supports 0.6 mm, 0.9 mm, or 1.0 mm solid wire or cored wire.
- Open the side panel of the welder to access the wire feed mechanism.
- Place the wire spool onto the spool holder, ensuring it rotates freely.
- Thread the wire through the wire feed mechanism, ensuring it passes through the correct groove for the wire diameter.
- Secure the wire with the wire pressing wheel.
- Close the side panel.

Figure 3.1: Steps for threading the filler wire into the welding machine, showing the spool, wire pressing wheel, and wire feeding wheel.
3.2 Connecting Cables
- Connect the welding gun to the appropriate connector on the front panel.
- Connect the earthing cable to the negative (-) terminal and clamp it securely to the workpiece.
- For MMA (Stick) welding, connect the electrode holder to the positive (+) terminal.
- For Gas MIG welding, connect the shielding gas hose to the gas connector on the rear panel and to your gas cylinder. Ensure the gas regulator is properly installed and the gas flow is set correctly.
- Plug the supply voltage cable into a suitable 110V power outlet.
Video 3.1: Demonstrates the setup process, including wire installation and cable connections for the DEKO 135Amp MIG Welder.
4. Operating Instructions
This section outlines the general operating procedures for the DEKO 135Amp MIG/MMA Welder. Always refer to specific welding technique guides for detailed instructions on different materials and joint types.
4.1 Powering On and Mode Selection
- Ensure all connections are secure and the earthing clamp is firmly attached to the workpiece.
- Turn on the main switch located on the rear panel. The power indicator light should illuminate.
- Use the MMA-MIG Transfer Switch to select your desired welding mode (MIG or MMA).
- For MIG welding, select the appropriate wire type using the Wire Selection control.
4.2 Adjusting Welding Parameters (Synergic Control)
The DEKO 135Amp MIG/MMA Welder features synergic control, which simplifies parameter adjustment. When you adjust the welding power according to the sheet thickness, the machine simultaneously adjusts both the wire feed speed and the amount of current. This provides a good starting point for various welding situations.
- Use the Welding Power Control knob to set the desired power level. The digital display will show the corresponding values.
- Fine-tune settings as needed based on the material thickness and desired weld characteristics.

Figure 4.1: Illustrates the compact size and efficiency of the welder, emphasizing the ease of adjusting welding parameters.
4.3 Welding Process
- Ensure proper ventilation and wear all required PPE.
- Position the welding gun or electrode at the starting point of your weld.
- Initiate the arc (for MIG, press the trigger; for MMA, strike the electrode).
- Maintain a consistent travel speed and arc length for a uniform weld bead.
- After welding, release the trigger (MIG) or lift the electrode (MMA).
- Allow the workpiece to cool before handling.

Figure 4.2: Visual representation of the welder's multi-functionality, demonstrating MMA, Flux MIG, and Gas MIG welding in action.
5. Maintenance
Regular maintenance ensures the longevity and optimal performance of your DEKO 135Amp MIG/MMA Welder. Always disconnect the power supply before performing any maintenance.
- Cleaning: Periodically clean the exterior of the machine with a dry cloth. Use compressed air to clear dust from the cooling vents.
- Wire Feed Mechanism: Inspect the wire feed rollers and guide tubes for wear or debris. Clean or replace as necessary to ensure smooth wire feeding.
- Welding Gun: Clean the contact tip and gas nozzle regularly. Replace worn contact tips to maintain good arc stability.
- Cables and Connections: Check all cables for damage (cuts, fraying) and ensure connections are tight. Replace damaged cables immediately.
- Storage: Store the welder in a dry, clean environment, away from excessive dust and moisture.
6. Troubleshooting
This section provides solutions to common issues you might encounter with your DEKO 135Amp MIG/MMA Welder. For problems not listed here, contact customer support.
| Problem | Possible Cause | Solution |
|---|---|---|
| No power to the machine | Power cable disconnected, main switch off, circuit breaker tripped. | Check power cable connection, turn on main switch, reset circuit breaker. |
| No arc or weak arc | Poor earthing connection, incorrect welding parameters, worn contact tip (MIG), damp electrodes (MMA). | Ensure good earthing, adjust power/wire speed, replace contact tip, dry electrodes. |
| Wire not feeding smoothly (MIG) | Incorrect wire tension, clogged liner, wrong size drive roller, tangled wire spool. | Adjust tension, clean/replace liner, ensure correct drive roller, untangle wire. |
| Overheating indicator on | Prolonged use beyond duty cycle, blocked cooling vents. | Allow machine to cool down, clear any obstructions from vents. |
7. Specifications
Key technical specifications for the DEKO 135Amp MIG/MMA Welder.
- Model: DKUS-MIG135M
- Input Voltage: 110V
- Welding Current: Up to 135 Amp
- Welding Processes: Gas/Solid Wire MIG (GMAW), Gasless Flux Core MIG (FCAW), Stick/MMA
- Technology: IGBT DC Inverter
- Supported Wire Diameters: 0.6 mm, 0.8 mm, 0.9 mm, 1.0 mm
- Item Weight: Approximately 19.4 pounds
- Product Dimensions: 14.57 x 6.1 x 11.81 inches

Figure 7.1: Illustration highlighting the IGBT intelligent inverter technology, which contributes to the welder's efficiency and performance.
8. Warranty and Support
For warranty information, technical support, or service inquiries, please refer to the warranty card included with your product or contact DEKO customer service directly. Keep your purchase receipt as proof of purchase.
DEKO Customer Service: Please visit the official DEKO website or refer to the contact information provided in your product packaging for the most up-to-date support details.
Related documentsDKUS-MIG135M

Ask a question about this manual
Ask about setup, troubleshooting, compatibility, parts, safety, or missing instructions. Manuals+ will review the question and use this page’s manual context to help answer it.