1. Introduction
This manual provides detailed instructions for the BEITONG Asura 2 Pro Wireless Game Controller. It covers product features, setup procedures, operational guidelines, maintenance, and troubleshooting to ensure optimal performance and user experience. Please read this manual thoroughly before using your controller.

Figure 1: Overview of the BEITONG Asura 2 Pro Wireless Game Controller with labeled components.
2. Product Overview and Features
The BEITONG Asura 2 Pro is a high-performance wireless gamepad designed for a superior gaming experience across multiple platforms. Key features include:
- Wireless and Wired Connectivity: Supports 2.4GHz wireless connection and wired USB connection for versatile use.
- Hall Effect Triggers: Electromagnetic induction principle for precise and smooth trigger response with 0.1mm accuracy.
- Programmable M Buttons: Configurable LB, RB, M1, M2 buttons allowing up to thirty action keys per profile for complex commands.
- Customizable Software: BEITONG Gamepad Assistant software for adjusting joystick sensitivity, deadzone, vibration intensity, turbo frequency, and key mapping.
- High-Precision Components: ALPS high-precision joysticks, micro tact switches for LB/RB, and an 8-direction D-pad.
- Dual Rumble Motors: Provides immersive in-game vibration feedback.
- Ergonomic Design: Laser-textured anti-slip grip and anti-sweat outer case for comfortable extended play.
- Long-lasting Battery: Integrated 600 mAh lithium-polymer rechargeable battery.

Figure 2: Front view of the BEITONG Asura 2 Pro Wireless Game Controller.

Figure 3: Back view of the BEITONG Asura 2 Pro Wireless Game Controller, showing M buttons and dongle storage slot.
3. Setup and Connection
The Asura 2 Pro controller supports various connection methods for different devices.
3.1. Compatibility
The controller is compatible with Windows 7/8/10/11, Android TV (4.0 and above), Steam, and Tesla. An extra OTG adapter may be needed for Steam Deck. It does NOT support Xbox 360/One, Mac, iOS, PS4/5, Amazon Fire TV, or Fire Stick.

Figure 4: Visual representation of compatible devices including PC, Laptop, Android TV, Steam Deck, and Tesla.
3.2. Wired Connection to PC
- Connect the controller to your PC via the provided USB cable.
- Press the HOME button on the controller to turn it on.
- Connection is successful when the controller vibrates and the indicator light stays solid.
Video 1: Demonstrates how to connect the BEITONG Asura 2 Pro controller to a PC using a wired USB connection.
3.3. 2.4G Wireless Connection to PC
- Insert the 2.4GHz wireless receiver into an available USB port on your PC.
- Press the HOME button on the controller to turn it on.
- Connection is successful when the controller vibrates and the indicator light stays solid.
Video 2: Demonstrates how to connect the BEITONG Asura 2 Pro controller to a PC using the 2.4G wireless receiver.
3.4. Connection to Tesla via USB Cable
For Tesla Model 3 and Y purchased after November 2021, games may only be played through the USB port of the glove box due to potential data transmission reading function limitations.
- On your Tesla's center console, click 'Controls'.
- Then click 'Glove box' to open it.
- Take out the controller and its USB cable.
- Connect the controller to the USB port in the glove box with the cable.
- Press the HOME button on the controller to turn it on.
- Connection is successful when the controller vibrates and the indicator light stays solid (Indicator 1 of Asura 2 is on).
- You can then enjoy your game.
Tip: It is suggested to order an extended USB Hub for dual gamers or plugging other devices.
Video 3: Guide on connecting the BEITONG Asura 2 Pro controller to a Tesla via USB cable.
3.5. Connection to Tesla via 2.4GHz Dongle
For Tesla Model 3 and Y purchased after November 2021, games may only be played through the USB port of the glove box due to potential data transmission reading function limitations.
- On your Tesla's center console, click 'Controls'.
- Then click 'Glove box' to open it.
- Take out the controller and the 2.4GHz dongle (stored in the back slot of the controller).
- Connect the dongle to the USB port in the glove box.
- Press the HOME button on the controller to turn it on.
- Connection is successful when the controller vibrates and the indicator light stays solid (Indicator 1 of Asura 2 is on).
- You can then enjoy your game.
Tip: It is suggested to order an extended USB Hub for dual gamers or plugging other devices.
Video 4: Guide on connecting the BEITONG Asura 2 Pro controller to a Tesla via the 2.4GHz dongle.
4. Operating Instructions
4.1. Programmable M Buttons (M1, M2)
The M1 and M2 buttons on the back of the controller are highly customizable. Up to thirty action keys can be saved per profile, allowing for complex commands with a single click.

Figure 5: Illustration of programmable macro buttons (M1, M2) and their customization options.
4.2. Turbo Function
The Turbo function allows for rapid, repeated input of a button press. To activate, press the TURBO button and then the desired action button (A, B, X, Y, LB, RB, LT, RT). Long press the action button to activate turbo.

Figure 6: Diagram explaining how to set and use the Turbo function.
4.3. Left Stick and D-pad Function Switch
The [SHIFT] key allows you to switch the function between the left stick and the D-pad, catering to different gaming preferences. Be careful not to accidentally press the SHIFT key during gameplay to avoid unintended changes in control.

Figure 7: Illustration of the SHIFT key for switching between left stick and D-pad functions.
4.4. Hall Effect Triggers
The Hall Effect Triggers utilize an electromagnetic induction principle, providing a pressing accuracy of up to 0.1mm. This technology offers a more precise and smoother feel compared to traditional triggers, enhancing the gaming experience.

Figure 8: Detailed explanation of the Hall Effect Trigger technology.
4.5. Customization with BEITONG Gamepad Assistant
The BEITONG Gamepad Assistant software allows for extensive customization of your controller. You can adjust joystick sensitivity, deadzone range, vibration intensity, turbo frequency, and key mapping. This software is recommended for advanced users to tailor the controller to their specific needs, though it is not required for basic functionality.
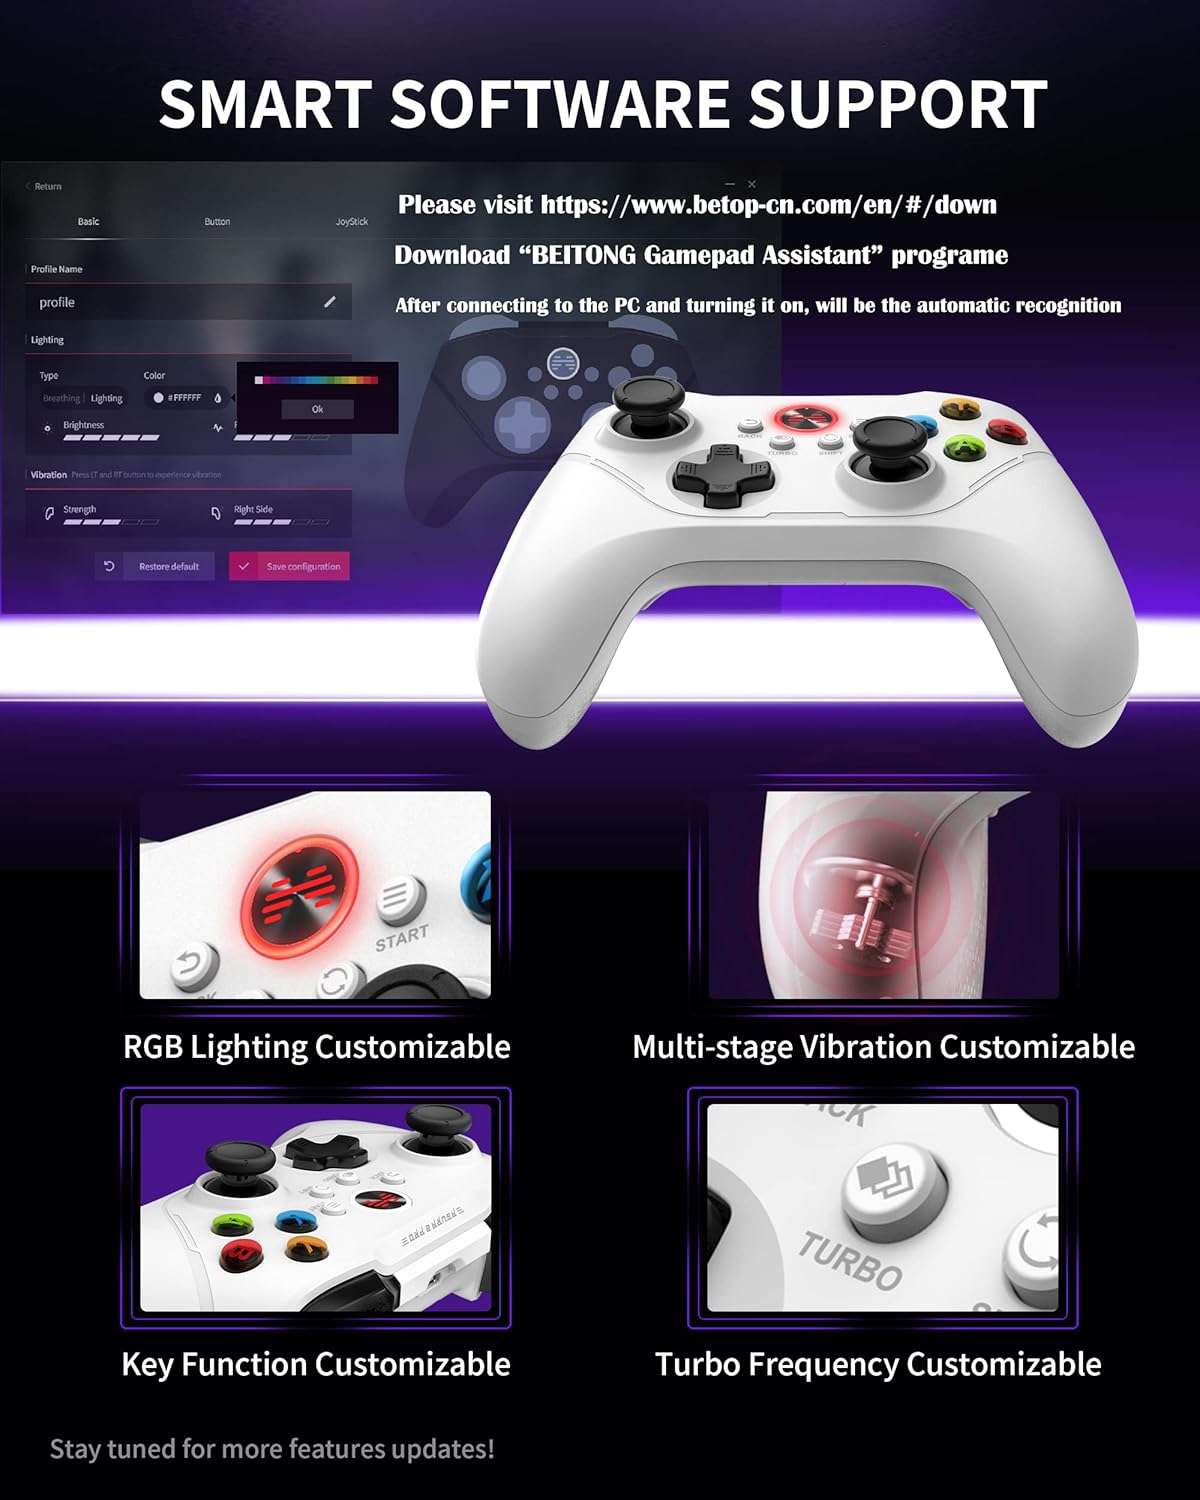
Figure 9: Screenshot of the BEITONG Gamepad Assistant software interface for customization.
5. Charging and Battery
The controller is equipped with a 600 mAh Lithium Polymer battery. To charge, connect the controller using a Type-C USB cable.
5.1. Charging Indicators
- When the device status is a normal connection, the indicator light will stay solid.
- When the device status is pending pairing, the indicator light will flash in multi-colors.
- When the battery is less than 30%, the indicator light will flash quickly.
- When the gamepad is charging, the indicator light will breathe.
- When the gamepad is fully charged, the indicator light will switch to a customized light or turn off after staying solid for 10 seconds.
5.2. Checking Battery Level
You can check the controller's battery level by running the BEITONG Gamepad Assistant software on your PC and checking the upper left corner of the interface.
Video 5: Instructions on how to charge the BEITONG Asura 2 Pro controller and check its battery status.
6. Troubleshooting
6.1. Clearing Pairing Information
If you experience issues with pairing or connecting the controller, you may need to clear its pairing information.
- Ensure the controller is in a power-off state.
- Press and hold the RB + BACK + RS + HOME buttons simultaneously.
- This action will actively clear the controller's pairing information.
Video 6: Demonstrates how to clear pairing information on the BEITONG Asura 2 Pro controller.
6.2. General Connection Issues
- Ensure the 2.4GHz receiver is securely plugged into a working USB port.
- Verify that the controller is sufficiently charged.
- Restart your PC or device and attempt to reconnect.
- If using a wired connection, try a different USB port or cable.
7. Specifications
| Feature | Detail |
|---|---|
| Model Number | BTP-A1T2 |
| Product Dimensions | 6.3 x 4.3 x 1.97 inches |
| Item Weight | 15.52 ounces |
| Manufacturer | BEITONG |
| Batteries | 1 Lithium Polymer battery (included) |
| Connectivity | 2.4GHz Wireless, USB Wired |
| Compatibility | Windows 7/8/10/11, Android TV, Steam, Tesla |
8. Warranty and Support
BEITONG is committed to providing quality products and support. The BEITONG technology team is available to provide technical assistance for any controller issues you may encounter during use.
For more detailed information and to download the latest e-manual or BEITONG Gamepad Assistant software, please visit the official BEITONG website. You can also view and download manuals directly from your PC/Laptop browser.
Video 7: Instructions on how to view and download manuals from the BEITONG official website on your PC/Laptop.


