1. Introduction
Thank you for choosing the SANPTENT C7115 Double Din Car Stereo Receiver. This manual provides essential information for the proper installation, operation, and maintenance of your new car stereo. Please read this manual thoroughly before using the product to ensure optimal performance and safety. Keep this manual for future reference.

Image 1.1: SANPTENT C7115 Double Din Car Stereo Receiver with accessories.
2. Product Features
- Apple Carplay & Android Auto: Seamlessly integrate your smartphone for navigation, calls, messages, and music via USB connection.
- 7-Inch Full Touchscreen: High-definition capacitive touch screen (1024*600 resolution) for sensitive and accurate control.
- Rear View Camera Support: Includes a waterproof camera with night vision and guide lines for easier and safer parking. Automatically displays feed when reversing.
- Mirror Link Function: Connect your iOS or Android smartphone via USB to mirror its screen content, including maps and videos, directly onto the stereo display.
- Bluetooth Connectivity: Supports hands-free calling and wireless audio streaming from your Bluetooth-enabled devices.
- Multi-Functions: Features USB/AUX input, FM radio, 7-color LED buttons, 16-band EQ sound effect, and audio/video output.
3. Package Contents
Verify that all items are present in the package:

Image 3.1: Included components in the SANPTENT C7115 package.
- SANPTENT C7115 Car Stereo Receiver
- Rear View Camera
- Backup Camera Cable
- Wiring Harness
- Camera Cable
- Remote Control
- Mounting Brackets & Screws
- User Manual
Important: Please confirm your dashboard opening size is suitable before ordering. If not, a double din mounting bracket may be required (not included).
4. Safety Information
- Ensure the vehicle's ignition is off and the negative battery terminal is disconnected before installation to prevent electrical shorts.
- Do not operate the stereo's advanced functions or watch videos while driving, as this can distract from the road and lead to accidents.
- Only use the stereo in vehicles with a 12V output.
- Avoid exposing the unit to extreme temperatures, direct sunlight for prolonged periods, or excessive moisture.
- If you are unsure about any installation steps, consult a qualified professional.
5. Installation Guide (Setup)
Proper installation is crucial for the performance of your car stereo. It is recommended to have this unit installed by a professional if you are not familiar with car audio wiring.
5.1 Wiring Diagram

Image 5.1: Wiring and Port Connections.
Refer to the diagram above for detailed wiring connections. Key connections include:
- Red (ACC): Connect to ignition switch (+12V).
- Yellow (B+): Connect to constant power supply (+12V).
- Black (GND): Connect to vehicle chassis ground.
- Orange (ILL): Connect to headlight control line (illumination).
- Pink (REVERSE): Connect to reversing light power for automatic camera display.
- KEY1/KEY2: Connect to steering wheel control wires (if applicable).
- Speaker Wires: Connect to corresponding vehicle speakers (Front Left, Front Right, Rear Left, Rear Right).
- Rear Camera Input: Connect the video cable from the rear camera to the 'CVSB input' port.
5.2 Mounting
The unit is a universal double din standard size (approximately 7.4 inches × 4.6 inches × 2.6 inches). Use the provided mounting brackets and screws to secure the stereo into your vehicle's dashboard opening. Ensure a snug fit to prevent vibrations.
6. Basic Operation
6.1 Power On/Off
Press the power button (usually labeled 'PWR' or integrated with the volume knob) to turn the unit on or off. The unit will automatically power on when the vehicle's ignition is turned on.
6.2 Volume Control
Adjust the volume using the physical volume knob or the 'Vol+' and 'Vol-' buttons on the front panel. The remote control also provides volume adjustment.
6.3 Touchscreen Interface

Image 6.1: Touchscreen and Button Layout.
The 7-inch capacitive touchscreen allows for intuitive control. Tap icons to select functions, swipe to navigate menus, and use pinch-to-zoom gestures where applicable. Physical buttons below the screen provide quick access to common functions:
- MENU: Access the main menu or return to the home screen.
- VOL-/VOL+: Decrease/Increase volume.
- MUTE: Mute/unmute audio.
- ◀◀ (Previous Song): Skip to the previous track.
- ▶▶ (Next Song): Skip to the next track.
- NAVI: Directly launch navigation (if configured).
- RST (Reset): Small pinhole button for system reset.
7. Apple Carplay & Android Auto
Connect your smartphone via USB to access Apple Carplay or Android Auto for a smarter and safer driving experience.

Image 7.1: Apple Carplay and Android Auto interfaces.
7.1 Connecting to Apple Carplay
- Ensure Carplay is enabled on your iPhone settings.
- Connect your iPhone to the stereo's USB port using a certified USB cable.
- The Carplay interface will automatically launch on the stereo screen.
- You can now use Siri, make calls, send messages, get directions, and listen to music through the stereo.
7.2 Connecting to Android Auto
- Download the Android Auto app on your Android phone from the Google Play Store.
- Connect your Android phone to the stereo's USB port using a certified USB cable.
- Follow any on-screen prompts on your phone and the stereo to grant necessary permissions.
- The Android Auto interface will launch, allowing access to Google Assistant, navigation, calls, and media.
8. Mirror Link Function
Mirror Link allows you to display your smartphone's screen directly onto the car stereo's display.

Image 8.1: Mirror Link in operation, displaying smartphone content.
- Connect your smartphone (iOS or Android) to the stereo's USB port using a USB cable.
- Select the 'Mirror Link' or 'Phone Link' option on the stereo's main menu.
- Follow the on-screen instructions to establish the connection. This may involve installing a specific app on your phone or granting permissions.
- Once connected, your phone's screen will be mirrored on the stereo display.
9. Bluetooth Connectivity
Connect your phone via Bluetooth for hands-free communication and audio streaming.

Image 9.1: Bluetooth features for hands-free calls and music.
9.1 Pairing a Bluetooth Device
- Turn on Bluetooth on your smartphone.
- On the car stereo, navigate to the Bluetooth menu.
- Search for available devices on your phone. The stereo's name (e.g., 'CAR BT') should appear.
- Select the stereo's name on your phone to pair. Enter '0000' if a PIN is requested.
- Once paired, the stereo will indicate a successful connection.
9.2 Hands-Free Calling
After pairing, you can make and receive calls directly through the stereo. The stereo's microphone and car speakers will be used for communication.
9.3 Bluetooth Audio Streaming
Play music from your paired smartphone directly through the car stereo. Use the stereo's controls or your phone to manage playback (play, pause, skip tracks).
10. Rear View Camera
The included rear view camera enhances parking safety by providing a clear view of the area behind your vehicle.
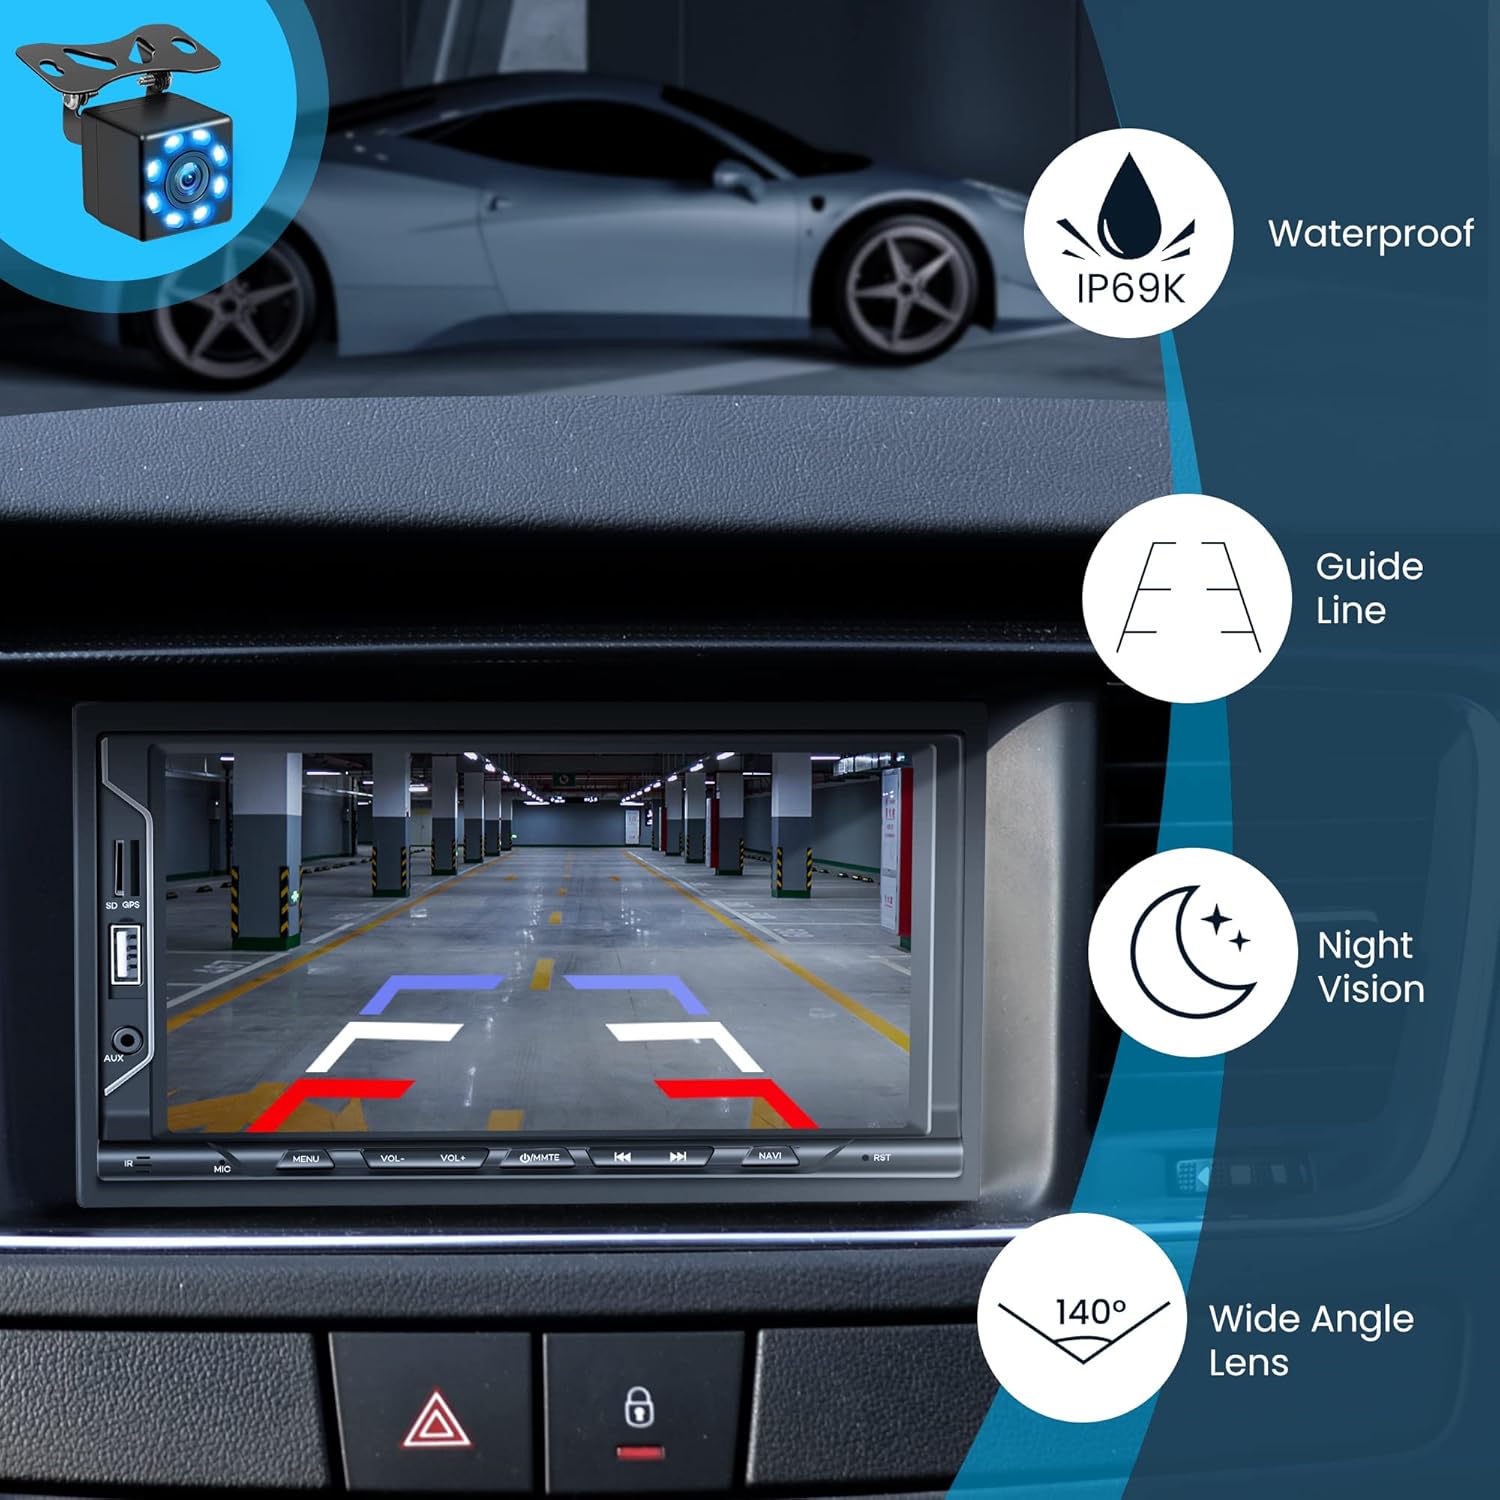
Image 10.1: Rear View Camera display with features.
10.1 Camera Installation
Mount the rear view camera at the rear of your vehicle, typically near the license plate. Connect the camera's video output to the stereo's 'CVSB input' (yellow RCA connector). Connect the camera's power wire (red +12V) to your vehicle's reversing light power source, and the ground wire (black GND) to a suitable chassis ground. This allows the camera to activate automatically when the vehicle is shifted into reverse.
10.2 Camera Features
- Waterproof (IP69K): Designed to withstand harsh weather conditions.
- Night Vision: Provides visibility in low-light conditions.
- Guide Lines: Overlayed lines on the display assist with parking alignment.
- 140° Wide Angle Lens: Offers a broad field of view behind the vehicle.
11. Radio (FM)
The stereo features an FM radio tuner for listening to your favorite stations.
11.1 Tuning Stations
- Select the 'Radio' icon from the main menu.
- Use the 'Scan' function to automatically search and save available stations.
- Manually tune by pressing the forward/backward arrows or by directly entering the frequency on the touchscreen.
Note: While the product description mentions FM radio, some users have reported limitations regarding AM radio functionality. Please verify specific band availability upon receipt.
12. USB/AUX Input
Connect external devices for media playback.
12.1 USB Playback
Insert a USB flash drive into the USB port. The stereo will automatically detect and play compatible audio or video files. Use the touchscreen controls to navigate folders and select media.
12.2 AUX Input
Connect an external audio device (e.g., MP3 player) to the 3.5mm AUX input jack using an audio cable. Select 'AUX' from the main menu to play audio from the connected device.
13. Audio Settings (Equalizer)
Customize your audio experience using the built-in equalizer.
Access the 'EQ' or 'Sound Settings' menu to adjust various audio parameters, including bass, treble, balance, fader, and preset equalizer modes (e.g., Pop, Rock, Classic, Jazz).
14. Troubleshooting
This section addresses common issues you might encounter.
- No Power: Check all power connections (Red, Yellow, Black wires). Ensure the vehicle's fuse for the stereo is not blown.
- No Sound: Verify speaker connections. Check volume levels and ensure the unit is not muted. Confirm audio output settings.
- Bluetooth Not Connecting: Ensure Bluetooth is enabled on both the stereo and your phone. Delete previous pairings and try pairing again.
- Carplay/Android Auto Not Working: Use a certified USB cable. Ensure the phone's operating system is up to date. Check phone settings for Carplay/Android Auto permissions.
- Rear Camera Not Displaying: Check the camera's video cable connection to the stereo. Verify the camera's power connection to the reverse light.
- Unit Resets/Freezes: Press the 'RST' (Reset) button with a thin object (like a paperclip). Ensure stable power supply.
If problems persist, consult a professional or contact customer support.
15. Specifications
| Feature | Specification |
|---|---|
| Brand | SANPTENT |
| Model Number | C7115 |
| Product Dimensions | 17.78 x 12.7 x 12.7 cm (7.4 x 4.6 x 2.6 inches) |
| Item Weight | 840 g |
| Screen Size | 7 Inch |
| Screen Resolution | 1024*600 |
| Connectivity Technology | USB, Bluetooth |
| Compatible Devices | Smartphone (iOS, Android) |
| Special Features | Equalizer, Touchscreen, Apple Carplay, Android Auto, Mirror Link, Rear View Camera Support |
| Audio Output Mode | Stereo |
| Video Encoding | H.264, H.265/HEVC |
16. Maintenance
To ensure the longevity and optimal performance of your car stereo, follow these maintenance guidelines:
- Cleaning the Screen: Use a soft, lint-free cloth to gently wipe the touchscreen. For stubborn smudges, slightly dampen the cloth with water or a screen-safe cleaner. Avoid harsh chemicals or abrasive materials.
- General Cleaning: Keep the unit free from dust and debris. Use a soft brush or compressed air to clean around buttons and ports.
- Temperature: Avoid leaving the unit in direct sunlight for extended periods, especially in hot weather, as this can damage the screen and internal components.
- Software Updates: Periodically check the manufacturer's website for any available firmware updates to improve performance and add new features.
17. Warranty and Support
For warranty information, please refer to the documentation included with your purchase or contact the retailer. If you require technical assistance or have questions not covered in this manual, please contact SANPTENT customer support through their official channels or the platform where the product was purchased.

