1. Introduction
Thank you for choosing the LEMOISTAR 8 Inch Wall Mounted Fan. This manual provides essential information for the safe and efficient operation of your fan. Please read these instructions carefully before installation and use, and retain them for future reference.

A front-facing view of the LEMOISTAR 8-inch wall-mounted fan, showcasing its white grille and base, with visible green fan blades.
2. Safety Instructions
To reduce the risk of fire, electric shock, or injury, observe the following safety precautions:
- Ensure the power supply voltage matches the fan's requirements.
- Do not operate the fan with a damaged cord or plug. If damaged, contact customer support.
- Keep fingers, pencils, or any other objects out of the fan grille when it is operating.
- Unplug the fan from the power outlet before cleaning or performing any maintenance.
- Do not use the fan in wet or damp locations, such as bathrooms or near water sources.
- Do not place the fan near open flames or heat sources.
- This appliance is not intended for use by persons (including children) with reduced physical, sensory or mental capabilities, or lack of experience and knowledge, unless they have been given supervision or instruction concerning use of the appliance by a person responsible for their safety.
- Children should be supervised to ensure that they do not play with the appliance.
3. Package Contents
Verify that all items listed below are included in your package:
- 1x Wall Fan
- 1x Remote Control
- 1x Power Adapter
- 1x Wall Bracket
- 1x Base (for optional desktop use, if applicable)
- 1x Nail-free Adhesive
- 2x Nails
- 2x Auxiliary Stickers
- 1x Instruction Manual
- 1x Color Box

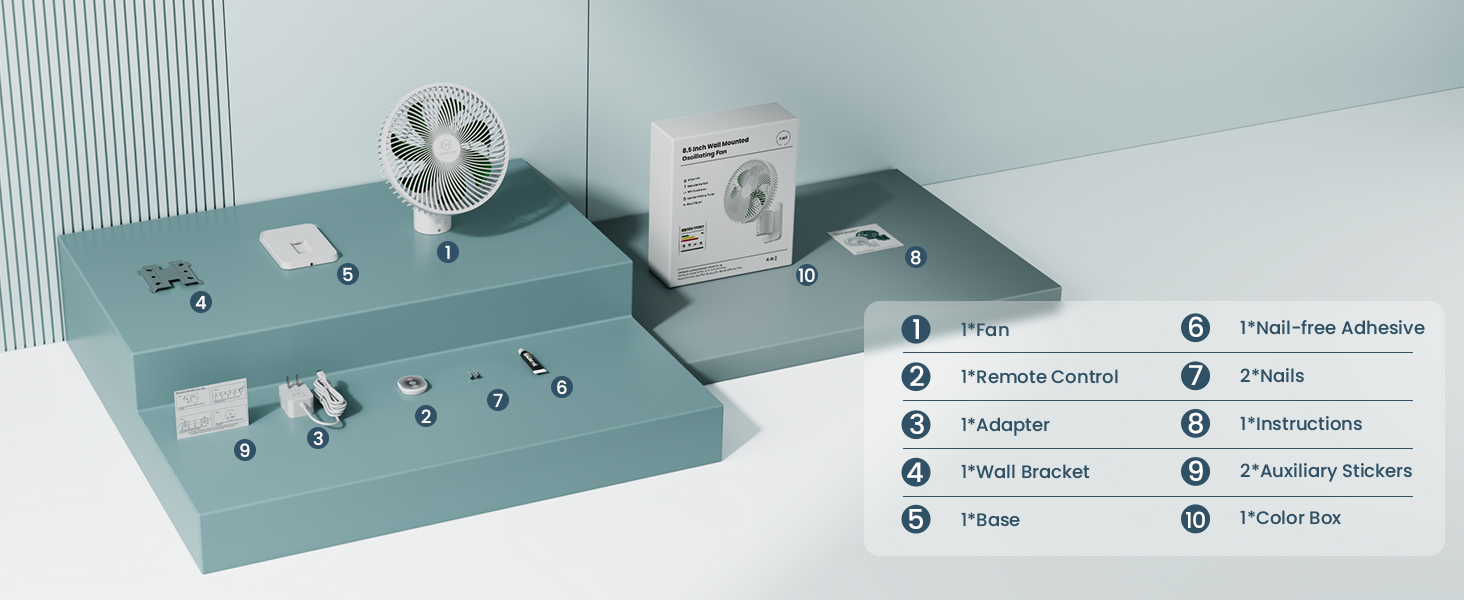
An organized display of all items found in the product box, including the fan unit, remote control, adapter, wall bracket, base, nail-free adhesive, nails, auxiliary stickers, instructions, and the color box.
4. Product Features
- Adjustable Airflow: Features 90° horizontal oscillation and 120° vertical tilt for comprehensive air distribution.
- Multiple Speed Settings: Four speed modes (Low, Middle, High, Super) to customize airflow intensity.
- Convenient Timer: Includes 0.5, 1.5, 4, and 8-hour timer settings for automatic shut-off.
- Remote Control: Operate all functions from a distance with the included remote control.
- Quiet Operation: Engineered for low noise levels (25-40dB) suitable for various environments.
- Efficient Design: Equipped with 7 blades and a unique air-duct design for powerful and quiet air circulation.
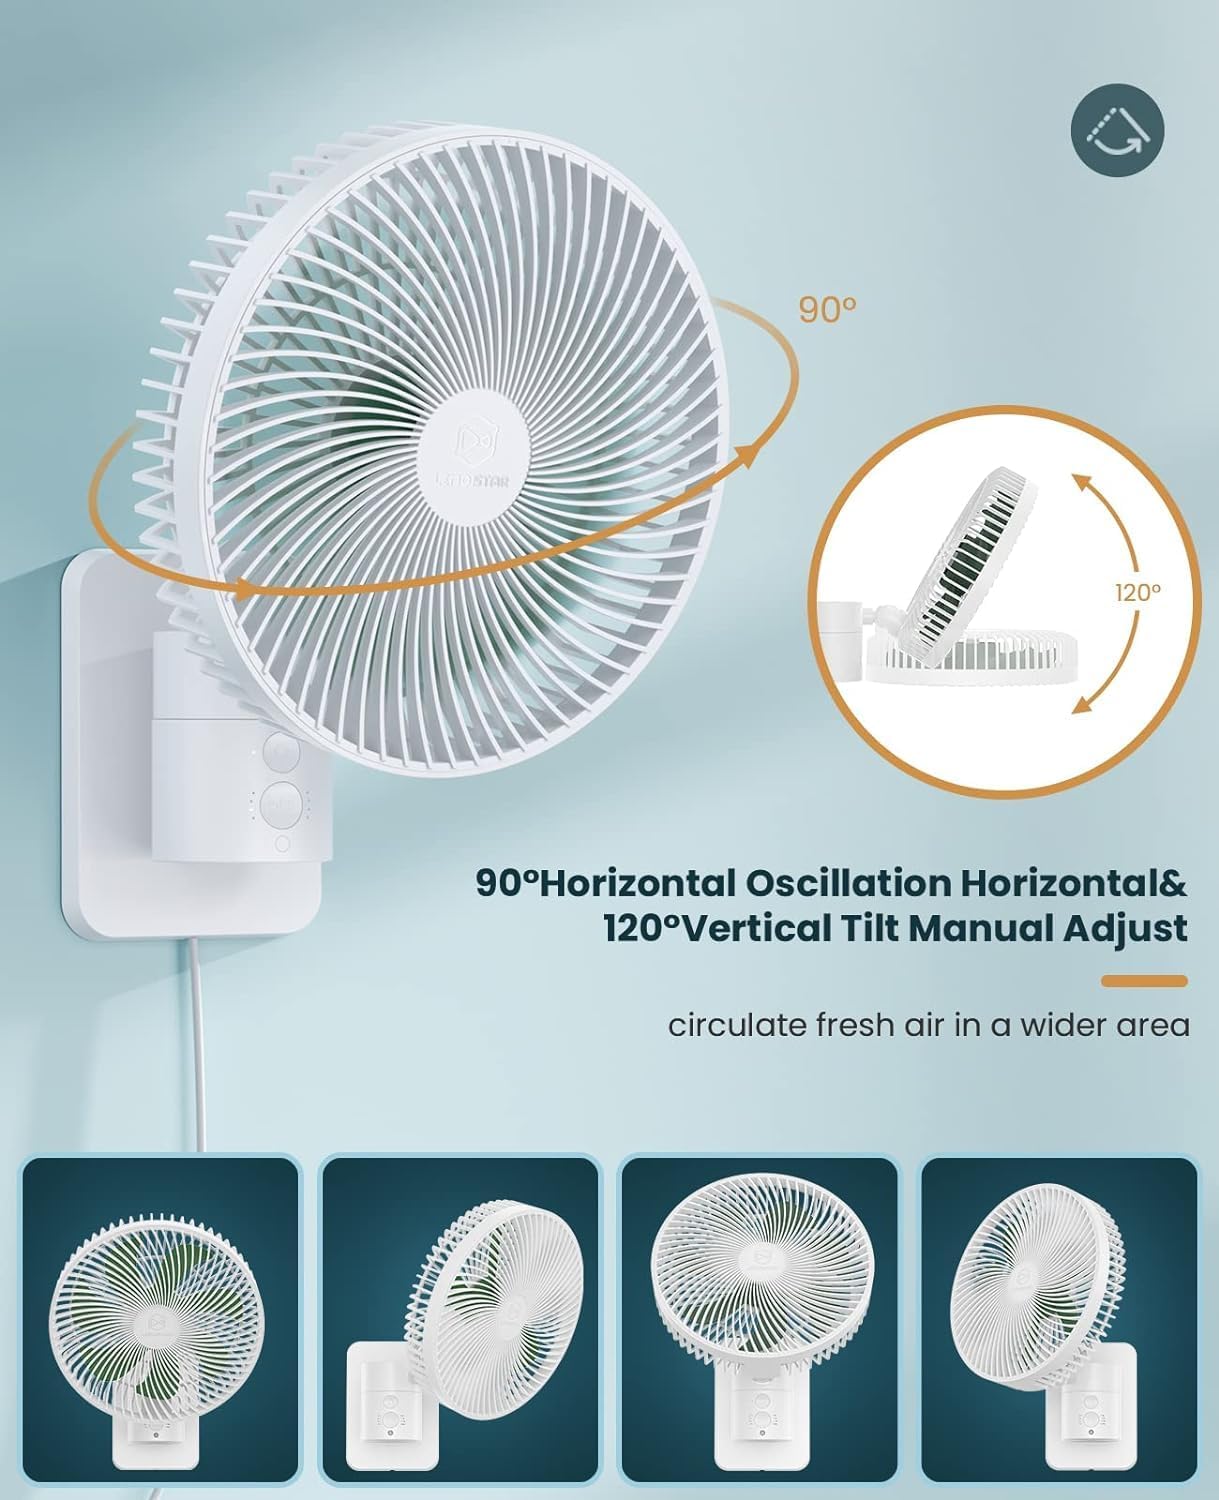
This image illustrates the fan's adjustable movement capabilities, including a 90-degree horizontal oscillation for wide area coverage and a 120-degree vertical tilt for directing airflow up or down.
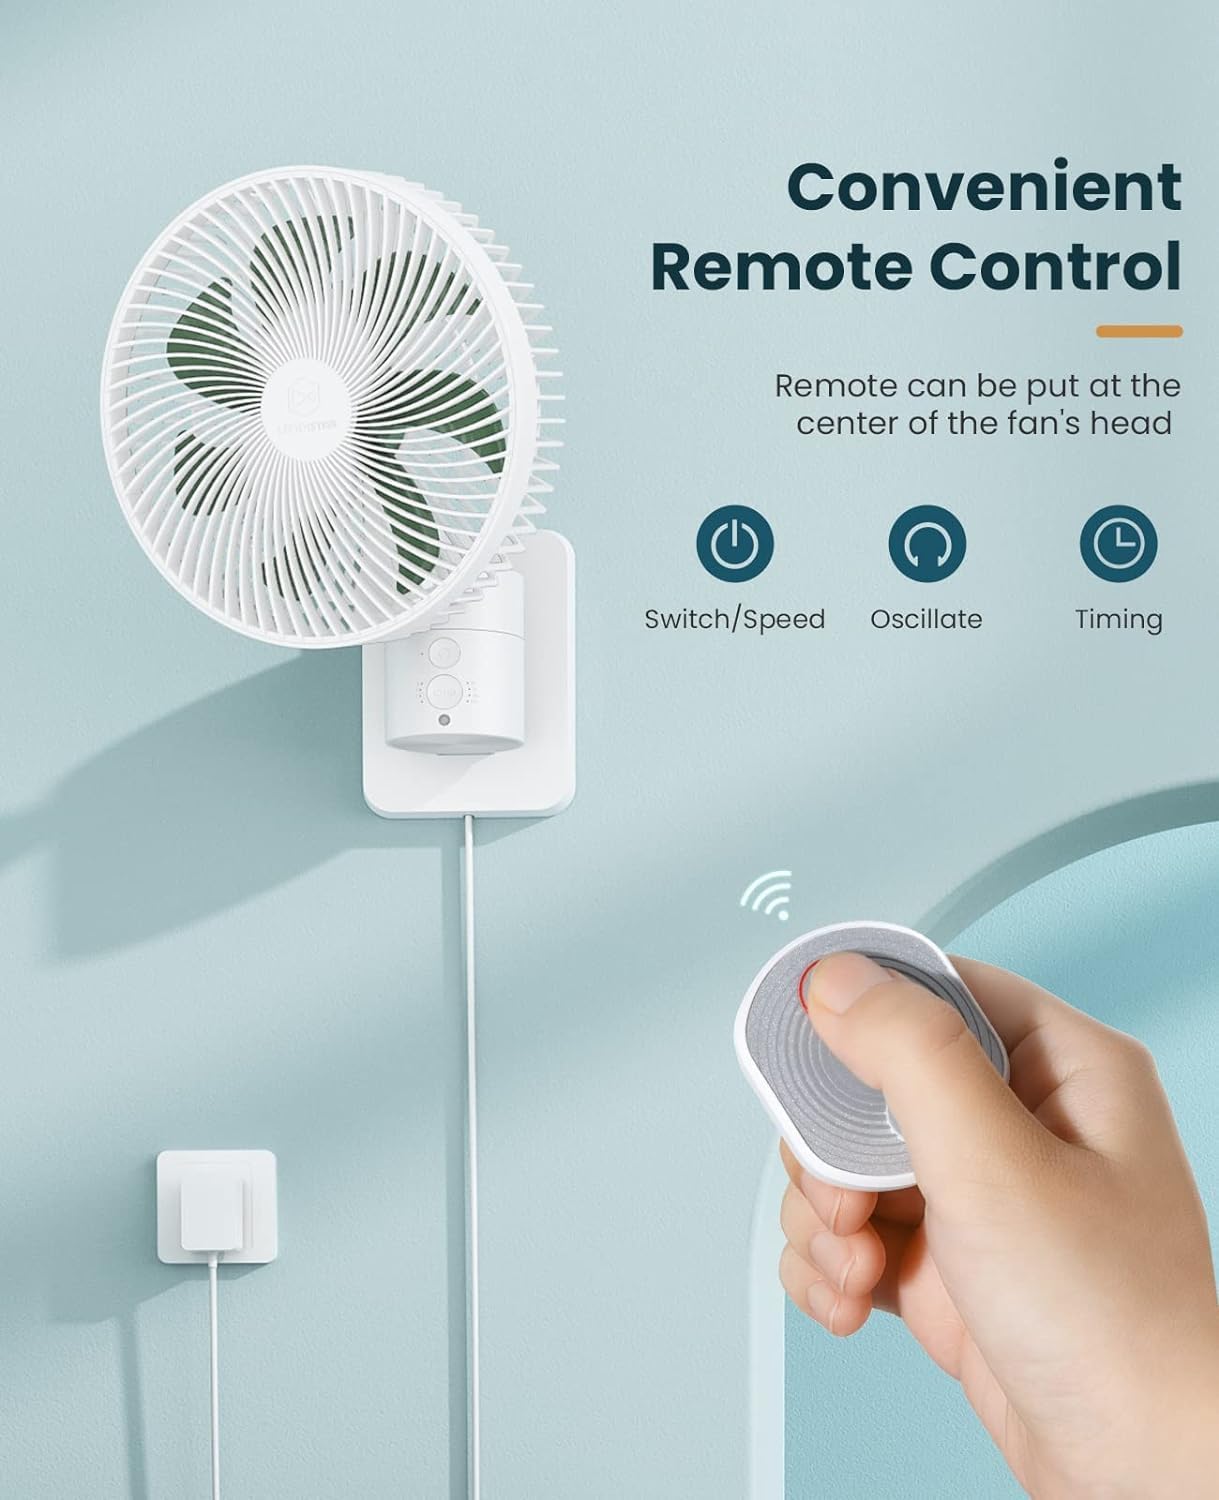
A hand holds the remote control, pointing towards the wall-mounted fan. The remote features buttons for power/speed, oscillation, and timer settings, offering convenient operation.

A woman is comfortably seated on a sofa, reading a book, while the wall-mounted fan directs airflow towards her. The image indicates four distinct speed settings (5m/s, 8m/s, 12m/s, 14m/s) for customized cooling.

A person is shown sleeping in a bed, undisturbed by the fan, which is mounted on the wall. The image highlights the fan's quiet operation (25-40dB) and four timer settings (0.5H, 1.5H, 4H, 8H) for automated shut-off.

This graphic compares the airflow distribution of the LEMOISTAR fan with its 7 blades, showing a wider and more powerful air stream, against a standard 3-blade fan with a narrower airflow.

A detailed cutaway view reveals the fan's brushless motor and the specially designed air-duct system, engineered for reduced noise and extended product lifespan.
5. Setup and Installation
5.1 Product Dimensions
Before installation, consider the fan's dimensions to ensure proper placement.

Technical drawing illustrating the height, width, and depth measurements of the fan unit and its wall bracket, essential for installation planning.
5.2 Mounting Options
The fan can be mounted using two methods:
Method 1: Screw Installation (for non-glass surfaces)
- Select a suitable location on a non-glass surface (e.g., wall stud).
- Position the wall bracket and mark the screw holes.
- Drill pilot holes if necessary.
- Fix the bracket to the wall using the two included nails/screws. Ensure it is securely fastened.
A close-up image demonstrating the process of securing the metal wall bracket to a wall using the provided screws, suitable for non-glass surfaces.
Method 2: Nail-Free Adhesive Installation (for smooth surfaces)
This method is suitable for smooth surfaces such as glass, wood, metal, or ceramic tiles.
- Clean the desired mounting surface thoroughly to ensure it is free of dust and grease.
- Apply the included nail-free adhesive to the back of the wall bracket.
- Press the bracket firmly onto the cleaned surface.
- Use the auxiliary stickers to hold the bracket in place while the adhesive cures (refer to adhesive instructions for curing time).
- Once the adhesive is fully cured, attach the fan to the bracket.

This image shows how to apply the included nail-free adhesive to the back of the wall bracket, offering an alternative installation method for smooth surfaces like glass, wood, metal, or ceramic tiles.
5.3 Connecting Power
After mounting, connect the fan's power cord to the adapter, and then plug the adapter into a standard electrical outlet.
6. Operating Instructions
Your LEMOISTAR wall fan can be operated using either the remote control or the manual buttons on the fan unit.

An illustration highlighting the functions of both the remote control (Power Switch, Oscillation, Timer) and the corresponding manual buttons located on the fan's base.
6.1 Remote Control Functions
- Power/Speed Button: Press once to turn on the fan. Subsequent presses cycle through the 4 speed settings (Low, Middle, High, Super). Press and hold to turn off.
- Oscillation Button: Press to activate or deactivate the 90° horizontal oscillation feature.
- Timer Button: Press to cycle through the timer settings: 0.5 hours, 1.5 hours, 4 hours, 8 hours. The fan will automatically turn off after the selected duration.
6.2 Manual Button Functions
The fan unit has integrated buttons that mirror the remote control's functionality:
- Power Switch: Controls power and cycles through speed settings.
- Oscillation Button: Activates or deactivates oscillation.
- Timer Button: Sets the automatic shut-off timer.
6.3 Adjusting Tilt
The fan head can be manually adjusted up to 120° vertically to direct airflow as needed. Gently tilt the fan head to the desired angle.
7. Maintenance and Cleaning
Regular cleaning ensures optimal performance and extends the lifespan of your fan.
- Disconnect Power: Always unplug the fan from the power outlet before cleaning.
- Remove Front Grille: Rotate the fan's front frame counter-clockwise to detach it. No tools are typically required for this step.
- Clean Blades and Grille: Use a soft, dry cloth to wipe dust and debris from the fan blades and the inside of the grille. For stubborn dirt, a slightly damp cloth can be used, but ensure all parts are completely dry before reassembly.
- Clean Exterior: Wipe the exterior surfaces of the fan with a soft, dry cloth. Do not use abrasive cleaners or solvents.
- Reassemble: Align the front frame with the fan body and rotate clockwise until securely locked.

A hand is shown wiping the fan blades with a dry cloth, demonstrating the ease of maintenance after rotating the front frame counter-clockwise for removal.
8. Troubleshooting
If you encounter issues with your fan, refer to the following common problems and solutions:
| Problem | Possible Cause | Solution |
|---|---|---|
| Fan does not turn on. | No power supply. | Ensure the power adapter is securely plugged into a working outlet and the fan. |
| Remote control is not working. | Battery depleted or incorrect orientation. Obstruction between remote and fan. | Replace the remote control battery. Ensure the battery is inserted with correct polarity. Remove any obstructions. Try operating the fan using manual buttons. |
| Fan makes unusual noise (e.g., rattling). | Loose parts, debris in blades, or motor issue. | Unplug the fan. Carefully remove the front grille and check for any foreign objects or loose components. Clean the blades. If the issue persists, contact customer support. |
| Weak airflow. | Fan speed set too low. Blades are dirty. | Increase the fan speed setting. Clean the fan blades and grille as per maintenance instructions. |
If the problem persists after attempting these solutions, please contact customer support.
9. Specifications
| Feature | Specification |
|---|---|
| Brand | LEMOISTAR |
| Model Name | A1 |
| Size | 8 Inch |
| Color | White+Green |
| Product Dimensions | 8.39"D x 6.38"W x 11.06"H |
| Item Weight | 1.5 Pounds |
| Power Source | Corded Electric |
| Voltage | 12 Volts |
| Wattage | 11 Watt-hours |
| Number of Power Levels | 4 |
| Noise Level | 25-40 dB |
| Air Flow Capacity | 2160 Cubic Feet Per Minute |
| Oscillation | 90° Horizontal |
| Tilt Adjustment | 120° Vertical |
| Control Method | Remote, Touch |
| Cord Length | 70 Inches |
10. Warranty and Support
LEMOISTAR products are designed for reliability and performance. If you encounter any quality problems or require assistance with your fan, please contact our customer support team. Refer to the product packaging or the official LEMOISTAR website for specific warranty details and contact information.
Our dedicated support team is available to help you with any questions or concerns regarding your product.


