
1. Introduction
This manual provides essential instructions for the safe and efficient operation of your Joc H011U Portable Mini Music Player. Please read this manual thoroughly before using the device and retain it for future reference.
The Joc H011U is a compact digital media player designed for portability, offering music playback and other features. It supports Micro SD cards for expanded storage.
2. Package Contents
Verify that all items are present in your package:
- Joc H011U Portable Mini Music Player
- USB Charging Cable
- User Manual
3. Product Overview
Familiarize yourself with the components and controls of your Joc H011U player.

Image 1: Front and side view of the Joc H011U Portable Mini Music Player. The image shows the speaker grille on the left, a small display screen, numerical buttons (0-9), and playback control buttons (M, previous, play/pause, next). The right side features a USB port, headphone jack, and Micro SD card slot.
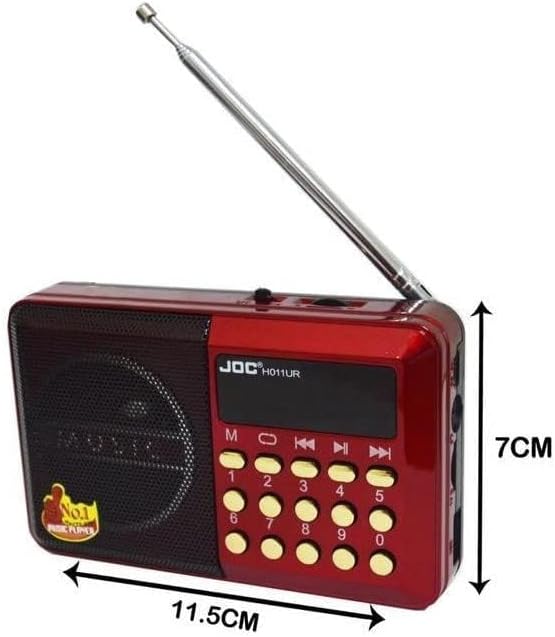
Image 2: Top and side view of the Joc H011U Portable Mini Music Player, illustrating its dimensions. The device measures approximately 11.5 cm in length and 7 cm in height. An extendable antenna is visible on the top, indicating potential radio functionality.
Controls and Ports:
- Speaker: Audio output.
- Display Screen: Shows track information, mode, and battery status.
- Numerical Buttons (0-9): For direct track selection or frequency input.
- M (Mode) Button: Switches between different modes (e.g., Music, FM Radio).
- Previous/Next Buttons: Navigates tracks or radio stations.
- Play/Pause Button: Starts or pauses playback.
- USB Port: For charging and data transfer.
- Headphone Jack: For private listening.
- Micro SD Card Slot: For inserting memory cards with audio files.
- Antenna: For FM radio reception.
4. Setup
4.1 Charging the Device
- Connect the small end of the USB charging cable to the USB port on the player.
- Connect the larger end of the USB cable to a USB power adapter (not included) or a computer's USB port.
- The display will indicate charging status. Allow the device to fully charge before first use (approximately 2-3 hours).
4.2 Inserting a Micro SD Card
The device supports Micro SD cards up to 32 GB (as per specifications).
- Locate the Micro SD card slot on the side of the player.
- Gently insert the Micro SD card with the gold contacts facing downwards until it clicks into place.
- To remove, gently push the card inwards until it springs out.
Note: Ensure the device is powered off before inserting or removing the Micro SD card to prevent data corruption.
4.3 Powering On/Off
- To Power On: Locate the power switch (if present, otherwise long-press Play/Pause button).
- To Power Off: Repeat the power-on action.
5. Operating Instructions
5.1 Music Playback
- Ensure a Micro SD card with audio files is inserted.
- Power on the device. It should automatically enter music playback mode or you may need to press the M (Mode) button to select it.
- Press the Play/Pause button to start or pause playback.
- Use the Previous and Next buttons to skip tracks.
- To select a track directly, use the numerical buttons (0-9) to enter the track number, then press Play/Pause (functionality may vary by firmware).
5.2 FM Radio Operation
- Extend the antenna for better reception.
- Press the M (Mode) button to switch to FM Radio mode.
- Automatic Scan: Long-press the Play/Pause button to initiate an automatic scan for available radio stations. The player will save detected stations.
- Manual Tuning: Use the Previous and Next buttons for fine-tuning or to navigate through saved stations.
- Direct Frequency Input: Use the numerical buttons (0-9) to enter a specific FM frequency, then press Play/Pause (e.g., 1-0-2-5 for 102.5 MHz).
5.3 Volume Control
Volume control is typically integrated with the Previous/Next buttons or dedicated buttons. Refer to the device's physical controls for specific volume adjustment methods (e.g., long-press Previous for Volume Down, long-press Next for Volume Up).
6. Maintenance
- Cleaning: Use a soft, dry cloth to clean the device. Do not use liquid cleaners or aerosols.
- Storage: Store the player in a cool, dry place away from direct sunlight and extreme temperatures.
- Battery Care: To prolong battery life, avoid fully discharging the battery frequently. Charge the device regularly, even if not in use for extended periods.
- Water Exposure: This device is not waterproof. Avoid exposure to water or high humidity.
7. Troubleshooting
| Problem | Possible Cause | Solution |
|---|---|---|
| Device does not power on. | Low battery; device malfunction. | Charge the device fully. If problem persists, contact support. |
| No sound during playback. | Volume too low; corrupted audio file; headphone issue. | Increase volume. Check audio files. Test with different headphones. |
| Micro SD card not recognized. | Card not inserted correctly; card corrupted; unsupported format. | Reinsert card. Try a different card. Ensure files are in a compatible format (e.g., MP3). |
| Poor FM radio reception. | Antenna not extended; weak signal area. | Fully extend the antenna. Try moving to an area with better signal. |
8. Specifications
| Feature | Detail |
|---|---|
| Model Number | H011U |
| Brand | Joc |
| Product Dimensions | 13.49 x 8 x 3.99 cm |
| Weight | 240 g |
| Special Features | Music Player, FM Radio |
| Memory Storage Capacity | 32 GB (Micro SD card, not included) |
| Screen Size | 0.96 inches |
| Compatible Devices | Laptop, Personal Computer (for data transfer) |
| Media Type | Micro SD |
| Battery Life | Up to 10 Hours |
9. Warranty and Support
Joc products are manufactured to high-quality standards. For warranty information and technical support, please refer to the warranty card included with your purchase or visit the official Joc website. Keep your proof of purchase for warranty claims.
For further assistance, please contact Joc customer service.