
ClocTeck QI-C06
Contents
ClocTeck Nixie Tube Clock (Model QI-C06) User Manual
Brand: ClocTeck | Model: QI-C06
1. Introduction
Welcome to the user manual for your ClocTeck Nixie Tube Clock. This digital clock is designed to provide accurate timekeeping with a retro aesthetic, featuring customizable RGB lighting, Wi-Fi time synchronization, alarm, and timer functions. This manual provides detailed instructions for setup, operation, maintenance, and troubleshooting to ensure optimal use of your device.
2. Safety Information
- Keep the device away from water and high humidity environments.
- Avoid exposing the device to direct sunlight or extreme temperatures.
- Do not attempt to disassemble or repair the device yourself. Refer to qualified personnel for service.
- Use only the provided USB-C cable for power. Ensure the power adapter (not included) meets the required specifications.
- Handle the display tubes with care to prevent damage.
3. Package Contents
Please verify that all items are present in your package:
- ClocTeck Nixie Tube Clock (Main Unit with Walnut Base)
- 6 x Display Tubes (may be pre-installed or require assembly)
- USB-C Power Cable
- Instruction Manual
- Cleaning Cloth

Image: The ClocTeck Nixie Tube Clock displayed alongside its elegant black packaging box.
4. Product Overview
The ClocTeck Nixie Tube Clock features a stylish walnut wood base housing the control electronics and six individual display tubes. Each tube simulates a Nixie tube display using RGB LEDs and engraved acrylic panes to show digits.

Image: The ClocTeck Nixie Tube Clock, featuring a walnut base and six illuminated display tubes, showing the time in a modern retro style.
Control Buttons:
The clock features two control buttons on its base:
- MODE Button: Used to cycle through display modes and access color settings.
- TIME Button: Used to activate countdown mode and access time/alarm settings.

Image: Detail view of the 'MODE' and 'TIME' buttons on the clock's wooden base, used for settings adjustment.
5. Setup
5.1. Tube Installation (if applicable)
If your display tubes are not pre-installed, carefully insert each tube into its designated slot on the clock base. Ensure they are seated firmly.
Video: This video demonstrates the installation process for the 6 display tubes into the ClocTeck Nixie Tube Clock base.
5.2. Power Connection
- Connect the provided USB-C cable to the port on the back of the clock.
- Plug the other end of the USB-C cable into a compatible USB power adapter (not included). A standard 5V/1A or higher USB adapter is recommended.
- The clock will power on and display the current time or a default sequence.
6. Operating Instructions
6.1. Basic Operation (Using Buttons)
Video: This tutorial demonstrates the basic button operations for the ClocTeck Nixie Tube Clock, including mode selection, color settings, countdown, and time/alarm adjustments.
- MODE Button (Short Press): Cycles through different display modes (e.g., normal, single color, monochrome alternate, breathing, rainbow flashing, water flowing).
- MODE Button (Long Press): Enters color settings mode, allowing you to customize the RGB colors.
- TIME Button (Short Press): Activates the countdown timer mode.
- TIME Button (Long Press): Enters time and alarm setting mode. The display will show blue for time settings and red for alarm settings.
- Adjusting Values: While in setting modes (color, time, alarm), use the MODE and TIME buttons to adjust values. Specific instructions for each setting are detailed below.
6.2. Wi-Fi Time Synchronization & Mobile Control
The ClocTeck Nixie Tube Clock supports Wi-Fi connectivity for automatic time synchronization and convenient control via a mobile device. This feature requires a 2.4GHz Wi-Fi network.
- Connect to Clock's Wi-Fi: On your mobile device, search for Wi-Fi networks. Connect to the network named "ClocTeck_XXXX" (where XXXX is a unique identifier).
- Access Control Interface: Once connected, open a web browser on your mobile device and navigate to the clock's internal IP address (usually displayed on the clock or found in the manual). This will open the control interface.
- Configure Wi-Fi: In the interface, select your home 2.4GHz Wi-Fi network and enter its password. The clock will then connect to your home network and synchronize its time automatically.
- Time Settings: Within the mobile interface, you can set the time zone, switch between 12/24-hour format, and enable/disable automatic Daylight Saving Time (DST). You can also manually sync the time.
- Alarm Settings: Set a single alarm time.
- Timer Function: Set a countdown timer for up to 99 minutes.
- Display Settings: Customize display colors for each tube, choose from various display modes (Normal, Carry, Jumping), and adjust brightness.
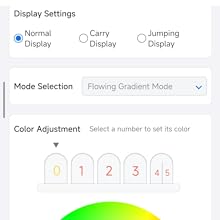
Image: Mobile app interface for display mode selection.

Image: Mobile app interface for custom color adjustment.
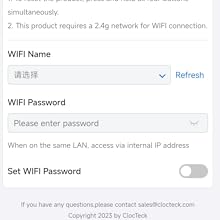
Image: Mobile app interface for time, alarm, and timer settings.

Image: Mobile app interface for Wi-Fi connection setup.
7. Maintenance
7.1. Cleaning
To maintain the appearance and functionality of your clock:
- Use the provided cleaning cloth or a soft, dry, lint-free cloth to gently wipe the display tubes and wooden base.
- Do not use abrasive cleaners, solvents, or spray directly onto the device.
- Ensure the device is unplugged before cleaning.
8. Troubleshooting
| Problem | Possible Cause | Solution |
|---|---|---|
| Clock is not powering on. | No power, faulty cable/adapter. | Ensure the USB-C cable is securely connected and the power adapter is working. Try a different USB port or adapter. |
| Time is inaccurate or drifts. | No Wi-Fi sync, internal clock drift. | Connect to Wi-Fi for automatic time synchronization. If Wi-Fi is not an option, manually adjust the time periodically. |
| Cannot connect to Wi-Fi. | Incorrect password, 5GHz network, signal interference. | Ensure you are connecting to a 2.4GHz Wi-Fi network and entering the correct password. Move the clock closer to the Wi-Fi router. |
| Display is too dim/bright. | Brightness setting needs adjustment. | Adjust brightness via the mobile app or by short pressing the TIME button (refer to section 6.1). |
| Alarm is not sounding. | Alarm disabled, volume too low. | Check alarm settings in the mobile app or via button controls to ensure it is enabled and set correctly. The alarm sound is not very loud. |
9. Specifications
- Brand: ClocTeck
- Model: QI-C06
- Display Type: Digital (RGB Glow Tube Simulation)
- Color: 6 Tubes (Walnut Base)
- Power Source: Corded Electric (USB-C)
- Product Dimensions: 11"W x 3.2"H
- Item Weight: 1.96 pounds (0.89 Kilograms)
- Material: Wood (Walnut Frame Material)
- Special Features: Adjustable Brightness, Large Display, Alarm, Mood Light, Timer, Wi-Fi Time SYNC, 12/24H Display
- Connectivity Technology: USB-C, Wi-Fi (2.4GHz)
- UPC: 749212833579
10. Warranty and Support
ClocTeck products are designed for quality and reliability. For warranty information, please refer to the documentation included with your purchase or contact our customer support.
If you encounter any issues or have questions regarding your ClocTeck Nixie Tube Clock, please contact our support team:
- Email: sales@clocteck.com
Documents and downloads
Ask a question about this manual
Ask about setup, troubleshooting, compatibility, parts, safety, or missing instructions. Manuals+ will review the question and use this page’s manual context to help answer it.