1. Introduction
Thank you for choosing the EAGLE PEAK 3 Tier Lean-to Portable Greenhouse. This manual provides essential information for the safe assembly, operation, and maintenance of your greenhouse. Designed to extend your growing season, this greenhouse offers a protected environment for your plants. Please read these instructions thoroughly before assembly and retain them for future reference.
2. Important Safety Information
WARNING: Always install this greenhouse against a solid, stable wall to ensure safety and durability, especially in windy or harsh weather conditions.
- Secure the extended flap on the bottom cover with ground stakes or weighted down with soil, rocks, or weight bags.
- Use upgraded stakes and tie-down ropes to improve durability and stability in windier conditions.
- Keep sharp edges away from children and pets during assembly and use.
- Do not expose the greenhouse to direct sunlight for extended periods without proper ventilation to prevent excessive heat buildup and UV damage to the cover.
- Always follow the manufacturer's instructions for proper assembly, use, and maintenance.
3. Parts List
Before beginning assembly, ensure all parts are present and undamaged. Refer to the diagram below for identification.
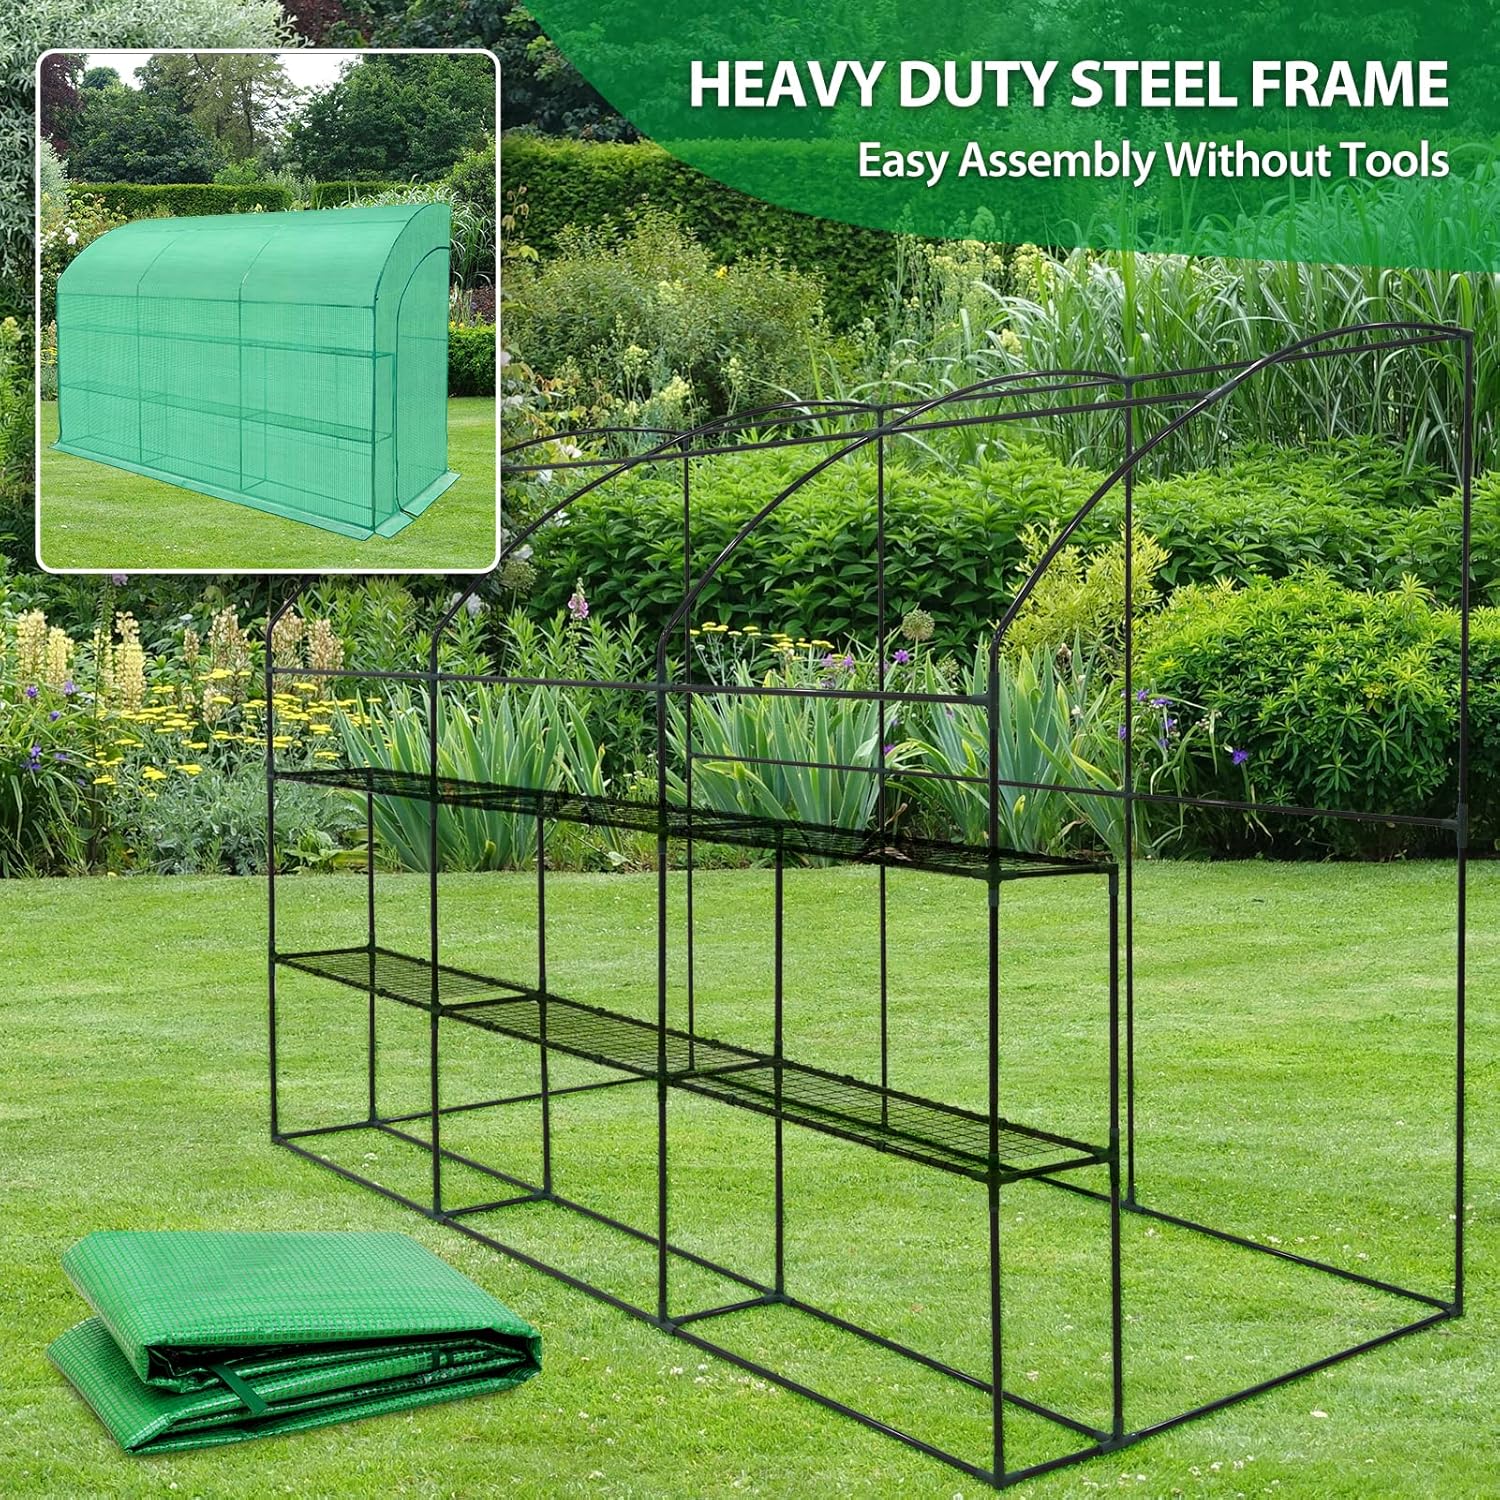
Figure 3.1: Greenhouse frame and cover components. This image illustrates the various metal tubes, plastic connectors, and the PE cover that make up the greenhouse structure.
- Powder-coated steel frame tubes (various lengths and shapes)
- Plastic connectors
- Reinforced Polyethylene (PE) cover
- Wire shelves (3 tiers)
- Ground stakes and tie-down ropes
- Wall mounting brackets and screws
4. Assembly Instructions
The EAGLE PEAK greenhouse is designed for quick and hassle-free setup without the need for additional tools.
- Prepare the Site: Choose a solid, stable wall for installation. Ensure the ground is level and clear of debris.
- Assemble the Frame: Connect the steel frame tubes using the plastic connectors. Ensure all tubes are fitted together snugly with no gaps. Refer to the assembly diagram for correct orientation.

Figure 4.1: Frame assembly. This diagram illustrates how the steel tubes connect via plastic joints to form the greenhouse structure.
- Install Wire Shelves: Place the wire shelves onto the designated tiers within the frame. Ensure they are securely seated.

Figure 4.2: The included 3-tier flower rack provides organized space for plants.
- Attach the PE Cover: Carefully drape the reinforced polyethylene cover over the assembled frame. Laying the frame on the ground can make it easier to attach the cover and protect it from scratches. Ensure the cover is properly aligned and fits snugly.
- Secure to Wall: Position the greenhouse against the chosen solid wall. Use the provided wall mounting brackets and screws to securely fix the greenhouse to the wall. This step is critical for stability.

Figure 4.3: Steel bolts are used to secure the greenhouse frame to a stable wall for enhanced stability.
- Anchor the Base: Secure the extended flap on the bottom cover using ground stakes, or weigh it down with soil, rocks, or weight bags to prevent wind uplift. Utilize the tie-down ropes and additional stakes for extra stability, especially in areas prone to wind.

Figure 4.4: Methods for securing the greenhouse base, including weighting down flaps with rocks and anchoring with stakes.
5. Operating Your Greenhouse
Your EAGLE PEAK greenhouse is designed to create an optimal environment for plant growth.
- Access and Ventilation: The greenhouse features two roll-up zipper doors. Open these doors for convenient access to your plants and to enhance ventilation, which is crucial for preventing excessive heat and humidity buildup.

Figure 5.1: Detail of the zippered roll-up door for easy access and ventilation.
- Plant Placement: Utilize the three tiers of wire shelving to organize your plants. Place taller plants or those requiring more space on the ground level, and smaller pots or seedlings on the shelves.
- Temperature and Humidity Control: Monitor the internal temperature and humidity. Adjust ventilation by partially or fully opening the zipper doors as needed to maintain ideal conditions for your specific plants.
6. Care and Maintenance
Regular maintenance will prolong the life of your greenhouse.
- Cleaning the Cover: Clean the PE cover periodically with mild soap and water. Avoid abrasive cleaners or brushes that could damage the material. Rinse thoroughly.
- Frame Inspection: Regularly check the steel frame and connectors for any signs of damage, rust, or loosening. Tighten any loose connections.
- Anchoring Check: Periodically inspect the ground stakes, tie-down ropes, and wall attachments to ensure they remain secure, especially after strong winds or heavy rain.
- Winter Storage (Optional): If not used year-round, disassemble the greenhouse and store the frame and cover in a dry, protected area to prevent wear and tear from extreme weather.
7. Troubleshooting
| Problem | Possible Cause | Solution |
|---|---|---|
| Greenhouse feels unstable or wobbly. | Insufficient anchoring; loose frame connections; not secured to a wall. | Ensure the greenhouse is securely fixed to a solid wall. Re-check all frame connections for tightness. Use all provided ground stakes and tie-down ropes, and weigh down the base flaps with heavy objects. |
| Cover tears or develops holes. | Sharp edges during assembly; prolonged UV exposure; extreme weather; manufacturing defect. | Inspect for sharp edges on the frame and cover them if found. Ensure proper ventilation to reduce heat. Patch small tears with greenhouse repair tape. Contact customer support for significant damage. |
| Excessive heat or humidity inside. | Inadequate ventilation. | Open the zipper doors partially or fully to allow for better airflow. Consider adding a small fan if necessary. |
| Zipper difficulty. | Dirt/debris in zipper; misaligned cover. | Clean the zipper teeth. Ensure the cover is correctly positioned and not pulling on the zipper at an awkward angle. |
8. Product Specifications
| Feature | Detail |
|---|---|
| Model Number | Piece together Greenhouse |
| Product Dimensions (L x W x H) | 120" x 60" x 84" (118.8"L x 58.8"W x 85.2"H) |
| Item Weight | 31.1 pounds |
| Frame Material | Powder-coated Alloy Steel |
| Cover Material | Reinforced Polyethylene (PE) |
| Number of Doors | 2 (Roll-up Zipper Doors) |
| Number of Vents | 1 (implied from product description, though not explicitly detailed as a separate vent) |
| Shelving | 3 Tiers of Wire Shelves |
| Color | Clear/Green PE Cover |
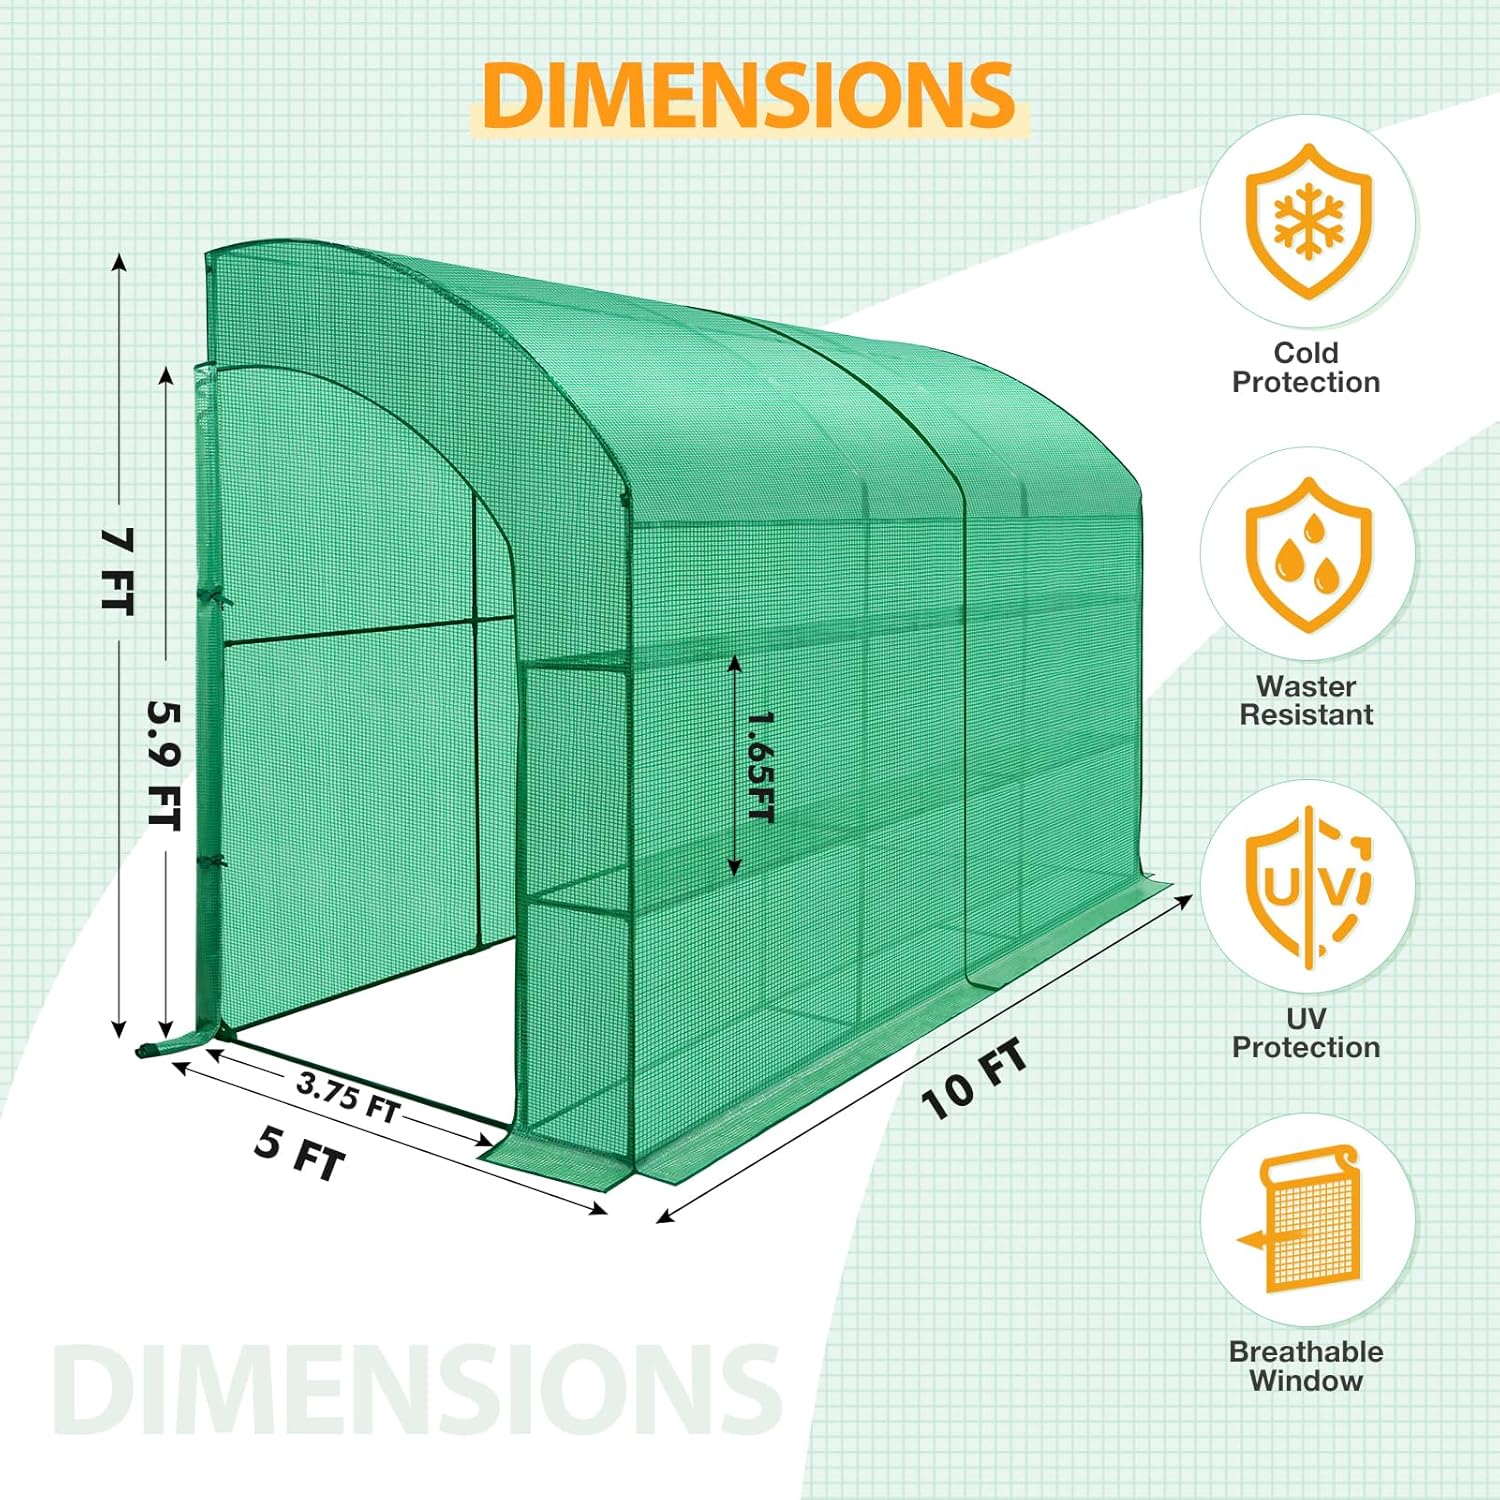
Figure 8.1: Key dimensions of the EAGLE PEAK Lean-to Portable Greenhouse.
9. Warranty and Support
EAGLE PEAK is committed to providing high-quality products and customer satisfaction. For warranty information, product support, or to inquire about replacement parts, please contact EAGLE PEAK customer service.
You can often find contact details on the official EAGLE PEAK Store on Amazon or through the product packaging.
"Our professional service team is always here when you have any questions or problems." - EAGLE PEAK Brand Story.


