
1. Introduction
Thank you for purchasing the Godox DP600III Studio Strobe Light Kit. This professional studio flash is designed for various photography applications, including wedding, advertising, portrait, and fashion photography. It features a built-in 2.4G wireless X system for enhanced control and a fast 1-second recycle time. This manual provides detailed instructions for safe operation, setup, and maintenance of your equipment.
2. Safety Information
Please read and understand all safety precautions before using this product. Improper use can result in electric shock, fire, or serious injury.
- Do not disassemble or modify the unit. Repairs should only be performed by authorized service personnel.
- Keep the unit dry. Do not expose it to rain or moisture.
- Do not touch the flash tube or modeling lamp immediately after use, as they can be extremely hot.
- Ensure the power supply voltage matches the specifications of the unit (110V).
- Always unplug the unit from the power outlet before cleaning or when not in use.
- Avoid direct eye exposure to the flash, as it can cause temporary vision impairment.
- Use only Godox-approved accessories.
3. Package Contents
The Godox DP600III Studio Strobe Light Kit typically includes the following items:
- Godox DP600III Strobe Light Unit
- Power Cable
- Standard Reflector
- Modeling Lamp
- Honeycomb Grid Softbox
- Light Stand
- Instruction Manual
4. Product Overview
The Godox DP600III is a robust studio strobe designed for reliable performance. Below are images illustrating the main unit and its control panel.

Figure 4.1: Godox DP600III Studio Strobe Light with standard reflector attached.

Figure 4.2: Side view of the DP600III strobe, highlighting the integrated handle and ventilation system.

Figure 4.3: Close-up of the DP600III control panel, displaying the LCD screen and various buttons and dials.
5. Setup
5.1 Assembling the Light Stand
Unfold the light stand legs and extend the sections to the desired height. Ensure all locking knobs are securely tightened to prevent collapse.

Figure 5.1: Diagram illustrating the dimensions and adjustable sections of the light stand.
5.2 Attaching the Strobe to the Light Stand
- Mount the DP600III strobe unit onto the top stud of the light stand.
- Tighten the locking knob on the strobe's mounting bracket to secure it in place.
5.3 Assembling the Softbox
The honeycomb grid softbox provides diffused and controlled lighting. Follow these steps for assembly:

Figure 5.2: Components of the softbox, including the internal reflective surface and diffusion panels.
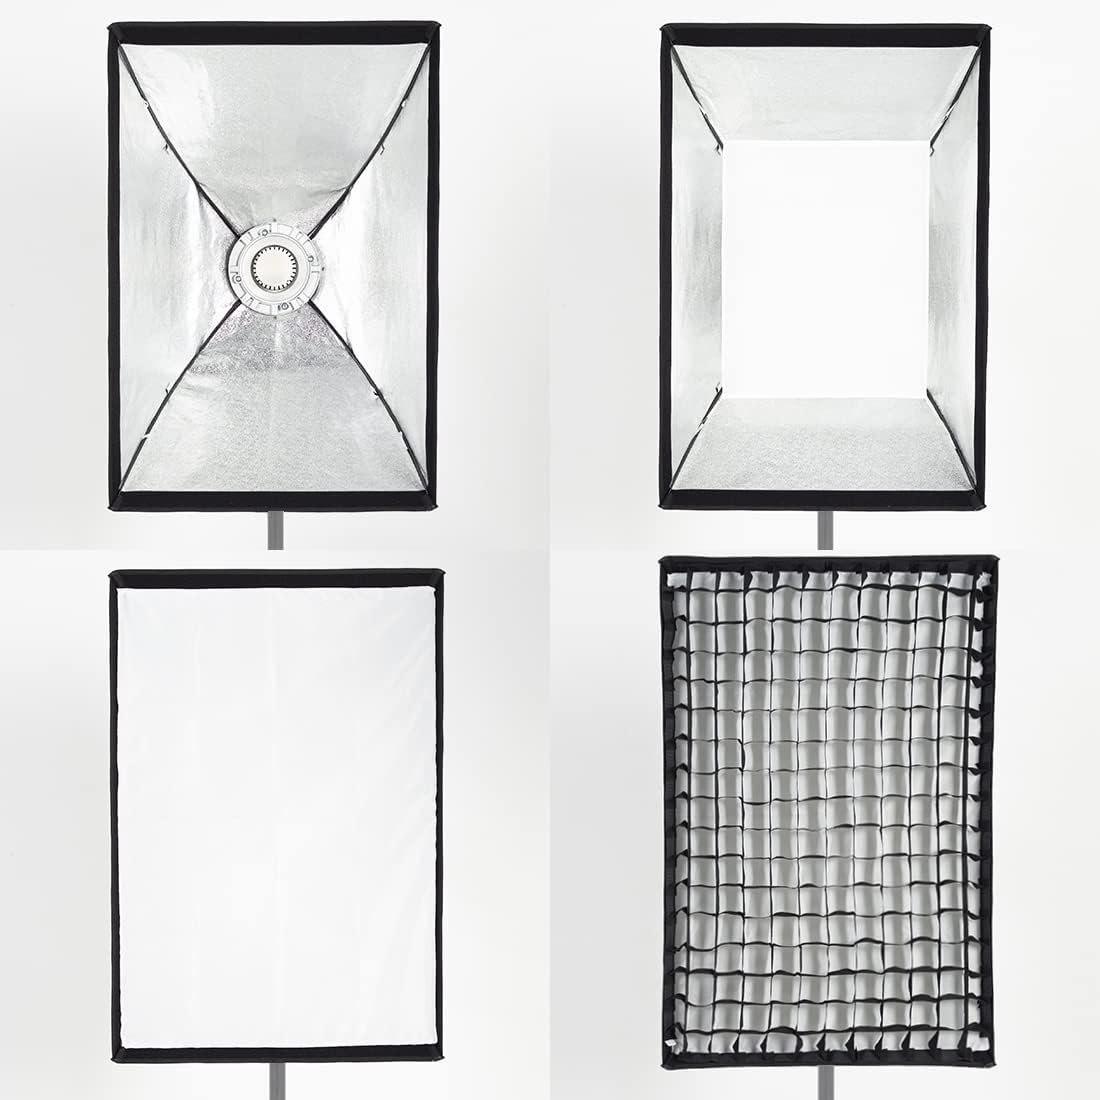
Figure 5.3: Visual guide for quick softbox installation, showing rod insertion and fabric attachment.
- Step 1: First, insert the support rod into the chuck diagonally.
- Step 2: Then install the support rod on the soft box.
- Step 3: Stick the four-sided Velcro on the back of the soft box.
- Step 4: Paste the soft light cloth and the grille in turn.
5.4 Attaching the Softbox to the Strobe
Align the Bowens mount of the assembled softbox with the strobe's mount. Insert and twist clockwise until it locks into place.
6. Operating Instructions
This section details the functions and controls of your Godox DP600III strobe light.

Figure 6.1: Detailed view of the DP600III control panel with labeled functions.
6.1 Power On/Off
Connect the power cable to the strobe and a suitable power outlet. Press the ON/OFF button located on the control panel to power the unit on or off.
6.2 Adjusting Power Output
The DP600III offers 61 steps of power output, from 1/64 to 1/1. Rotate the Rotation Adjustment knob to increase or decrease the flash power. The current power level will be displayed on the LCD screen.
6.3 Modeling Lamp Modes
The modeling lamp has three modes: OFF, PROP (proportional to flash power), and Percentage. Press the Modeling Lamp button to cycle through these modes. In Percentage mode, you can adjust the brightness independently.
6.4 Wireless X System Operation
The built-in 2.4G Godox wireless X system allows for remote control and triggering. It supports Godox X2, XPro, XT32, and FT-16 triggers.
- Groups (GR) and Channels (CH): Press the GR/CH button and turn the knob to set the group (0-9, A-F) and channel (1-32). This allows for organizing multiple strobes.
- Wireless ID Setting: To limit interference from other nearby systems, you can set a wireless ID (01-99). Press the FN button to access this setting and use the knob to select the ID.

Figure 6.2: Display showing the wireless ID setting (01-99) to prevent interference.
6.5 S1/S2 Optical Slave Modes
The strobe features S1 and S2 optical slave modes for triggering without a radio trigger. Press the S1/S2 button to activate these modes.
- S1 Mode: The strobe will fire in response to the first flash from another unit.
- S2 Mode: The strobe will ignore the pre-flash of another unit and fire on the main flash, useful for cameras with pre-flash functions.
6.6 Auto Recovery of Settings
The DP600III automatically recovers the last adjusted settings upon restart, ensuring continuity in your workflow.
7. Maintenance
7.1 Cleaning
Regular cleaning helps maintain the performance and longevity of your strobe light.
- Always disconnect the power before cleaning.
- Use a soft, dry cloth to wipe the exterior of the unit.
- For the flash tube and modeling lamp, use a clean, lint-free cloth, possibly dampened with a small amount of lens cleaner, then wipe dry. Avoid touching the glass directly with bare hands.
- Do not use harsh chemicals or abrasive cleaners.
7.2 Storage
When not in use, store the strobe light in a cool, dry place, away from direct sunlight and excessive humidity. Protect it from dust and physical impact.
8. Troubleshooting
If you encounter issues with your Godox DP600III, refer to the following common problems and solutions:
| Problem | Possible Cause | Solution |
|---|---|---|
| Strobe does not power on. | Power cable not connected; power outlet faulty; unit fuse blown. | Check power cable connection; try a different outlet; replace fuse (refer to service manual or contact support). |
| Strobe does not fire. | Trigger not synchronized; power output too low; flash tube faulty. | Ensure trigger and strobe are on the same group/channel/ID; increase power output; contact support for flash tube replacement. |
| Inconsistent flash output. | Unstable power supply; unit overheating. | Ensure stable power source; allow unit to cool down if used continuously. |
| Wireless trigger not working. | Incorrect group/channel/ID settings; trigger battery low. | Verify matching group, channel, and ID settings on both strobe and trigger; replace trigger battery. |
If the problem persists after attempting these solutions, please contact Godox customer support.
9. Specifications
Technical specifications for the Godox DP600III Studio Strobe Light.
| Feature | Detail |
|---|---|
| Model | DP600III |
| Power Output | 600Ws |
| Power Output Adjustment | 61 steps (1/64 to 1/1) |
| Recycle Time | 1 second (at full power) |
| Color Temperature | 5600K ±200K |
| Flash Sync Speed | 1/200 or 1/250 (depending on camera) |
| Modeling Lamp Modes | OFF / PROP / Percentage |
| Wireless System | Built-in 2.4G Godox X System |
| Wireless Groups | 16 (0-9, A-F) |
| Wireless Channels | 32 (1-32) |
| Wireless ID | 99 (01-99) |
| Mount Type | Bowens Mount |
| Item Weight | 37.7 pounds (approx. 17.1 kg) |
| Power Input | AC 110V |
Note: Specifications are subject to change without notice.
10. Warranty & Support
Godox products are manufactured to high standards and come with a limited warranty. Please refer to the warranty card included with your product for specific terms and conditions.
Customer Support
For technical assistance, service, or warranty claims, please contact Godox customer support through their official website or the retailer from whom you purchased the product. Have your product model number (DP600III) and purchase date ready when contacting support.