
1. Introduction
This manual provides detailed instructions for the installation, operation, and maintenance of your EDSACE 8-Channel 4K PoE Network Video Recorder (NVR). Please read this manual thoroughly before using the product to ensure proper setup and functionality. This NVR supports up to 8MP/5MP/4MP/3MP/1080P PoE cameras and utilizes H.265+ video compression for efficient storage.
2. Setup
2.1 Package Contents
- EDSACE 8-Channel 4K PoE NVR
- Power Adapter
- USB Mouse
- Ethernet Cable
- Quick Start Guide
2.2 Hardware Overview
Familiarize yourself with the ports and indicators on your NVR unit.
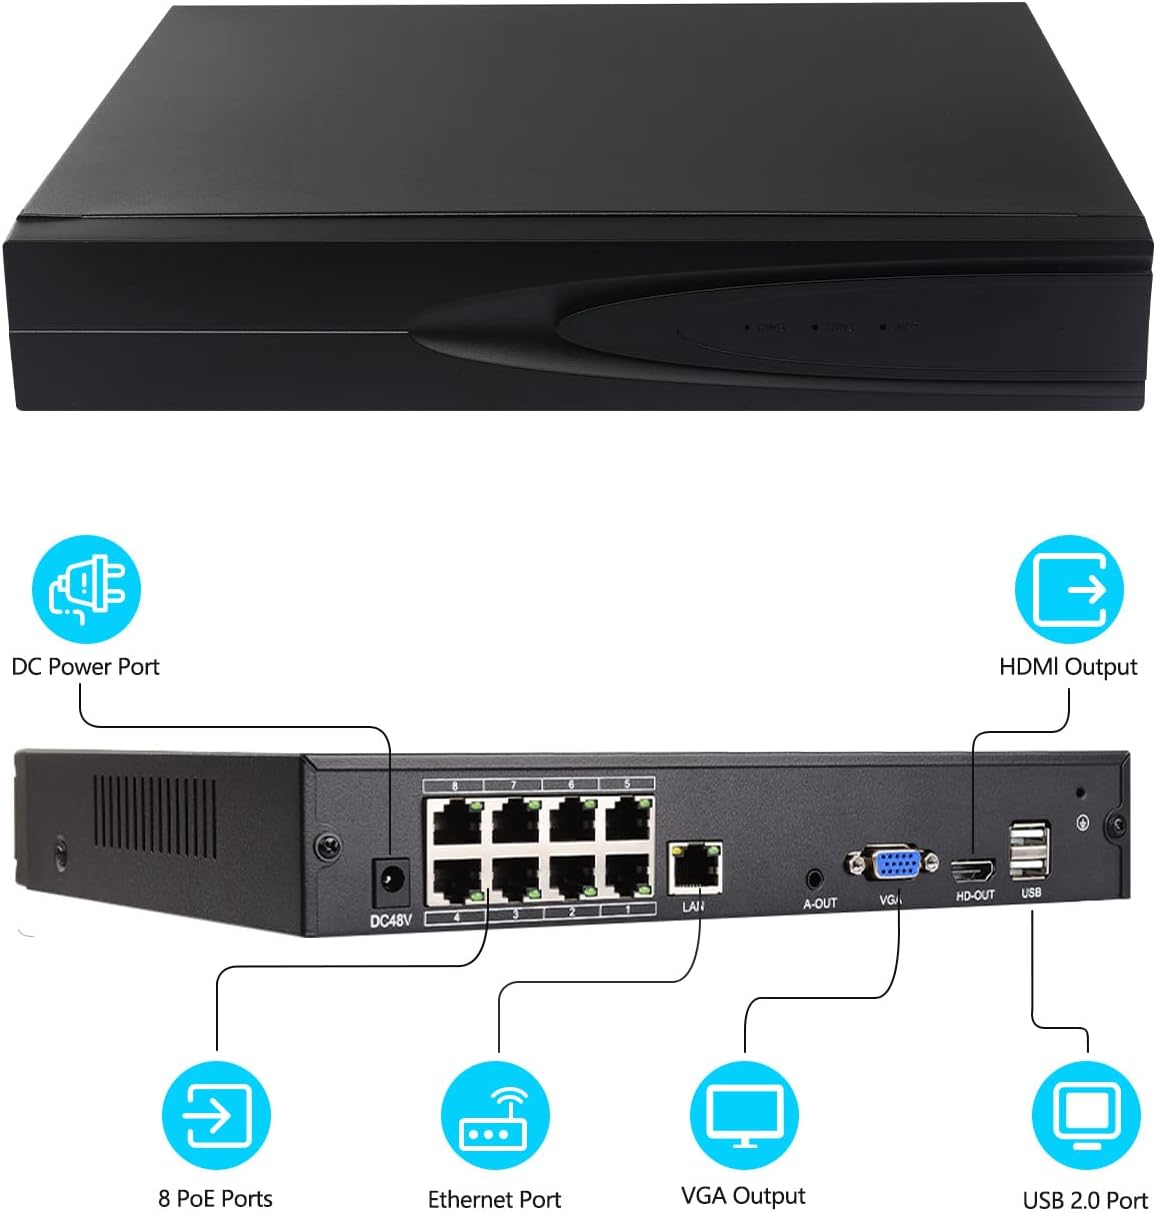
Image: Front and rear view of the EDSACE NVR, highlighting the DC Power Port, 8 PoE Ports, Ethernet Port, VGA Output, HDMI Output, and USB 2.0 Port.
2.3 Hard Drive Installation (Hard Drive Not Included)
The NVR supports up to a 12TB hard disk drive. Refer to the quick start guide for detailed instructions on how to install a compatible 3.5-inch SATA hard drive into the NVR chassis.
2.4 Connecting Your NVR
- Connect Cameras: Connect your PoE IP cameras to the 8 PoE ports on the rear of the NVR using Ethernet cables. The NVR will provide power and data to the cameras.
- Connect to Network: Connect the NVR's LAN port to your router or network switch using an Ethernet cable for internet access and remote viewing.
- Connect Display: Connect a monitor to the NVR using either the HDMI Output or VGA Output port.
- Connect USB Mouse: Plug the included USB mouse into one of the USB ports for local control.
- Power On: Connect the power adapter to the DC48V port and then plug it into a power outlet. The NVR will power on automatically.

Image: Rear panel of the EDSACE NVR, illustrating the DC48V power input, 8 PoE ports, LAN port, A-OUT, VGA, HD-OUT (HDMI), and USB ports.
3. Operating Instructions
3.1 Initial Configuration
Upon first boot, follow the on-screen wizard to set up basic parameters such as language, date/time, network settings, and hard drive initialization. Create a strong password for administrator access.
3.2 Live View and Playback
Once cameras are connected and configured, you can view live feeds on your connected monitor. Use the mouse to navigate the interface for live viewing, recording playback, and system settings.

Image: An EDSACE NVR unit placed under a television, which displays a live feed from four security cameras in a split-screen layout, demonstrating typical home security monitoring.
3.3 Remote Access via Seetong App
The EDSACE NVR supports remote viewing and control through the 'Seetong' application. This app is available for mobile phones (App Store, Google Play), PC, Mac, and web browsers.
- Download App: Search for 'Seetong' in your device's app store or visit the official Seetong website.
- Register Account: Create a new user account within the app.
- Add Device: Follow the in-app instructions to add your NVR by scanning its QR code or manually entering its device ID. Ensure your NVR is connected to the internet.
- View and Control: Once added, you can view live camera feeds, play back recorded footage, receive alerts, and manage NVR settings remotely.

Image: A person interacting with the Seetong mobile application on a smartphone, showing various camera feeds. A laptop in the foreground also displays the Seetong interface, indicating multi-platform access.
3.4 Recording and Smart Features
- 24/7 Recording: Configure continuous recording schedules for all channels.
- Motion Alarm: Set up motion detection zones and sensitivity. When motion is detected, the NVR can trigger recording, send app notifications, or email alerts.
- Face Detection: Utilize advanced AI features for face detection (if supported by connected cameras).
- Smart Playback: Efficiently review recorded footage with smart search functions, allowing you to quickly find events based on motion or other triggers.
- H.265+ Video Compression: The NVR uses H.265+ compression technology to significantly reduce file sizes while maintaining video quality, optimizing storage space.

Image: A visual comparison demonstrating how H.265+ video compression requires significantly less storage space than H.264 for the same amount of video data. Below, two images show a person breaking in, with H.265+ offering clearer detail than H.264.
3.5 Person & Vehicle Detection
The NVR features intelligent AI detection capabilities to distinguish between human figures and vehicles, reducing false alarms caused by irrelevant movements. This allows for more precise alerts and event recording.

Image: An overhead view showing a person walking and a car parked, with blue outlines indicating the NVR's ability to detect and differentiate between a 'Person' and a 'Vehicle'.
4. Maintenance
4.1 Hard Drive Management
Regularly check the status of your hard drive through the NVR's system settings. The NVR will automatically overwrite the oldest footage when the hard drive is full, based on your recording settings. Consider backing up important footage periodically.
4.2 Firmware Updates
Periodically check for firmware updates through the NVR's system menu or the Seetong app. Keeping your NVR's firmware updated ensures optimal performance, security, and access to new features.
4.3 General Care
Keep the NVR in a well-ventilated area, away from direct sunlight, moisture, and extreme temperatures. Clean the exterior with a soft, dry cloth. Do not block ventilation openings.
5. Troubleshooting
5.1 No Video Output
- Check power connections to the NVR and monitor.
- Verify HDMI/VGA cable connections.
- Ensure the correct input source is selected on your monitor.
5.2 Cameras Not Displaying
- Ensure cameras are properly connected to the NVR's PoE ports.
- Check Ethernet cables for damage.
- Verify camera power status (if applicable, though PoE provides power).
- Confirm cameras are compatible with the NVR (e.g., Onvif support).
5.3 Remote Access Issues
- Ensure the NVR is connected to the internet.
- Check your router's internet connection.
- Verify NVR network settings (DHCP enabled or static IP configured correctly).
- Confirm correct device ID or QR code was used in the Seetong app.
- Check firewall settings on your network if issues persist.
5.4 Password Reset
If you forget your NVR password, refer to the 'Forgot Password' option on the login screen or consult the Seetong app's support section for recovery procedures.
6. Specifications
| Model | B09ZPK7T27 |
| Channels | 8 Channel PoE |
| Video Resolution Support | 8MP/5MP/4MP/3MP/1080P |
| Video Compression | H.265+ |
| Hard Disk Capacity | Up to 12 TB (Hard Disk Not Included) |
| Connectivity Technology | Wired (Ethernet, PoE) |
| Compatible Devices | PoE Cameras, NVR |
| Remote Access App | Seetong (iOS, Android, PC, Mac, Web) |
| Dimensions | 13.82 x 11.61 x 2.99 inches |
| Item Weight | 3.39 pounds |
7. Warranty and Support
7.1 Manufacturer Information
This product is manufactured by EDSACE. For specific warranty details, please refer to the warranty card included with your product or contact EDSACE customer support directly.

Image: The official EDSACE brand logo, featuring a stylized eye within a shield and the brand name.
7.2 Customer Support
For technical assistance, troubleshooting, or any inquiries regarding your EDSACE NVR, please utilize the support resources available through the Seetong application or visit the official EDSACE website for contact information.
7.3 Privacy Commitment
EDSACE is committed to protecting your privacy. Your video data is secured with AES encryption and RSA/ECDHE algorithms for high-strength key exchange and TLS compliance, ensuring your recordings remain private at all times.

Image: A blue shield with a white padlock icon, symbolizing the commitment to privacy and data security for user videos.