
DC HOUSE B09ZPF7SCG
DC HOUSE Solar Powered Automatic Chicken Coop Door Opener Instruction Manual
Model: B09ZPF7SCG
1. Introduction
This manual provides detailed instructions for the installation, operation, maintenance, and troubleshooting of your DC HOUSE Solar Powered Automatic Chicken Coop Door Opener. Please read this manual thoroughly before installation and use to ensure proper function and safety.
The DC HOUSE Automatic Chicken Coop Door Opener is designed to provide a convenient and secure solution for managing your poultry. It features solar power, a rechargeable battery, light sensing for automatic operation, and a remote control for manual override.
2. Safety Information
Always follow basic safety precautions when installing and operating this device.
- Ensure all connections are secure before operation.
- Keep hands and loose clothing away from moving parts during operation.
- Do not attempt to modify the device.
- Proper installation of infrared sensors is crucial to prevent injury to animals.
- Keep the solar panel clean for optimal charging performance.
3. Package Contents
Verify that all components are present before beginning installation.
- Automatic Chicken Coop Door Unit
- Solar Panel (10W)
- Rechargeable Battery
- Remote Control
- Infrared Sensor
- Mounting Hardware (screws, brackets, etc.)
- Instruction Manual

Image: Overview of the DC HOUSE Automatic Chicken Coop Door Opener components, including the main unit, solar panel, and door mechanism.
4. Setup and Installation
Follow these steps for proper installation of your automatic chicken coop door.
4.1 Mounting the Door Unit
- Choose a suitable location on your chicken coop for the door unit. Ensure there is enough space for the door to open and close freely.
- Securely attach the main door unit to the coop using the provided mounting hardware. Ensure it is level and stable.

Image: An example of the automatic chicken coop door installed on a coop, showing the door mechanism and control unit.
4.2 Solar Panel Installation
- Mount the 10W solar panel in a location that receives maximum direct sunlight throughout the day.
- Connect the solar panel cable to the designated input on the control unit. Ensure the battery cables are connected to start the machine.

Image: A solar panel mounted on the roof of a chicken coop, providing power to the automatic door system.

Image: Close-up view of the 10W solar panel and the rechargeable battery controller, highlighting their connection points.
4.3 Infrared Sensor Installation
Proper installation of the infrared sensor is critical for safety, preventing the door from closing on your poultry.
- Rotate to unload the first cap off the infrared sensor.
- Put the launcher on and install the cap.
- Mount the infrared sensor at the bottom of the door opening, ensuring the beam crosses the path of the door.
- Connect the sensor to the control unit as per the wiring diagram.

Image: Diagram illustrating the installation of the infrared sensor, showing how it detects obstacles and prevents the door from closing.
5. Operating Instructions
Your DC HOUSE Automatic Chicken Coop Door Opener offers two operating modes: Automatic and Manual.
5.1 Automatic Mode (Light Sensing)
In Automatic mode, the door opens in the morning and closes at dusk, based on brightness induction.
- Ensure the system is powered on.
- The light sensor will detect ambient light levels.
- The door will automatically open when sufficient light is detected (morning).
- The door will automatically close when light levels drop (dusk).
Image: Illustration of the automatic coop door opening during the day and closing at night, controlled by a light sensor.
5.2 Manual Mode (Remote Control)
Use the remote control for manual operation, overriding the automatic settings.
- Press the designated button on the remote control to open the door.
- Press the designated button on the remote control to close the door.
Image: A hand holding a remote control, demonstrating the manual operation of the chicken coop door.
6. Maintenance
Regular maintenance ensures the longevity and optimal performance of your chicken coop door opener.
- Clean the Solar Panel: Periodically wipe the solar panel with a soft, damp cloth to remove dust and debris, ensuring efficient charging.
- Check Door Movement: Ensure the door moves freely without obstruction. Clear any debris from the tracks.
- Inspect Wiring: Check all electrical connections and wiring for any signs of wear or damage.
- Battery Health: The rechargeable battery is designed for long life. If the power light indicates low battery or the door doesn't operate reliably, check the battery connection and solar panel charging.
- Sensor Cleaning: Keep the infrared sensor lenses clean to ensure accurate detection.
7. Troubleshooting
Refer to the following table for common issues and their solutions.
| Problem | Possible Cause | Solution |
|---|---|---|
| Door doesn't work. | Power light is off. Remote control not sending signal. Infrared sensor sensing an obstacle. Not connected to 12V power supply. | Check power connection. Press remote control to send signal. Clear obstacles from infrared sensor path. Ensure 12V power supply is connected if not using solar. |
| Green power light is on, but door doesn't work. | Battery power is low or battery is damaged. | Check solar panel for charging. Replace battery if damaged. |
| Remote receiver module light is red and makes a sound. | Remote control receiver module is receiving a signal. | This indicates the module is working correctly. |
| Remote control lights up blue. | Remote control is sending a signal. | This indicates the remote control is working correctly. |
| Infrared sensor light is on. | Sensing an obstacle. | Clear the obstacle. The door will not close if an obstacle is detected. |
| Door doesn't automatically open during the day or close at night. | Brightness sensing resistor is blocked or cannot sense brightness. | Clean the brightness sensor. Rotate the Light Sensor adjustment button 3-4 turns counterclockwise to decrease the sensing brightness value. Wait 5 minutes to see if it will automatically rise. |
| Door opens too early or closes too late. | Brightness sensing distance is too long. | Counterclockwise decrease the sensing distance. |

Image: A visual troubleshooting guide showing common issues and solutions for the automatic chicken coop door system.
8. Specifications
| Feature | Detail |
|---|---|
| Brand | DC HOUSE |
| Model | B09ZPF7SCG |
| Product Dimensions (L x W x H) | 30L x 5.1W x 59.7H centimetres |
| Material | Acrylonitrile Butadiene Styrene (ABS) |
| Special Features | Automatic and Remote Controlled Operation, Light Sensing, Infrared Safety Sensor |
| Power Source | 10W Solar Panel, Rechargeable Battery |
| Target Species | Chicken, Duck, Geese, other poultry |
| Door Opening Width | 11.8 inches (approx. 30 cm) |
| Door Opening Height | 12.7 inches (approx. 32.2 cm) |
| Total Door Height | 23.5 inches (approx. 59.7 cm) |
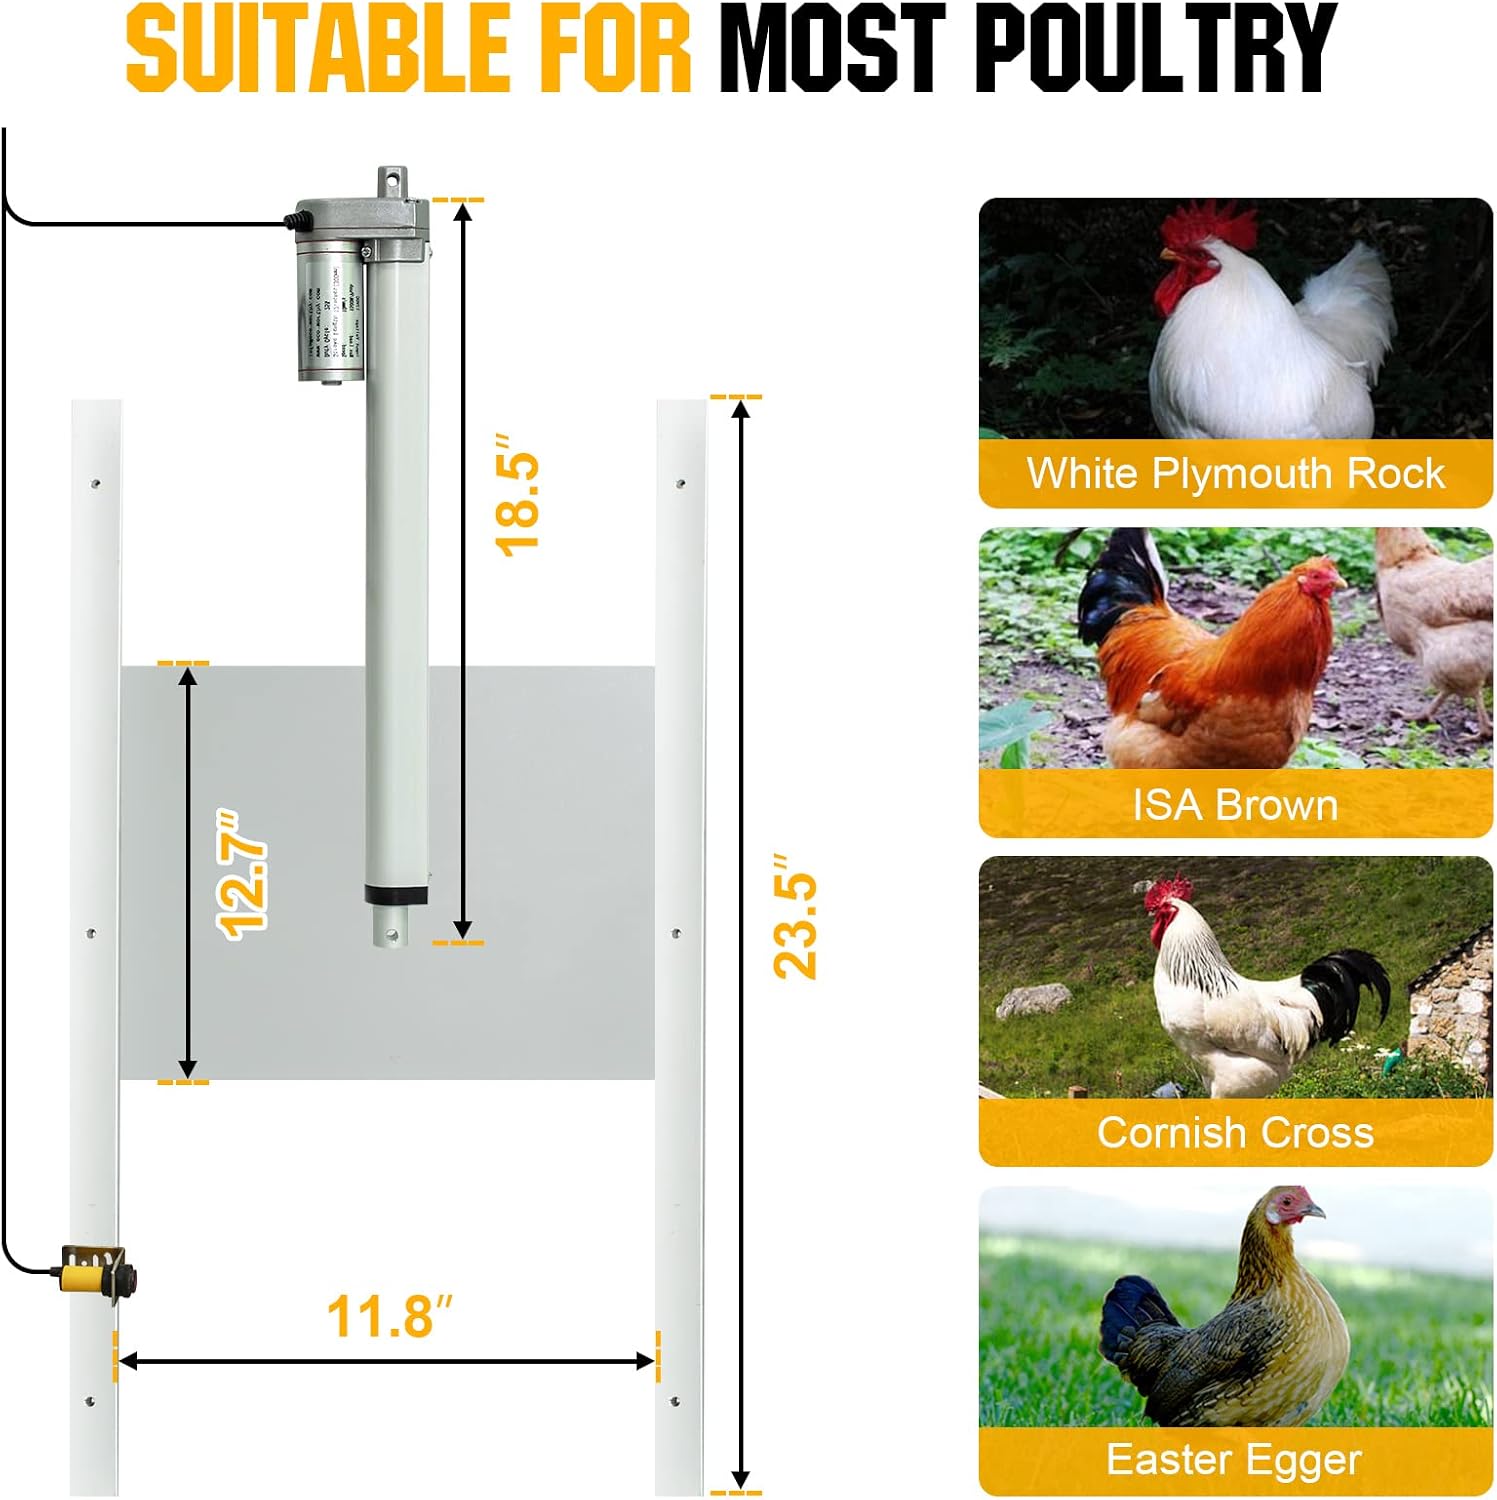
Image: Diagram showing the key dimensions of the automatic chicken coop door, including width and height.
9. Warranty and Support
DC HOUSE provides unconditional free after-sales service within one year of receiving the goods.
For support, please contact DC HOUSE customer service. If you experience issues with email replies via Amazon, please send your inquiry to the dedicated customer service email: DCHOUSE_GLOBAL. Please note that customer service email may not operate on holidays.
Related documentsB09ZPF7SCG


Ask a question about this manual
Ask about setup, troubleshooting, compatibility, parts, safety, or missing instructions. Manuals+ will review the question and use this page’s manual context to help answer it.