1. Introduction
The AMOCAM 10-Unit Apartment Intercom System is a wired video door phone solution designed for multi-unit dwellings. This system allows residents to see, hear, and speak with visitors at the outdoor station, enhancing security and convenience. It supports one outdoor camera unit and up to ten indoor monitor units, enabling communication between the outdoor station and individual households.
2. Safety Information
- Electrical Safety: Ensure all power connections are made by a qualified electrician and comply with local electrical codes. Disconnect power before performing any installation or maintenance.
- Water Exposure: While the outdoor unit is weatherproof (IP65 rated), avoid direct high-pressure water spray. Ensure all connections are sealed properly.
- Cable Management: Route all cables securely to prevent tripping hazards and damage.
- Operating Temperature: Do not expose the units to extreme temperatures outside the specified operating range.
3. Package Contents
Please verify that all items listed below are included in your package:
- 1 x Outdoor Camera Unit
- 10 x Indoor Monitor Units (7-inch)
- 10 x Monitor Hanging Plates
- 10 x Power Adapters for Indoor Monitors
- 10 x 4-core/5-core Connection Cables (for monitors)
- 1 x 2-core Connection Cable (for electric lock)
- 1 x Bag of Screws and Wall Plugs
- 1 x User Manual

Image 3.1: AMOCAM 10-Unit Apartment Intercom System components, showing one outdoor camera unit and ten indoor monitor units.
4. Product Overview
4.1 Outdoor Camera Unit
The outdoor unit features a durable aluminum alloy casing and is designed for outdoor installation with an IP65 weatherproof rating. It includes a 700TVL color CMOS camera with a 60/35/70/70 degree viewing angle (U/D/L/R), built-in microphone and speaker for two-way audio, and 5 LED lights for night vision. It has 10 call buttons, allowing visitors to directly contact specific indoor units.

Image 4.1: Front view of the AMOCAM outdoor camera unit, featuring the camera lens, speaker grille, and ten call buttons for individual apartment units.

Image 4.2: Labeled diagram of the AMOCAM outdoor camera unit, pointing out key components such as the microphone (MIC), camera lens, LED lights for night vision, aluminum panels, speaker, and call buttons.
4.2 Indoor Monitor Unit
Each indoor monitor features a 7-inch TFT LCD color screen with an 800x480 resolution, providing a clear view of visitors. The monitor has touch-sensitive keys for various functions including ring cancel, volume/brightness adjustment, monitoring, unlocking, and intercom. It is constructed from ABS engineering plastics and designed for surface mounting.

Image 4.3: Front view of a single AMOCAM 7-inch indoor monitor, displaying its sleek design and touch-sensitive control icons at the bottom.
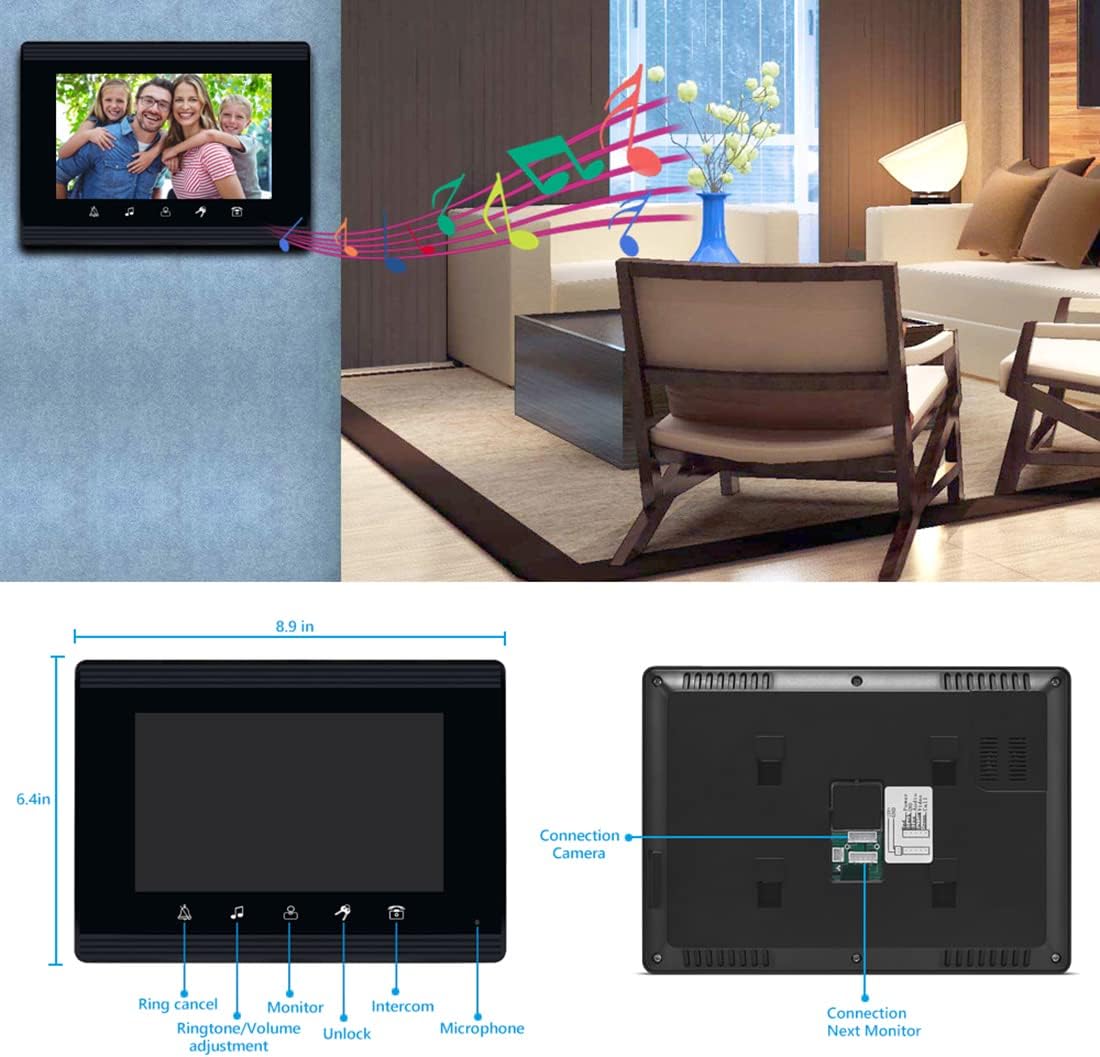
Image 4.4: Detailed view of the AMOCAM 7-inch indoor monitor, highlighting its dimensions (8.9 inches wide, 6.4 inches high) and connection ports for the camera and additional monitors on the back.
5. Setup & Installation
Proper installation is crucial for optimal performance. It is recommended to have a qualified technician perform the installation.
5.1 Mounting the Outdoor Unit
- Choose a suitable location near the entrance, ensuring the camera has a clear view of visitors. The standard installation height for the camera lens is between 145cm and 160cm from the ground.
- Secure the mounting bracket (set iron) to the wall using the provided screws and wall plugs.
- Attach the outdoor unit to the mounting bracket.
5.2 Mounting the Indoor Monitors
- Select a convenient location inside each apartment unit, typically near the entrance or in a common area.
- Secure the hanging plate to the wall using screws and wall plugs.
- Hang the indoor monitor onto the hanging plate.
5.3 Wiring Diagram
The system uses 4-core or 5-core wiring for connecting the outdoor unit to the indoor monitors, and a 2-core cable for an optional electric lock. Ensure all connections are firm and correctly aligned according to the diagram below.

Image 5.1: Diagram illustrating the AMOCAM apartment video door phone intercom system installation in a multi-unit building, showing connections between the outdoor unit, indoor units, and an optional E-lock.

Image 5.2: Comprehensive installation guide for the AMOCAM intercom system, including a diagram for mounting the outdoor station at a standard height and a detailed wiring diagram showing connections for the outdoor camera, multiple indoor monitors, power adapters, and an electric lock.
5.4 Power Connection
Connect the provided power adapters to each indoor monitor and plug them into a standard AC 100-240V outlet. The outdoor camera unit receives its power from the indoor monitors (DC15V).
6. Operating Instructions
6.1 Receiving a Call
When a visitor presses the call button on the outdoor unit corresponding to your apartment, your indoor monitor will ring and display the visitor's image. Press the 'Answer' icon (typically a phone receiver symbol) on the monitor to establish two-way communication.
6.2 Two-Way Communication
After answering, you can speak with the visitor through the built-in microphone and speaker on the indoor monitor. The outdoor unit also has a microphone and speaker for the visitor.
6.3 Monitoring
To view the outdoor area without a visitor initiating a call, press the 'Monitor' icon (typically an eye symbol) on your indoor monitor. This will activate the outdoor camera and display the live feed on your screen.
6.4 Unlocking the Door
If an electric lock is connected to the system, you can unlock the door remotely by pressing the 'Unlock' icon (typically a key symbol) on your indoor monitor during a call or while monitoring.
6.5 Adjusting Settings
The indoor monitor allows adjustment of various settings:
- Volume: Adjust the ringtone and communication volume using the dedicated icon (speaker symbol).
- Brightness & Contrast: Adjust the display settings for optimal viewing.
- Ringtone: Select from 16 different doorbell chimes.

Image 6.1: Close-up of the AMOCAM indoor monitor's touch keys, displaying a live video feed on the screen. The image emphasizes the modern design and ease of operation.
7. Maintenance
- Cleaning: Use a soft, dry cloth to clean the indoor monitors. For the outdoor unit, a damp cloth can be used. Avoid abrasive cleaners or solvents.
- Cable Inspection: Periodically check all wiring for signs of wear or damage. Ensure connections remain secure.
- Lens Cleaning: Gently clean the camera lens on the outdoor unit with a soft, lint-free cloth to maintain clear video quality.
8. Troubleshooting
| Problem | Possible Cause | Solution |
|---|---|---|
| No image on indoor monitor | Loose wiring connection No power to monitor Faulty camera | Check all wiring between outdoor unit and monitor. Ensure power adapter is plugged in and working. Contact support if wiring and power are confirmed. |
| No audio during communication | Microphone/speaker blocked Volume set too low Loose wiring | Check for obstructions on microphone/speaker. Adjust volume settings on indoor monitor. Verify wiring connections. |
| Door unlock function not working | Electric lock not connected or faulty 2-core cable loose | Ensure electric lock is properly installed and functional. Check the 2-core cable connection to the electric lock. |
| Indoor monitor not ringing | Ringtone volume too low Call button on outdoor unit faulty | Increase ringtone volume on the indoor monitor. Test other call buttons or contact support. |
9. Specifications
| Component | Specification |
|---|---|
| Outdoor Camera Unit | |
| Camera Resolution | 700 TV Lines |
| Camera Sensor | 1/3 Color CMOS |
| Night Vision | 5 LED lights |
| Audio | Built-in Microphone and Speaker |
| Power Source | From Monitor, DC15V |
| Viewing Angle (U/D/L/R) | 60/35/70/70 degrees |
| Connection | 4-core/5-core wire (max support 12 monitors) |
| Material | Aluminum |
| Weatherproof Rating | IP65 |
| Dimensions | 4.8 x 10.8 x 1.7 inches |
| Indoor Monitor Unit | |
| Display | 7 inch TFT LCD screen (16:9) |
| Resolution | 800 x 480 |
| Input Power | AC 100-240V 50 Hz-60 Hz |
| Output Power | DC 15V/1500 mA |
| Case Material | ABS Engineering Plastics |
| Installation | Surface mounting |
| Control Method | Touch Keys |
| Dimensions | 8.9 x 6.4 x 1.0 inches |
| General | |
| Connectivity Technology | Wired |
| Model Number | 520-70W-10 |
| UPC | 721927699978 |
10. Warranty & Support
AMOCAM products are designed for reliability and performance. For specific warranty details, please refer to the warranty card included with your purchase or contact AMOCAM customer support. If you encounter any issues not covered in this manual, please reach out to our support team for assistance.
Manufacturer: AMOCAM
Contact Information: Please visit the official AMOCAM website or your point of purchase for the latest support contact details.


