1. Introduction
This manual provides detailed instructions for the installation, operation, and maintenance of your LAMTTO C310J Dual 1080P Dash Cam. Please read this manual thoroughly before using the product to ensure proper functionality and safety. This device is designed to record driving footage both in front of and inside your vehicle, offering enhanced security and evidence in case of incidents.
2. Product Overview
The LAMTTO C310J is a compact dash cam featuring dual 1080P cameras for simultaneous front and interior recording. It includes a 1.5-inch display and a range of advanced features to ensure comprehensive coverage.
Key Features:
- Dual 1080P Recording: Captures clear footage from both the front (170° wide-angle) and interior (140° wide-angle) of the vehicle.
- WDR Technology: Enhances image clarity in varying light conditions, preventing overexposure and underexposure.
- Loop Recording: Automatically overwrites the oldest files when the memory card is full, ensuring continuous recording.
- G-Sensor: Detects sudden impacts or collisions and automatically locks the current video file to prevent it from being overwritten.
- Parking Monitoring: Activates recording automatically when motion or impact is detected while the vehicle is parked (requires hardwire kit, not included).
- LED Signal Light Compatibility: Records traffic signals without flickering.
- Infrared Night Vision: Provides clear interior recording even in low-light conditions.
Package Contents:
- LAMTTO C310J Dash Cam Unit
- Car Charger
- USB Data Cable
- Suction Cup Mount
- User Manual
- Pry Tool
- 64GB SD Card

Figure 2.1: LAMTTO C310J Dash Cam main unit.

Figure 2.2: Dash Cam highlighting key features.
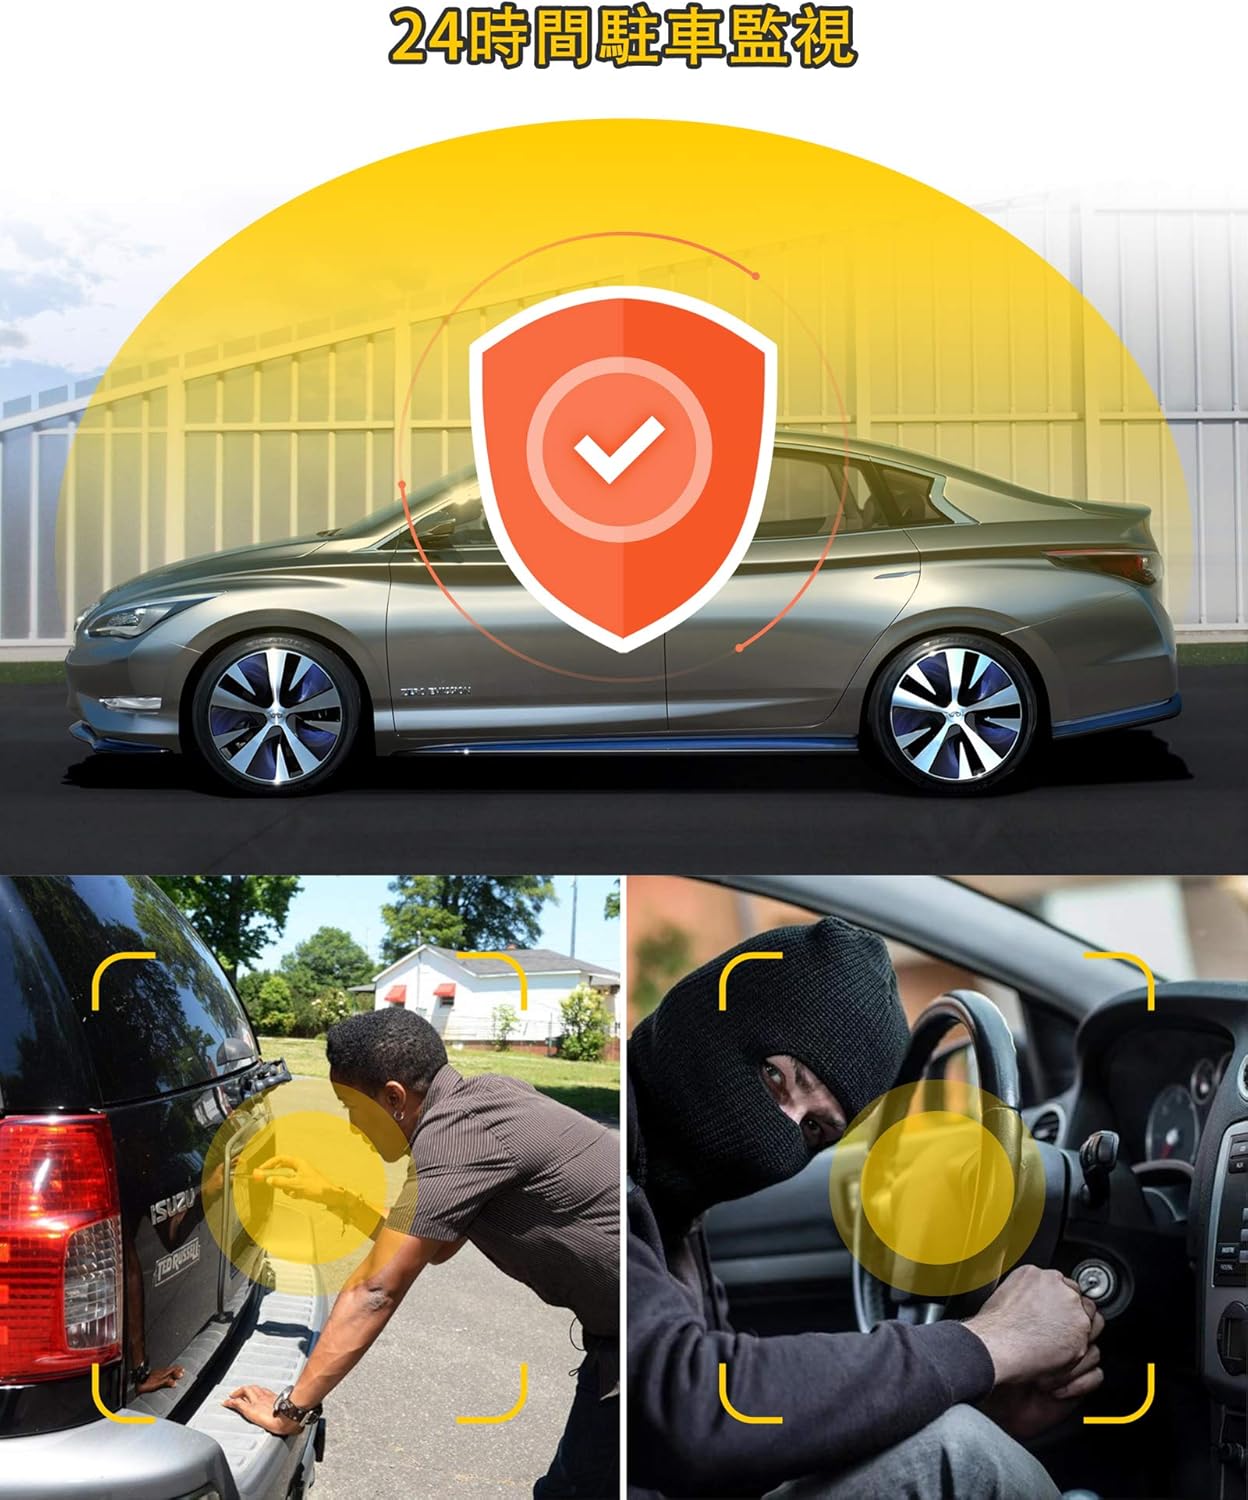
Figure 2.3: All items included in the LAMTTO C310J package.
3. Setup and Installation
Follow these steps to properly install your dash cam in your vehicle.
3.1 Front Camera Installation
- Clean the Windshield: Thoroughly clean the area on your front windshield where the dash cam will be mounted. Ensure it is free of dust and grease for optimal adhesion.
- Apply Electrostatic Film (Optional): If desired, apply the electrostatic film to the cleaned area before attaching the mount. This can help protect your windshield and make removal easier.
- Attach the Suction Cup Mount: Secure the suction cup mount to the dash cam unit. Press the mount firmly against the windshield and engage the locking mechanism to ensure it is stable.
- Adjust Camera Angle: Once mounted, adjust the camera lens to capture the desired view of the road ahead. The camera can be rotated 270 degrees for optimal positioning.

Figure 3.1: Step-by-step guide for installing the dash cam.
3.2 Rear Camera Installation (if applicable)
- Attach Rear Camera: Secure the rear camera to the rear windshield using its adhesive. Ensure the lens is clean and positioned to capture the desired view. The rear camera can be rotated 360 degrees.
3.3 Cable Routing and Power Connection
- Route Cables: Carefully route the power cable and any rear camera cables along the edges of your windshield and dashboard. Use the included pry tool to tuck cables neatly into gaps for a clean installation.
- Connect Power: Plug the car charger into your vehicle's cigarette lighter socket and connect the other end to the dash cam's power input.

Figure 3.2: Example of routing cables for a tidy installation.
Installation Video:
Video 3.1: Detailed guide on how to install the dash cam.
4. Operating Instructions
Understand the various functions and settings of your LAMTTO C310J Dash Cam.
4.1 Power On/Off
The dash cam will automatically power on and begin recording when your vehicle's engine starts. It will power off automatically when the engine is turned off.
4.2 Recording Modes
- Loop Recording: This feature ensures continuous recording by overwriting the oldest unlocked video files when the memory card reaches its capacity. You can set video segment lengths (1, 2, or 3 minutes).
- G-Sensor (Impact Detection): The built-in G-sensor detects sudden impacts or collisions. When triggered, it automatically locks the current video file, preventing it from being overwritten, and saves it as an emergency file.
- Parking Monitoring: When enabled, if your vehicle experiences a slight vibration while parked (engine off), the dash cam will automatically start recording for 20 seconds and then shut down. This provides surveillance against hit-and-runs or vandalism.
- Motion Detection: In standby mode (power ON), the dash cam will start recording automatically when it detects movement in front of the camera.

Figure 4.1: Dash cam display with icons for parking monitoring, motion detection, G-sensor, and loop recording.

Figure 4.2: Illustration of the 24-hour parking monitoring feature.

Figure 4.3: Loop recording ensures continuous footage without manual deletion.

Figure 4.4: The G-sensor automatically locks video files during an impact.
4.3 Display Modes
The 1.5-inch display supports split-screen viewing, allowing you to see both front and interior camera feeds simultaneously. You can switch between front-only, interior-only, or split-screen modes as needed during driving.

Figure 4.5: Front 170° and interior 140° wide-angle recording.

Figure 4.6: Example of simultaneous front and interior recording.
4.4 Night Vision and WDR
Equipped with WDR (Wide Dynamic Range) technology and 4 infrared lights, the dash cam provides clear recordings even at night or in challenging lighting conditions. It effectively corrects overexposed or underexposed areas, ensuring details like license plates are visible.

Figure 4.7: Comparison of video quality with HDR off vs. HDR on.
4.5 LED Signal Light Compatibility
The recording frame rate is adjusted to 27.5fps (from traditional 30fps) to prevent the flickering phenomenon of LED traffic signals, ensuring clear recording of traffic lights.
5. App Connectivity
Connect your dash cam to your smartphone via Wi-Fi for easy access to live footage, video playback, and settings adjustments.
- Power On the Dash Cam: Ensure your dash cam is powered on.
- Download the App: Download the 'AUTOSOCT' app from your smartphone's app store.
- Register/Login: Open the app and register for an account or log in. New users may need to create an account using an email address.
- Grant Permissions: Allow the app necessary permissions for camera, location, and local network access.
- Connect to Wi-Fi: Go to your phone's Wi-Fi settings and connect to the dash cam's Wi-Fi network (e.g., 'Avylet-A4-XXXX'). The default password is '12345678'.
- Add Device in App: Return to the 'AUTOSOCT' app and click 'Add Dash Cam' or similar option. The app should detect and connect to your dash cam.
- View Live Footage & Playback: Once connected, you can view live video streams, browse recorded files, and download them to your phone.
App Connectivity Video:
Video 5.1: Guide on smartphone linkage and image confirmation.
Video 5.2: Short preview of viewing real-time video via the app.
6. Maintenance
Regular maintenance ensures optimal performance and longevity of your dash cam.
6.1 SD Card Management
It is recommended to format the SD card regularly (e.g., once a month) to prevent data corruption and ensure smooth recording. You can format the SD card directly through the dash cam's menu or via the 'AUTOSOCT' smartphone app.
6.2 Cleaning
Wipe the camera lenses and the dash cam body with a soft, dry cloth. Avoid using abrasive cleaners or solvents that could damage the device.
7. Troubleshooting
If you encounter any issues with your LAMTTO C310J Dash Cam, refer to the following common problems and solutions.
- Dash Cam Not Powering On Automatically:
Ensure the car charger is securely plugged into both the cigarette lighter socket and the dash cam. Check if the vehicle's cigarette lighter socket is functioning. - SD Card Error / Recording Stops:
Format the SD card regularly. Ensure you are using a high-quality, compatible SD card (64GB card is included). If the issue persists, try a different SD card. - TV Signal Interference:
Some users have reported interference with car TV signals. This can occur if the dash cam is not adequately shielded against electromagnetic interference. If this is a concern, consider repositioning the dash cam or consulting with a professional installer. - Mounting Issues:
If the mount is not holding securely, ensure the windshield surface is clean and dry before applying the suction cup. For adhesive mounts, ensure proper pressure is applied during installation. - Poor Video Quality:
Ensure the camera lenses are clean. Check the resolution settings in the dash cam menu or app to confirm it's set to 1080P.
8. Specifications
| Feature | Specification |
|---|---|
| Screen Size | 1.5 inches |
| Color | Black |
| Batteries Included | Yes |
| Batteries Required | Yes |
| Brand Name | LAMTTO |
| Manufacturer | LAMTTO |
| Product Model Number | C310JP |
| Included Components | Car charger, User manual, Charging cable |
| Other Features | G-sensor, Loop recording, Built-in speaker, Internal memory, Night vision |
| Connectivity Technology | USB |
| Display Type | LCD |
| Mounting Type | Adhesive |
| Product Dimensions | 7 x 14 x 11 cm; 370 g |
| Item Weight | 0.37 Kilograms |
| Video Capture Resolution | 1080p |
9. Warranty and Support
Your LAMTTO C310J Dash Cam comes with an 18-month manufacturer's warranty. If you have any questions or require assistance with your product, please do not hesitate to contact us. We also offer a full refund within 1 month of purchase.
For support, please refer to the contact information provided with your purchase or visit the official LAMTTO store on Amazon.


