Introduction
This manual provides detailed instructions for the setup, operation, and maintenance of your Melnor 65140AMZ 4 Zone Digital Water Timer. This device is designed to automate watering for multiple areas in your garden, offering flexible scheduling and manual control options.

Image: The Melnor 65140AMZ 4 Zone Digital Water Timer, a dark gray unit with a large LCD screen and yellow control buttons, designed to connect to a standard outdoor faucet and manage up to four hoses.
Setup
1. Battery Installation
The timer requires 2 AA batteries (not included). To install, locate the battery compartment, insert the batteries according to the polarity indicators, and securely close the compartment.
2. Attaching to Faucet
Screw the timer onto your outdoor faucet. Ensure a tight connection to prevent leaks. The timer is designed to be easily installed without tools.

Image: The Melnor 4 Zone Digital Timer is shown installed on an outdoor faucet against a brick wall, with green hoses connected to its outlets, demonstrating a typical setup.
3. Connecting Hoses
Attach your garden hoses to the four outlets at the bottom of the timer. Each outlet corresponds to a watering zone. Ensure all connections are secure.

Image: A diagram illustrating the use of a product adapter and end connector for quick and easy hose attachment to the timer, labeled "Snap On! Snap Off!".
Operating Instructions
The Melnor 65140AMZ features a large, easy-to-read LCD screen and intuitive buttons for programming. Use the central arrow button to navigate between settings and the plus/minus buttons to adjust values.

Image: A detailed view of the Melnor 4 Zone Digital Timer highlighting its features: an easy-to-read large LCD screen, a filter washer for smooth operation, easy-touch schedule buttons, and angled valves for convenient hose attachment.
1. Setting the Clock
- Turn the dial to 'SET CLOCK'.
- Use the '+' and '-' buttons to set the current time.
- Press the central arrow button to confirm and move to the next setting.
2. Setting Start Water Times
- Turn the dial to 'START WATER'.
- Select the desired zone (1-4) using the 'ZONE' button.
- Use the '+' and '-' buttons to set the start time for watering. You can set up to 4 individual start times per day.
- Press the central arrow button to confirm.
3. Setting Watering Duration ('How Long')
- Turn the dial to 'HOW LONG'.
- Select the desired zone (1-4) using the 'ZONE' button.
- Use the '+' and '-' buttons to set the duration of watering (from 1 minute up to 6 hours).
- Press the central arrow button to confirm.
4. Setting Watering Frequency ('How Often')
- Turn the dial to 'HOW OFTEN'.
- Select the desired zone (1-4) using the 'ZONE' button.
- Use the '+' and '-' buttons to set the frequency (e.g., every hour, every day, every 2 days, up to once a week).
- Press the central arrow button to confirm.
5. Auto Mode
Once all settings are programmed, turn the dial to 'AUTO'. The timer will now operate according to your set schedule.
Video: An official Melnor Inc. video demonstrating the setup and programming of the Melnor 65140AMZ AquaTimer Digital, showing how to set the clock, start times, duration, and frequency for each zone.
6. Manual Watering Option
To manually water, turn the dial to 'MANUAL ON/OFF'. This allows you to use the faucet directly without affecting the programmed schedule.
7. Rain Delay
If rain is expected, you can pause the watering schedule for up to 7 days. Turn the dial to 'RAIN DELAY' and use the '+' and '-' buttons to set the delay duration. The timer will automatically resume the schedule after the delay period ends.
Video: An official Melnor Inc. video demonstrating the features and ease of use of the Melnor AquaTimer Digital Water Timer, including setting the clock, programming watering cycles, and utilizing the rain delay function.
Maintenance
1. Cleanable Filter Washer
The timer includes a cleanable filter washer at the inlet to prevent debris from entering and clogging the system. Periodically check and clean this filter to ensure optimal performance.
2. Battery Replacement
When the battery indicator on the LCD screen shows low power, replace the AA batteries promptly to ensure continuous operation and prevent unexpected valve behavior.
Troubleshooting
- No Water Flow / Valves Not Opening: Check battery level and replace if low. Ensure the faucet is fully open. Verify programming settings for start time, duration, and frequency.
- Continuous Water Flow / Valves Not Closing: This can often be caused by low batteries. Replace batteries with fresh ones. Check for debris in the valve mechanism or filter washer.
- Leakage at Faucet Connection: Ensure the timer is securely tightened to the faucet. Check the rubber washer inside the timer's inlet for proper seating and damage.
- Leakage at Hose Connections: Ensure hoses are securely tightened to the timer outlets. Check hose washers for proper seating and damage.
- Incorrect Watering Schedule: Re-verify all programming steps for clock setting, start times, durations, and frequencies for each zone. Ensure the dial is set to 'AUTO'.
Specifications
- Model: 65140AMZ
- Brand: Melnor
- Color: Black, Yellow
- Material: Plastic
- Product Dimensions: 2.48"D x 8.26"W x 5.62"H
- Item Weight: 8.5 ounces
- Number of Zones: 4
- Power Source: 2 x AA batteries (not included)
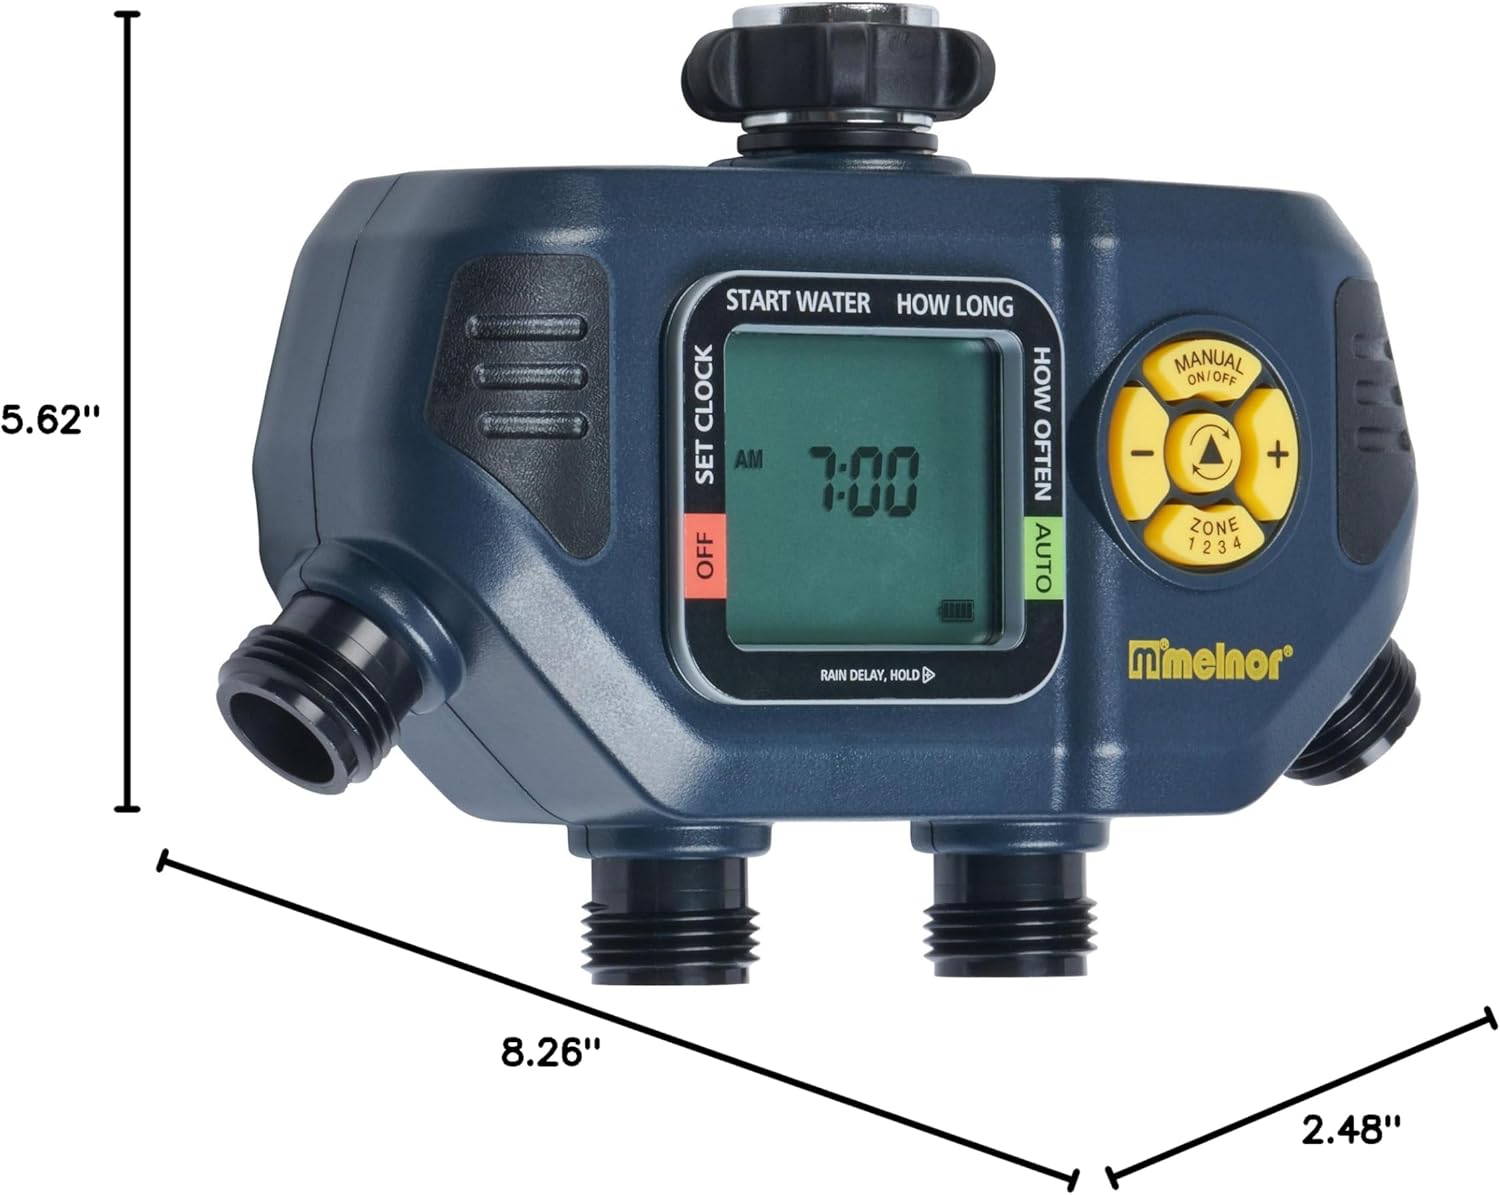
Image: The Melnor 4 Zone Digital Timer with its dimensions clearly labeled: 5.62 inches in height, 8.26 inches in width, and 2.48 inches in depth.
Warranty and Support
This Melnor product is backed by a 7-Year Limited Warranty. For replacements, troubleshooting assistance, or any questions/concerns, please contact Melnor Customer Care.

Image: A Melnor building with an American flag, accompanied by text highlighting the 7-year limited warranty and encouraging customers to contact Melnor Customer Care for replacements, troubleshooting, or questions.


