1. Introduction
Thank you for purchasing the Aiwa RD-40DAB/BK Portable Digital Radio. This manual provides essential information for the safe and efficient operation of your device. Please read it thoroughly before use and retain it for future reference.
The Aiwa RD-40DAB/BK is a versatile portable radio featuring DAB/DAB+ digital broadcasting and FM PLL reception. It includes a built-in speaker, headphone jack, dual alarm functions, and a rechargeable battery for extended listening.
2. Safety Information
- Do not expose the unit to rain, moisture, or extreme temperatures.
- Avoid placing the unit near heat sources or in direct sunlight.
- Clean the unit only with a soft, dry cloth. Do not use liquid cleaners or aerosols.
- Do not attempt to disassemble or modify the unit. Refer all servicing to qualified personnel.
- Dispose of batteries responsibly according to local regulations.
3. Package Contents
Verify that all items are present in the package:
- Aiwa RD-40DAB/BK Portable Digital Radio
- AC Charger
- USB Type-C Charging Cable
- Stereo Headphones
- Protective Carrying Bag
- User Manual (this document)
4. Product Overview
Front View

Figure 4.1: Front view of the Aiwa RD-40DAB/BK radio.
- Speaker Grille: Integrated 2-inch Crystal Sound speaker.
- Display: Backlit white dot matrix display (2 lines, alphanumeric).
- Navigation/OK Buttons: Up, Down, Left (-), Right (+), and OK for menu navigation and selection.
- M Button: Memory/Preset access.
- Zzz Button: Sleep timer function.
- i Button: Information display.
- SCAN Button: Initiates automatic station scanning.
- PRESET Button: Accesses preset stations.
- MENU Button: Enters the system menu.
Side View (Ports and Controls)

Figure 4.2: Side view showing power, headphone, reset, and USB-C ports.
- ON/OFF STANDBY Button: Powers the unit on or off, or puts it in standby mode.
- Headphone Jack (3.5mm): For connecting stereo headphones.
- RESET Pinhole: To reset the device to factory settings (use a thin object like a paperclip).
- DC 5V USB Type-C Port: For charging the internal battery.
Rear View
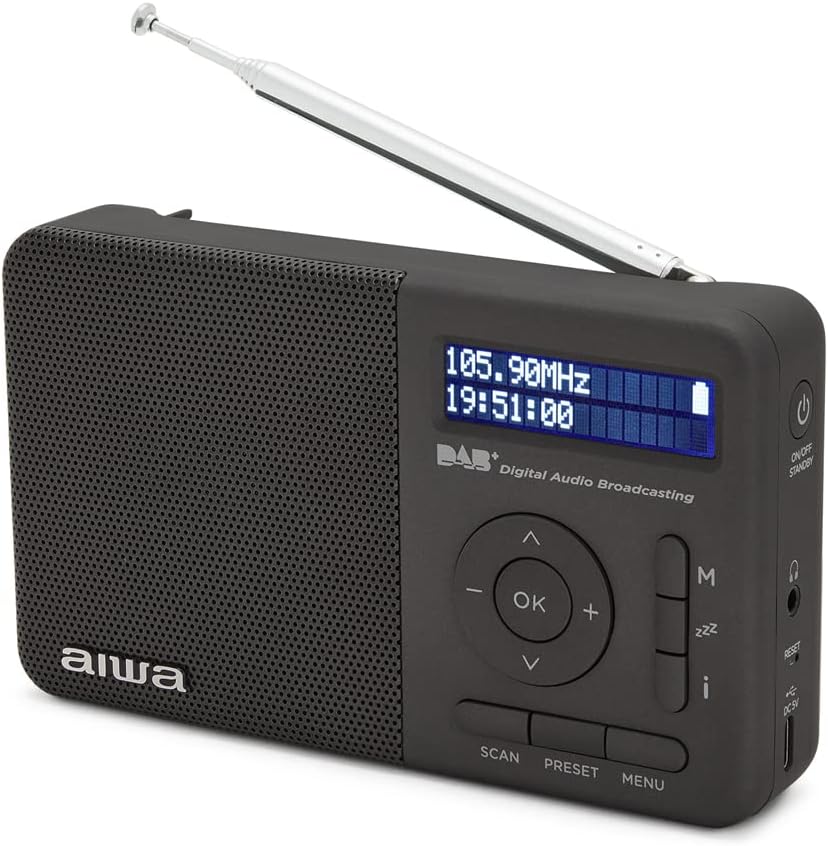
Figure 4.3: Rear view with telescopic antenna.
- Telescopic Antenna: Extend and swivel for optimal radio reception.
5. Setup
5.1 Charging the Battery
The radio is equipped with a rechargeable lithium battery. Before first use, fully charge the battery.
- Connect the supplied USB Type-C cable to the DC 5V port on the side of the radio.
- Connect the other end of the USB cable to the supplied AC charger.
- Plug the AC charger into a standard wall outlet.
- The display will indicate charging status. A full charge takes approximately 3 hours.
- Once fully charged, disconnect the charger. The radio provides up to 16 hours of playback on a full charge.

Figure 5.1: Included AC Charger.
5.2 Antenna Adjustment
For optimal radio reception, fully extend and adjust the telescopic antenna. Experiment with its position to find the best signal.
5.3 Initial Power On and Language Selection
- Press and hold the ON/OFF STANDBY button to power on the radio.
- Upon first use, the radio may prompt you to select a language. Use the Up/Down navigation buttons to scroll through the available languages (English, Spanish, Italian, German, Polish, Portuguese, French, Dutch).
- Press the OK button to confirm your selection.
6. Operating Instructions
6.1 Power On/Off
- To turn on: Press and hold the ON/OFF STANDBY button.
- To turn off/standby: Press and hold the ON/OFF STANDBY button again.
6.2 DAB/DAB+ Radio Operation

Figure 6.1: DAB+ Digital Audio Broadcasting.
- Switching to DAB mode: If not already in DAB mode, press the MENU button and navigate to 'Mode' or 'Source' to select DAB.
- Scanning for stations: Press the SCAN button to initiate an automatic scan for available DAB/DAB+ stations. The radio will store up to 50 stations.
- Selecting a station: Use the Up/Down navigation buttons to browse through the available stations. Press OK to select and listen.
- Saving presets: While listening to a station, press and hold the PRESET button. Use Up/Down to select a preset number (1-50), then press OK to save.
- Recalling presets: Press the PRESET button (short press) to cycle through saved stations or use Up/Down to select a preset, then OK.
- Information display: Press the i button to view station information (e.g., program name, signal strength).
6.3 FM Radio Operation

Figure 6.2: FM PLL Radio.
- Switching to FM mode: Press the MENU button and navigate to 'Mode' or 'Source' to select FM.
- Scanning for stations: Press the SCAN button to perform an automatic scan. The radio will store up to 50 FM stations.
- Manual tuning: Use the Left (-) and Right (+) buttons to fine-tune the frequency.
- Saving presets: While listening to an FM station, press and hold the PRESET button. Use Up/Down to select a preset number (1-50), then press OK to save.
- Recalling presets: Press the PRESET button (short press) to cycle through saved stations or use Up/Down to select a preset, then OK.
- RDS (Radio Data System): When available, RDS information (e.g., station name, program type) will be displayed automatically. Press the i button to cycle through available RDS data.
6.4 Volume Control
Use the Left (-) and Right (+) navigation buttons to adjust the volume level.
6.5 Headphone Use
Connect the supplied 3.5mm stereo headphones to the headphone jack on the side of the radio for private listening. The internal speaker will automatically mute when headphones are connected.
6.6 Alarm Clock Function
Figure 6.3: Dual Alarm Function.
The radio features a digital clock with dual alarm functions.
- Setting the clock: In standby mode or while playing, press the MENU button and navigate to 'Time/Date' or 'Clock Settings'. Use the navigation buttons to set the time and date, then press OK to confirm.
- Setting an alarm: Press the MENU button and navigate to 'Alarm 1 Setup' or 'Alarm 2 Setup'.
- Use the navigation buttons to set the alarm time, alarm source (Buzzer, DAB, or FM), and alarm volume.
- Select the alarm frequency (Daily, Weekdays, Weekends, Once).
- Ensure the alarm is set to 'On' and press OK to save.
6.7 Sleep Timer Function

Figure 6.4: Sleep Timer.
The sleep timer allows the radio to turn off automatically after a set period.
- Press the Zzz button repeatedly to cycle through available sleep times (e.g., 15, 30, 45, 60, 90 minutes, Off).
- The selected time will be displayed. The radio will automatically turn off after this duration.
6.8 Snooze Function
When an alarm sounds, press any button (except ON/OFF STANDBY) to activate the snooze function. The alarm will temporarily pause and sound again after a few minutes (default snooze time is usually 9 minutes, check menu for adjustment).
6.9 Menu Navigation

Figure 6.5: Menu System.
The radio features an 8-language menu system for advanced settings.
- Press the MENU button to enter the main menu.
- Use the Up/Down navigation buttons to scroll through menu options.
- Press OK to select a menu item or enter a sub-menu.
- Use the MENU button again to go back to the previous menu level or exit the menu.
7. Maintenance
7.1 Cleaning
Wipe the radio with a soft, dry, lint-free cloth. Do not use abrasive cleaners, waxes, or solvents.
7.2 Battery Care
To prolong battery life:
- Avoid fully discharging the battery frequently.
- Store the radio in a cool, dry place when not in use for extended periods.
- Recharge the battery at least once every three months if stored.
8. Troubleshooting
| Problem | Possible Cause | Solution |
|---|---|---|
| No power | Battery is depleted. | Charge the battery using the supplied AC adapter and USB-C cable. |
| Poor radio reception | Antenna not extended or positioned incorrectly. Weak signal area. | Fully extend and adjust the telescopic antenna. Try moving the radio to a different location. |
| No sound | Volume is too low. Headphones are connected. | Increase the volume. Disconnect headphones if you want to use the internal speaker. |
| Radio freezes or becomes unresponsive | Temporary software glitch. | Perform a soft reset by pressing the RESET pinhole with a thin object. |
9. Specifications
- Model: RD-40DAB/BK
- Radio Bands: DAB/DAB+, FM PLL with RDS
- Presets: 50 DAB+, 50 FM
- Display: Backlit White Dot Matrix (2 lines, alphanumeric)
- Speaker: Integrated 2-inch Crystal Sound
- Output Power: 2W RMS
- Antenna: 47cm Telescopic + Swivel
- Battery: Rechargeable Lithium (3.7V, 2000mAh)
- Playback Time: Up to 16 hours
- Charging Time: Approximately 3 hours
- Charging Port: USB Type-C (DC 5V)
- Headphone Jack: 3.5mm Stereo
- Alarm Functions: Dual Alarm, Sleep Timer, Snooze
- Menu Languages: English, Spanish, Italian, German, Polish, Portuguese, French, Dutch
- Dimensions (L x W x H): 14.5 cm x 3.3 cm x 8.5 cm
- Manufacturer: Aiwa
- Country of Origin: Germany
10. Warranty and Support
This Aiwa product is covered by a warranty. Please refer to the warranty card included in your package for specific terms and conditions. Spare parts availability is guaranteed for 2 years from the date of purchase.
For technical support or service inquiries, please contact your local Aiwa distributor or refer to the contact information provided on the official Aiwa website.


