1. Introduction
This user manual provides essential information for the safe and effective operation of the Bosch GIS 500 Thermo Detector. This infrared detector is designed for non-contact temperature measurement, offering precise readings within a wide range. Please read this manual thoroughly before first use and keep it for future reference.
2. Safety Information
Always observe the following safety precautions to prevent injury and damage to the device:
- Do not point the laser beam directly at people or animals.
- Avoid direct eye exposure to the laser beam.
- Do not use the device in explosive atmospheres, such as in the presence of flammable liquids, gases, or dust.
- Keep the device away from strong electromagnetic fields.
- Use only the specified battery type (1 x 1.5 V LR6 battery AA).
- Do not attempt to modify or repair the device yourself. Refer all servicing to qualified personnel.
- Clean the device only with a dry, soft cloth. Do not use solvents or abrasive cleaners.
The Bosch GIS 500 utilizes Laser Technology. Observe all warnings related to laser use.
3. Product Overview
The Bosch GIS 500 Thermo Detector is a compact and ergonomic infrared thermometer designed for various applications. It provides immediate temperature readings with a simple press of a button.

Figure 3.1: Front view of the Bosch GIS 500 Thermo Detector, showing the display and trigger.
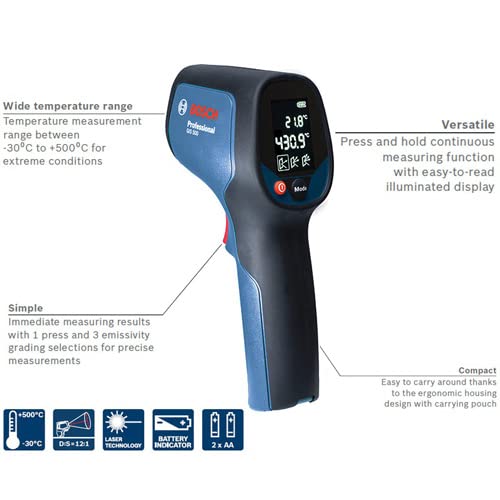
Figure 3.2: Bosch GIS 500 with key features highlighted, including wide temperature range, simple operation, compact design, and versatility.

Figure 3.3: Icons illustrating key functions: 2xAA battery, battery indicator, -30°C to +500°C range, D:S=12:1 distance-to-spot ratio, laser technology, and laser warning.
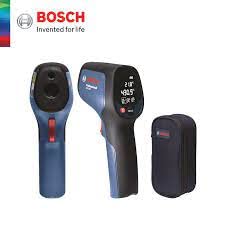
Figure 3.4: The Bosch GIS 500 Thermo Detector shown alongside its included carrying pouch.
Key Features:
- Simple Operation: Immediate measurement results with a single press.
- Emissivity Grades: Selection of 3 emissivity grades for more accurate measurements.
- Wide Temperature Range: Measures temperatures between -30°C and +500°C.
- Compact Design: Ergonomic housing for easy transport, includes a carrying case.
- Accurate Measurement: Designed for precise and easy recording of temperature.
- Versatile Applications: Suitable for electrical applications, HVAC, window installation, and automotive diagnostics.
4. Setup
4.1 Unpacking and Initial Inspection
Carefully remove the Bosch GIS 500 Thermo Detector and its accessories from the packaging. Verify that all components listed in the "Scope of Delivery" are present and undamaged:
- Bosch GIS 500 Thermo Detector
- Carrying Pouch
- 1 x 1.5 V LR6 battery (AA)
- User Manual (this document)
4.2 Battery Installation
The Bosch GIS 500 is powered by one 1.5 V LR6 (AA) battery. To install the battery:
- Locate the battery compartment cover, typically on the handle of the device.
- Open the battery compartment cover.
- Insert one 1.5 V LR6 (AA) battery, ensuring correct polarity (+/-) as indicated inside the compartment.
- Close the battery compartment cover securely.
The device features a battery indicator on its display to show the current battery level.
5. Operating Instructions
5.1 Powering On/Off
To power on the device, press the measurement trigger. The display will illuminate. The device will automatically power off after a period of inactivity to conserve battery life.
5.2 Taking a Measurement
The Bosch GIS 500 provides immediate, non-contact temperature measurements:
- Point the front of the detector towards the surface you wish to measure. Ensure the laser pointer (if activated) is aimed at the desired spot.
- Press and hold the measurement trigger. The device will continuously measure the temperature of the target area.
- The temperature reading will be displayed on the easy-to-read illuminated display.
- Release the trigger to hold the last measured value on the display.
5.3 Emissivity Adjustment
The Bosch GIS 500 allows for the selection of 3 emissivity grades to ensure more accurate measurements for different surface types. Refer to the device's on-screen menu or dedicated button (if available) to cycle through the emissivity settings. Consult a reference table for typical emissivity values of common materials if precise measurements are critical.
5.4 Measurement Range and Distance
The device measures temperatures between -30°C and +500°C. The optimal distance-to-spot ratio (D:S) for this device is 12:1, meaning that at a distance of 12 units, the measurement spot diameter is 1 unit. For example, at 12 inches distance, the spot measured is 1 inch in diameter. Maintain an appropriate distance to ensure accurate readings of the target area.
6. Maintenance
6.1 Cleaning
To maintain the accuracy and longevity of your Bosch GIS 500, keep it clean:
- Wipe the device housing with a soft, damp cloth. Do not use abrasive cleaners or solvents.
- For the lens, use a soft, lint-free cloth or a lens cleaning wipe. Avoid touching the lens directly with your fingers.
6.2 Storage
When not in use, store the device in its carrying pouch in a cool, dry place, away from direct sunlight and extreme temperatures. If storing for extended periods, remove the battery to prevent leakage.
7. Troubleshooting
This section addresses common issues you might encounter with your Bosch GIS 500 Thermo Detector.
| Problem | Possible Cause | Solution |
|---|---|---|
| Device does not power on. | Battery is dead or incorrectly installed. | Replace the battery or check its polarity. |
| Inaccurate temperature readings. | Incorrect emissivity setting; lens is dirty; target is too far or too small. | Adjust emissivity setting; clean the lens; move closer to the target or ensure it fills the measurement spot. |
| Display is dim or flickering. | Low battery. | Replace the battery. |
| Device only displays Celsius. | The device model may not support Fahrenheit display. | This model (Bosch GIS 500) is noted to primarily display in Celsius and may not have a Fahrenheit conversion option. Please refer to product specifications at purchase. |
If the problem persists after attempting these solutions, please contact customer support.
8. Specifications
| Attribute | Detail |
|---|---|
| Model Number | fe439f2e-30b4-4bdd-85ba-076feed9ea82 |
| Brand | AI |
| Manufacturer | Bosch |
| Temperature Range | -30°C to +500°C (5E+2 Degrees Celsius) |
| Power Source | Battery Powered (1 x 1.5 V LR6 AA) |
| Color | Blue |
| Package Dimensions | 10.47 x 6.42 x 3.46 inches |
| Item Weight | 1.18 Pounds |
| First Available Date | April 26, 2022 |
9. Warranty and Support
Please note that this product is a parallel import. While it is authentic and functionally equivalent to officially distributed items, it may not be eligible for manufacturer warranty service in the United States. It may also differ in model number, included accessories, packaging design, user manuals, and warranty coverage compared to products sold in the United States. Please review the product details carefully before purchasing.
For support regarding this product, please refer to the seller or the point of purchase. Keep your proof of purchase for any inquiries.
For general information about Bosch products, you may visit the official Bosch website, however, specific warranty claims for this parallel import model should be directed to your retailer.