Introduction
The ASUS Prime H610M-A WIFI D4 is a Mic-ATX motherboard designed to support 12th Generation Intel Processors with the LGA 1700 socket. It features DDR4 memory support, PCIe 4.0, dual M.2 slots, Intel 1Gb Ethernet, WIFI 5, and a variety of display outputs including DisplayPort, HDMI, and D-Sub. This manual provides essential information for setting up, operating, and maintaining your motherboard.

Figure 1: ASUS Prime H610M-A WIFI D4 Motherboard, retail packaging, and included Wi-Fi antenna.
Key Features:
- Intel LGA 1700 Socket: Ready for 12th Gen Intel Processors.
- Comprehensive Cooling: VRM heatsink, PCH heatsink and Fan Xpert 2+.
- Ultra-Fast Connectivity: 32Gbps M.2 slot, Intel 1Gb Ethernet, WIFI 5 and USB 3.2 Gen 2 ports.
- Aura Sync RGB: Onboard addressable Gen 2 headers for RGB LED strips, easily synchronized with Aura Sync compatible hardware.
Setup Guide
This section provides step-by-step instructions for installing your ASUS Prime H610M-A WIFI D4 motherboard and its components into a PC chassis.
1. Motherboard Overview
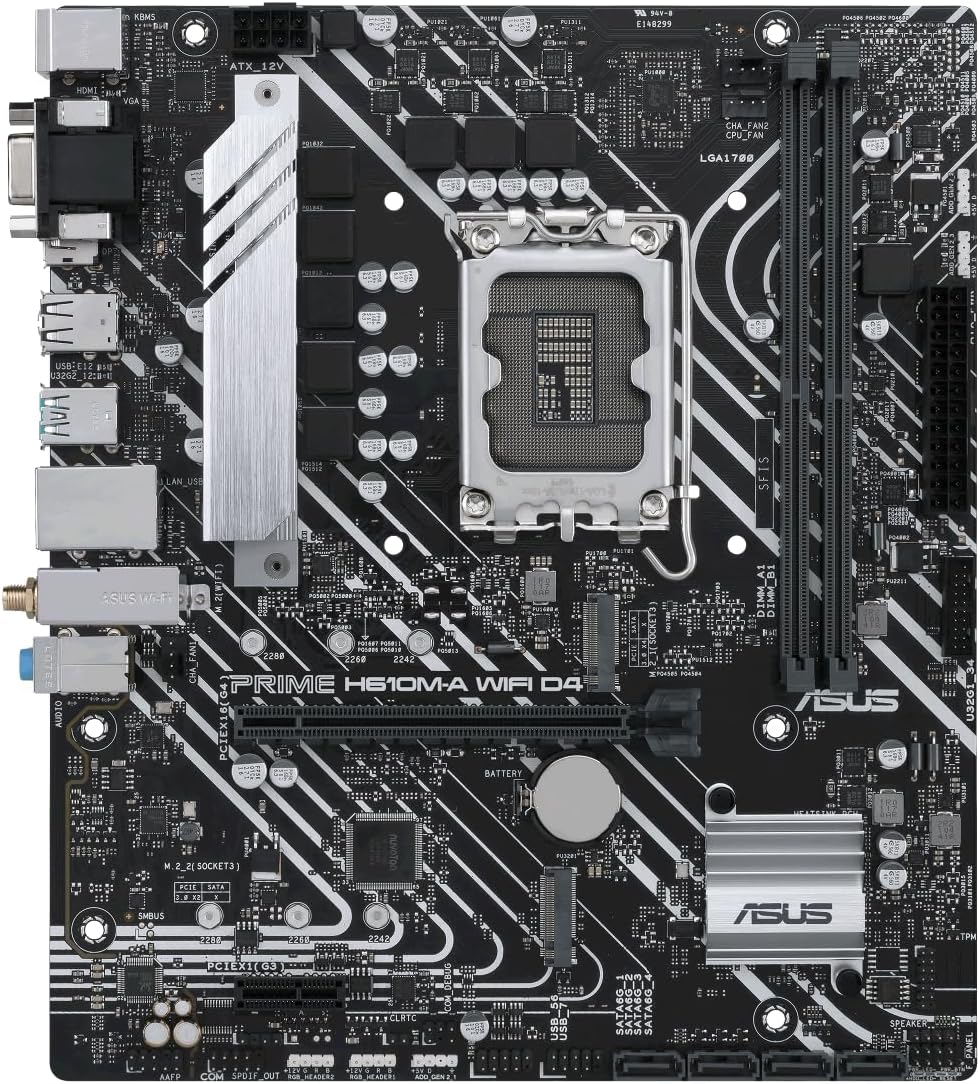
Figure 2: Component layout of the ASUS Prime H610M-A WIFI D4 Motherboard.
Familiarize yourself with the layout of the motherboard, including the CPU socket, DDR4 memory slots, M.2 slots, PCIe slots, and various headers for power and peripherals.
2. CPU Installation (LGA 1700)
- Carefully open the CPU socket retention lever.
- Align the triangular mark on the CPU with the mark on the socket.
- Gently place the CPU into the socket without forcing it.
- Close the retention lever to secure the CPU.
- Apply thermal paste and install the CPU cooler according to its manufacturer's instructions.
3. Memory (RAM) Installation
- Open the clips on both ends of the DDR4 memory slots.
- Align the notch on the memory module with the key in the slot.
- Press down firmly on both ends of the memory module until the clips snap into place.
4. M.2 SSD Installation
- Locate the M.2 slot(s) on the motherboard.
- Insert the M.2 SSD into the slot at an angle.
- Gently push down the SSD and secure it with the provided M.2 screw.
5. PCIe Card Installation
- Align your graphics card or other PCIe expansion card with the appropriate PCIe slot.
- Press down firmly until the card is seated securely in the slot and the retention clip engages.
- Secure the card to the chassis with a screw.
6. Power Connections
- Connect the 24-pin ATX power cable from your power supply to the main power connector on the motherboard.
- Connect the 8-pin (or 4+4 pin) CPU power cable to the CPU power connector near the CPU socket.
7. Rear I/O Panel Connections

Figure 3: Rear I/O Panel of the ASUS Prime H610M-A WIFI D4 Motherboard.
Connect your peripherals to the appropriate ports on the rear I/O panel:
- USB Ports: For keyboard, mouse, and other USB devices.
- Display Outputs: Connect your monitor to DisplayPort, HDMI, or D-Sub.
- Ethernet Port: Connect your network cable for wired internet.
- Audio Jacks: For speakers, headphones, and microphones.
- Wi-Fi Antenna Connectors: Attach the included Wi-Fi antenna for wireless connectivity.
Operating Instructions
Once all components are installed and connected, you can proceed with the initial boot-up and software setup.
1. Initial Boot and BIOS/UEFI Setup
- Power on your system.
- Press the DEL key or F2 key during startup to enter the BIOS/UEFI setup utility.
- Configure boot order, system time, and other essential settings as needed.
- Save changes and exit the BIOS/UEFI.
2. Operating System Installation
Insert your Windows 10/11 installation media (USB drive or DVD) and follow the on-screen prompts to install your operating system.
3. Driver Installation
After OS installation, install the necessary drivers for your motherboard components. These can typically be found on the ASUS support website for your specific model:
- Chipset Drivers
- Intel Graphics Drivers (if using integrated graphics)
- Intel LAN Driver
- Wi-Fi Driver
- Audio Drivers
- USB Drivers
4. Network Connectivity
- Wired: Connect an Ethernet cable to the Intel 1Gb Ethernet port.
- Wireless: Ensure the Wi-Fi antenna is connected. Configure Wi-Fi settings within your operating system.
5. Aura Sync RGB Configuration
If you have Aura Sync compatible RGB LED strips connected to the onboard addressable Gen 2 headers, you can control their lighting effects using the ASUS Aura Sync software, available for download from the ASUS website.
Maintenance
Proper maintenance ensures the longevity and optimal performance of your motherboard.
- Dust Removal: Regularly clean dust from the motherboard and components using compressed air. Ensure the system is powered off and unplugged before cleaning.
- BIOS Updates: Check the ASUS support website periodically for BIOS updates. BIOS updates can improve stability, compatibility, and performance. Follow the instructions provided by ASUS carefully when updating the BIOS.
- Driver Updates: Keep your drivers updated to ensure compatibility and optimal performance with new software and hardware.
- Connection Checks: Periodically check all cable connections (power, data, peripherals) to ensure they are secure.
Troubleshooting
This section addresses common issues you might encounter.
- No Power/No Boot:
- Ensure all power cables (24-pin ATX, 8-pin CPU) are securely connected to the motherboard and power supply.
- Verify the power supply is switched on.
- Check front panel power button connections to the motherboard.
- No Display:
- Ensure your monitor is connected to the correct display output on the motherboard or graphics card.
- Verify the graphics card (if installed) is properly seated in its PCIe slot and has adequate power.
- Try reseating RAM modules.
- System Instability/Crashes:
- Check CPU and GPU temperatures. Ensure cooling solutions are functioning correctly.
- Verify RAM modules are correctly installed and compatible.
- Update BIOS and drivers to the latest versions.
- Network Connectivity Issues:
- For wired connections, check the Ethernet cable and router/modem.
- For Wi-Fi, ensure the antenna is securely attached and Wi-Fi drivers are installed.
- Restart your router/modem.
- BIOS Reset:
If you encounter issues after changing BIOS settings, you can reset the BIOS to default settings. This can typically be done by:
- Entering the BIOS and selecting the "Load Optimized Defaults" option.
- Clearing the CMOS by briefly removing the CMOS battery (with the system powered off and unplugged) or using the CLRTC jumper on the motherboard (refer to your motherboard diagram for location).
For more detailed troubleshooting or persistent issues, please refer to the comprehensive user manual available on the official ASUS support website or contact ASUS customer support.
Specifications
| Feature | Detail |
|---|---|
| Brand | ASUS |
| Model Name | PRIME H610M-A WIFI D4 |
| CPU Socket | LGA 1700 |
| Compatible Processors | 12th Gen Intel Processors |
| Chipset Type | Intel H610 |
| RAM Memory Technology | DDR4 |
| Memory Clock Speed | 2133 MHz (Supports higher via XMP) |
| Memory Storage Capacity (Max) | 64 GB |
| Product Dimensions | 10.24 x 2.03 x 10.63 inches |
| Item Weight | 2.2 pounds |
| Platform | Windows 10 (Windows 11 Ready) |
| Connectivity | Intel 1Gb Ethernet, WIFI 5, USB 3.2 Gen 2 |
| Storage | Dual M.2 Slots (32Gbps), SATA 6Gbps |
| Graphics Output | DisplayPort, HDMI, D-Sub |
Warranty and Support
ASUS provides comprehensive support for its products. For warranty information, technical assistance, or to download the latest drivers and BIOS updates, please visit the official ASUS support website.
ASUS Support Website: www.asus.com/support/
Please have your product model number (PRIME H610M-A WIFI D4) and serial number ready when contacting support.