Introduction
The NUX NGS-6 Amp Academy is a versatile stomp-box amp modeler designed to deliver the authentic sound and feel of tube amplifiers in a compact pedal format. Utilizing NUX's advanced TSAC-2K (White-box Amp Modeling) algorithm, it offers exceptional headroom and dynamic range, making it highly pedal-friendly. This manual provides detailed instructions for setting up, operating, and maintaining your Amp Academy pedal to achieve optimal performance in various scenarios, from live stages to studio recording and silent practice.
Key Features
- Advanced TSAC-2K Amp Modeling for realistic tube amp feel.
- 6 Legendary Amp Models: Vintage, Classic, Modern, Brown, Red, and Iridium.
- 1024 Samples IR Resolution with 3rd-party IR loader capacity.
- Includes 12 Choptones custom IRs and 16 user slots.
- 32-bit/48kHz WAV format conversion for IRs via editor software.
- Versatile Connectivity: 1/4" Input/Output, XLR DI Out, 1/8" Phone Out, USB-C.
- Integrated Send/Return Effect Loop for external pedals.
- A/B Amp Footswitch and Scene Footswitch for flexible control.
- Intuitive Editor Software for detailed tweaking of IRs (Level, Low Cut, High Cut).
Controls and Connections

Figure 1: Top view of the Amp Academy pedal.

Figure 2: Rear view of the Amp Academy pedal's connections.
Top Panel Controls
- GAIN: Adjusts the input gain of the selected amplifier model.
- MASTER: Controls the overall output volume of the amplifier model.
- BASS, MIDDLE, TREBLE: Three-band equalizer controls for tone shaping.
- PRESENCE: Adjusts the high-frequency response, adding clarity or bite.
- BOOST: Controls the level of the built-in boost effect.
- SCENE: Selects between different scene presets (S1, S2, S3).
- DECAY / RVB / LEVEL (Alt): These knobs control reverb parameters when the Alt function is active.
- N.R. (Noise Reduction): Adjusts the threshold for the noise reduction feature.
Footswitches
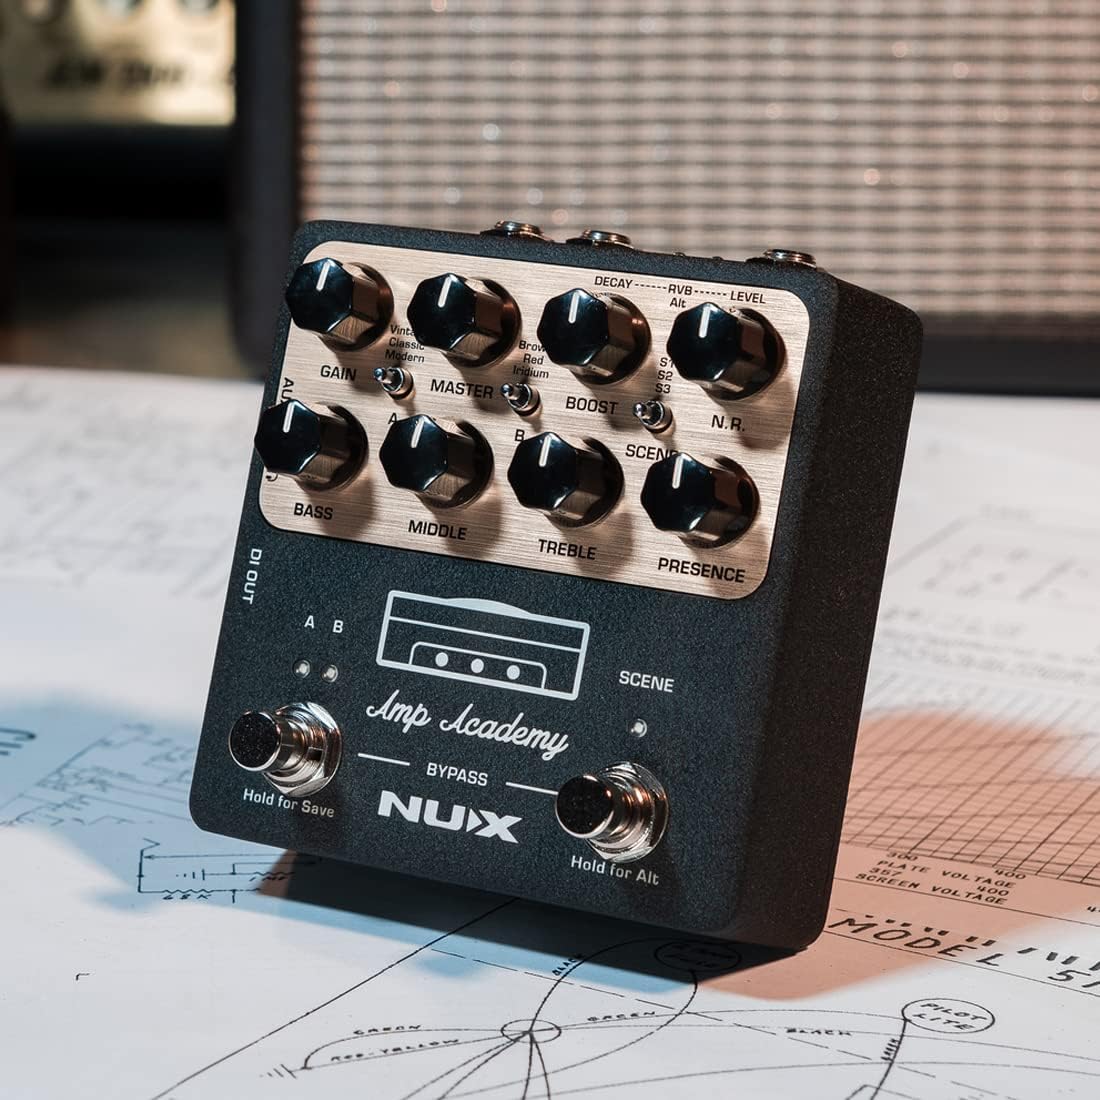
Figure 3: Close-up of footswitches.
- A/B Footswitch: Toggles between two different amp channels (A and B). Hold to save settings.
- SCENE Footswitch: Cycles through scene presets (S1, S2, S3). Hold for Alt function.
- BYPASS: Engages or disengages the pedal's effects.
Input/Output Jacks

Figure 4: Side view of connections.

Figure 5: Close-up of side jacks.
- INPUT (1/4" TS): Connect your guitar or other instrument here.
- DI OUT (XLR): Balanced output for connecting directly to a mixer or PA system.
- OUT (1/4" TS): Main unbalanced output.
- INSERT (1/4" TRS): Send/Return loop for integrating external effects pedals. Use the included Y-cable.
- USB-C: For connecting to a computer for editor software, firmware updates, and USB audio streaming.
- DC 9V: Power input for the pedal (9V DC, center negative).
- AUX IN (1/8" TRS): Connect external audio sources for practice.
- PHONE OUT (1/8" TRS): Headphone output for silent practice.
Setup
Live Performance Setup
For live performance, connect the Amp Academy to a mixer or PA system using the XLR DI OUT for a balanced signal. You can also use the 1/4" OUT to connect to a powered FRFR (Full Range, Flat Response) speaker for a personal on-stage monitor. Integrate time-based effects (like modulation or delay) into the INSERT loop using the provided Y-cable.

Figure 6: Live Performance Setup Diagram.
Recording Setup
Connect the Amp Academy directly to a recording interface via USB-C or XLR DI OUT for instant, high-quality guitar tone without needing an amplifier or microphones. The USB-C connection allows for direct audio streaming to your computer. Ensure IR OUT switches are in the UP position if you wish to use the IR signal for 1/4" out. For DI OUT, hold A/B footswitch and power the pedal to toggle IR signal (A/B indicators flash 3 times for IR ON, no flash for IR OFF).

Figure 7: Recording Setup Diagram.
Silent Practice Setup
For immersive silent practice, connect headphones or monitors directly to the 1/8" PHONE OUT. You can also connect an external audio source to the AUX IN for backing tracks.

Figure 8: Silent Practice Setup Diagram.
Effects Loop Setup
The Amp Academy features a send/return effects loop for integrating external time-based effects. Use the included TRS Y-cable to connect your external pedal(s) to the INSERT jack. The tip of the TRS connector is typically Send, and the ring is Return.
Video 1: NUX NGS-6 Amp Academy Amp Modeler Overview. This video provides a comprehensive look at the pedal's features, sound, and connectivity options, including the effects loop.
Operating Instructions
Basic Operation
- Power On/Off: Connect the 9V DC power supply to power on. Disconnect to power off.
- Selecting Amp Models: Use the rotary switch to select between the 6 legendary amp models.
- Adjusting Tone: Use the GAIN, MASTER, BASS, MIDDLE, TREBLE, and PRESENCE knobs to dial in your desired tone.
- Using Boost: Adjust the BOOST knob to add a clean boost to your signal.
- Scene Selection: Press the SCENE footswitch to cycle through S1, S2, and S3 presets.
- Saving Presets: Hold the A/B footswitch to save your current settings to the selected channel.
Using the Editor Software
The NUX Amp Academy editor software (available for PC/Mac/iOS/Android) provides in-depth control over all pedal parameters, including IR loading, EQ settings, and effect chain customization. Connect your pedal to your computer via the USB-C port to access the editor.

Figure 9: Amp Academy Editor Software - Signal Chain.
- IR Loading: Load your favorite 3rd-party IRs into the pedal's user slots. The editor automatically converts WAV format files.
- EQ Control: Fine-tune the EQ settings with visual feedback.
- Bias Tweaking: Adjust amplifier bias for nuanced tone shaping.
- Routing Modes: Configure various USB audio routing modes (Normal, Loopback, Reamp, Dry Out).

Figure 10: Amp Academy Editor Software - Routing Modes.
Maintenance
- Keep the pedal clean and free from dust. Use a soft, dry cloth.
- Avoid exposing the pedal to extreme temperatures, humidity, or direct sunlight.
- Do not attempt to disassemble or repair the unit yourself. Refer to qualified service personnel.
- Always use the specified 9V DC, center-negative power supply.
Troubleshooting
| Problem | Possible Cause | Solution |
|---|---|---|
| No sound output. | Incorrect connections, no power, pedal in bypass mode. | Check all cable connections. Ensure power supply is connected. Press BYPASS footswitch to engage effects. |
| Distorted or noisy sound. | GAIN too high, faulty cable, power supply issues. | Reduce GAIN. Try different cables. Ensure stable 9V DC power supply. Adjust N.R. knob. |
| Editor software not connecting. | USB cable issue, driver not installed, software version. | Try a different USB-C cable. Ensure correct drivers are installed (check NUX website). Update editor software and pedal firmware. |
| IRs not loading/sounding correctly. | Incorrect file format, IR settings. | Ensure IRs are 32-bit/48kHz WAV format (editor can convert). Check Level, Low Cut, High Cut settings in editor. |
Specifications
| Feature | Specification |
|---|---|
| Model | NGS-6 |
| Dimensions (L x W x H) | 3.8 x 3.3 x 5.2 inches |
| Weight | 1.65 pounds (748 Grams) |
| Power Requirements | 9V DC, Center Negative |
| IR Resolution | 1024 Samples |
| IR Slots | 6 (with Amp slots), 12 Choptones custom IRs, 16 user slots |
| Sampling Rate | 48kHz |
| Bit Depth | 32-bit |
| Hardware Interface | USB-C |
Warranty and Support
NUX products are designed for reliability and performance. For warranty information, please refer to the warranty card included with your product or visit the official NUX website. For technical support, firmware updates, and editor software downloads, please visit the NUX support page or contact their customer service directly. Keep your purchase receipt for warranty claims.


