
ZTBH Usb Microscope C
ZTBH USB Digital Microscope (Model Usb Microscope C) Instruction Manual
Model: Usb Microscope C
Introduction
This manual provides detailed instructions for the setup, operation, and maintenance of your ZTBH USB Digital Microscope, Model Usb Microscope C. This device is designed for observing small objects with high magnification and capturing images or videos directly on your computer.
Package Contents
Please check the package carefully to ensure all items are present:
- 1x ZTBH USB Digital Microscope
- 1x Microscope Stand (optional, depending on package variant)
- 5x Microscope Accessories (e.g., calibration ruler, protective caps)
- 1x USB Cable
- 1x User Manual (this document)
Note: The actual color of the item may vary slightly from images due to monitor brightness and lighting conditions. Manual measurement data may have slight deviations.
Specifications
| Image Sensor | 2.0 Million Pixels |
| Magnification | 1-500X (Continuous Zoom) |
| Lens Diameter | 12 mm |
| Illumination | 8 Adjustable LED Lights |
| Frame Rate | 30 frames per second (maximum) |
| Material | Aluminum Alloy (Microscope), Metal (Stand) |
| Weight | Approx. 1 kg (Total Package) |
| Dimensions (Stand Base) | 150mm x 80mm |
| Stand Height | Up to 100mm (Adjustable) |
| Supported Operating Systems | Windows XP/7/8 (Software: AMCAP) Windows 10 (Software: View PlayCap) Mac OS (Software: WebCam Monitor) |

Figure 1: Key Specifications and System Compatibility.
Setup
- Assemble the Stand (if applicable): If your package includes a stand, assemble it according to the diagrams. The stand typically consists of a base, a vertical support rod, and an adjustable holder for the microscope.
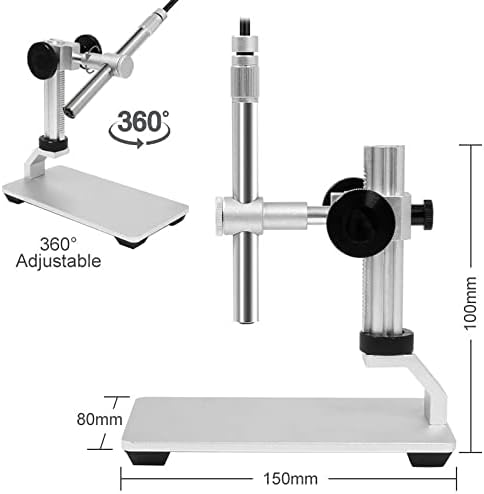
Figure 2: Microscope Stand Assembly and Dimensions.
- Mount the Microscope: Insert the microscope into the adjustable holder on the stand. Secure it firmly using the tightening knob.

Figure 3: Microscope Mounted on Stand with Accessories.
- Connect to Computer: Plug the USB cable from the microscope into an available USB port on your computer.
- Install Software:
- For Windows XP/7/8: Install the AMCAP software.
- For Windows 10: Install the View PlayCap software.
- For Mac OS: Install the WebCam Monitor software.
Note: The required software is typically provided on a mini-CD included with the microscope, or can be downloaded from the manufacturer's website. Follow the on-screen instructions for installation.
- Launch Software: After installation, open the appropriate software. The microscope should be detected automatically.
Operating Instructions
- Place Specimen: Position the object you wish to observe directly under the microscope lens.
- Adjust Height and Focus: Use the stand's adjustment knobs to bring the microscope closer or further from the specimen. Then, rotate the focus wheel on the microscope body to achieve a clear image on your computer screen.
- Adjust Magnification: The microscope offers 1-500X continuous zoom. Adjust the distance between the lens and the object, and fine-tune with the focus wheel to change magnification.

Figure 4: Magnification Effect Examples (1X to 500X).
- Adjust LED Illumination: The microscope features 8 adjustable LED lights around the lens. Use the brightness adjustment wheel on the USB cable to control the intensity of the illumination.

Figure 5: LED Illumination Adjustment.
- View and Capture: Observe the live feed on your computer screen. Use the software's functions to capture still images or record video footage of your observations.

Figure 6: Microscope in Use, Displaying Various Specimens.
Maintenance
- Cleaning the Lens: Use a soft, lint-free cloth specifically designed for optical lenses to gently wipe the microscope lens. Avoid using abrasive materials or harsh chemicals.
- Cleaning the Body: Wipe the microscope body and stand with a dry or slightly damp soft cloth. Do not use solvents.
- Storage: When not in use, store the microscope in a clean, dry, and dust-free environment. Use the protective caps for the lens if provided.
- Avoid Moisture: Keep the device away from water and high humidity to prevent damage to electronic components.
Troubleshooting
| Problem | Possible Cause | Solution |
|---|---|---|
| No image on screen. |
|
|
| Image is blurry. |
|
|
| LED lights are not working or too dim/bright. |
|
|
Warranty and Support
For warranty information and technical support, please refer to the documentation provided with your purchase or contact the retailer/manufacturer directly. Keep your purchase receipt as proof of purchase.
Ask a question about this manual
Ask about setup, troubleshooting, compatibility, parts, safety, or missing instructions. Manuals+ will review the question and use this page’s manual context to help answer it.