
1. Introduction
This manual provides comprehensive instructions for the installation, operation, and maintenance of your Dieffematic TM2 SKIPPER 433 MHz 1-Channel Remote Control. Please read this manual carefully before using the device to ensure proper function and safety.
The Dieffematic TM2 SKIPPER remote control is designed for convenient operation of motorized roller shutters and blinds. Its ergonomic design and simple programming make it an ideal solution for automating your home or office window coverings.
2. Product Features
- 1-Channel Transmitter: Controls a single motorized device or a group of devices programmed to the same channel.
- Operating Frequency: 433.92 MHz.
- Decoding System: Rolling code for enhanced security.
- Outdoor Range: Approximately 100-150 meters (depending on environmental conditions).
- Power Supply: Requires 2 x LR03 (AAA) batteries.
- Operating Temperature: -5°C to 50°C.
- Compact Design: Dimensions of 140 x 45 x 25 mm and a weight of 100g.
3. Package Contents
Please check the package for the following items:
- 1 x Dieffematic TM2 SKIPPER 433 MHz 1-Channel Remote Control (Model 145421)
- 1 x User Manual (this document)
- Note: Batteries (2 x LR03 AAA) may or may not be included depending on the retailer.
4. Setup
4.1. Battery Installation
- Locate the battery compartment cover on the back of the remote control.
- Slide or gently pry open the cover.
- Insert two LR03 (AAA) batteries, ensuring the correct polarity (+ and -) as indicated inside the compartment.
- Replace the battery compartment cover until it clicks securely into place.
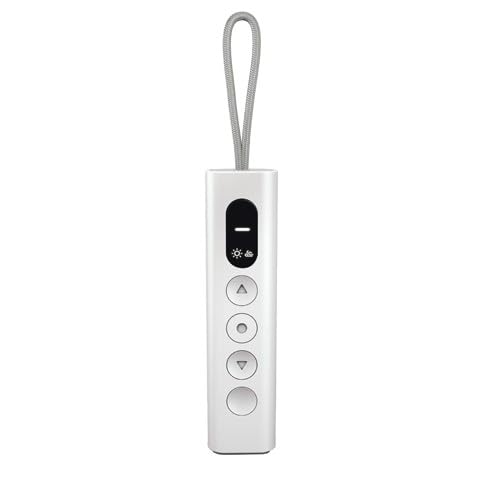
Image 1: Front view of the Dieffematic TM2 SKIPPER remote control. This image illustrates the compact design and button layout, which typically includes buttons for Up, Stop, and Down functions for roller shutters or blinds.
4.2. Programming / Pairing with Motorized Device
The programming procedure may vary slightly depending on the specific motorized roller shutter or blind system you are using. Always refer to the instruction manual of your motorized device for detailed pairing instructions. Below is a general guide:
- Prepare the Motorized Device: Put your motorized roller shutter or blind into programming mode. This usually involves pressing a small button on the motor unit or control panel for a few seconds. The motor may respond with a jog (brief movement) or an indicator light.
- Activate the Remote: Within a short timeframe (often 5-10 seconds) after the motor enters programming mode, press and hold the designated programming button on your Dieffematic TM2 SKIPPER remote control. This button is typically a small, recessed button, or it might be a combination of main buttons.
- Confirmation: The motorized device should respond with another jog or a change in its indicator light, confirming that the remote control has been successfully paired.
- Test Operation: Once paired, test the remote control by pressing the UP, STOP, and DOWN buttons to ensure the roller shutter or blind responds correctly.
If you are replacing an old remote, you might need to first delete the old remote's code from the motor's memory before programming the new one. Consult your motor's manual for this procedure.
5. Operating Instructions
Once the remote control is paired with your motorized device, operation is straightforward:
- UP Button: Press to raise the roller shutter or blind.
- DOWN Button: Press to lower the roller shutter or blind.
- STOP Button: Press to stop the roller shutter or blind at its current position.
Ensure you are within the effective operating range (100-150 meters outdoors) and that there are no significant obstructions between the remote and the receiver.
6. Maintenance
6.1. Battery Replacement
If the remote control's range decreases significantly or the indicator light (if present) does not illuminate, it may be time to replace the batteries.
- Follow the steps in Section 4.1 "Battery Installation" to open the battery compartment.
- Remove the old LR03 (AAA) batteries.
- Insert new LR03 (AAA) batteries, observing correct polarity.
- Close the battery compartment.
- Dispose of old batteries responsibly according to local regulations.
6.2. Cleaning
To clean the remote control, use a soft, dry cloth. Do not use abrasive cleaners, solvents, or immerse the device in water. Keep the remote control away from excessive dust and moisture.
7. Troubleshooting
| Problem | Possible Cause | Solution |
|---|---|---|
| Remote not responding. | Dead or incorrectly installed batteries. | Check battery polarity; replace batteries (Section 6.1). |
| Remote not responding. | Remote not paired with the motor. | Re-program the remote control (Section 4.2). |
| Reduced operating range. | Low batteries. | Replace batteries (Section 6.1). |
| Reduced operating range. | Interference or obstructions. | Ensure clear line of sight; move closer to the receiver. |
| Motor responds erratically. | Interference from other 433 MHz devices. | Try operating from a different position; check for other transmitting devices nearby. |
8. Specifications
| Model Number | 145421 |
| Brand | Dieffematic |
| Channels | 1 |
| Frequency | 433.92 MHz |
| Decoding System | Rolling Code |
| Outdoor Range | 100-150 meters |
| Battery Type | 2 x LR03 (AAA) |
| Operating Temperature | -5°C to 50°C |
| Dimensions (L x W x H) | 140 x 45 x 25 mm |
| Weight | 100 g |
9. Warranty and Support
This product is covered by a standard manufacturer's warranty. For specific warranty terms and conditions, please refer to the documentation provided with your purchase or contact your retailer.
For technical support, troubleshooting assistance beyond this manual, or inquiries regarding spare parts, please contact your point of purchase or the official Dieffematic support channels. Please have your model number (145421) ready when contacting support.