Introduction
This Whadda Stereo Speaker Protection Solder Kit (WSAH4700) is designed to prevent switch-on clicks and DC components from reaching your speakers, protecting them from potential damage. This DIY kit provides an educational and creative experience for enthusiasts of all skill levels to learn about electronics and soldering.
Safety Information
WARNING: This kit involves soldering and working with electrical components. Always exercise caution.
- Always work in a well-ventilated area when soldering.
- Use appropriate safety gear, including safety glasses.
- Ensure your soldering iron is on a heat-resistant stand and unplugged when not in use.
- Avoid touching the hot tip of the soldering iron.
- Be aware of static electricity when handling electronic components.
- Do not connect the assembled circuit to power before double-checking all connections and component orientations.
- This kit is intended for educational purposes and should be assembled under adult supervision if used by minors.
Package Contents
Carefully unpack the kit and verify that all components are present. Refer to the image below for a visual representation of the kit's contents.
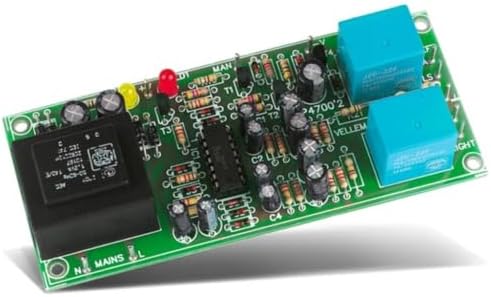
Image: All components of the Whadda WSAH4700 Speaker Protection Solder Kit, including the PCB, resistors, capacitors, diodes, transistors, ICs, transformer, and relays.
The kit typically includes:
- Printed Circuit Board (PCB)
- Resistors (various values)
- Capacitors (electrolytic and ceramic)
- Diodes
- Transistors
- Integrated Circuits (ICs) and sockets
- Relays
- Transformer
- LEDs
- Terminal blocks for connections
Setup and Assembly Instructions
Follow these steps carefully to assemble your Whadda WSAH4700 Speaker Protection Kit. A basic understanding of soldering is recommended. If you are new to soldering, consider practicing on a scrap board first.
- Identify Components: Before starting, identify all components and sort them by type and value. Compare them with the component list and the PCB silk screen markings.
- Solder Low-Profile Components First: Begin by soldering the lowest profile components, such as resistors and diodes. Ensure correct orientation for diodes (band indicates cathode).
- Install IC Sockets: Solder the IC sockets onto the PCB. Pay attention to the notch on the socket, which should align with the marking on the PCB. Do not insert the ICs yet.
- Solder Capacitors: Install ceramic capacitors (non-polarized) and then electrolytic capacitors. For electrolytic capacitors, ensure correct polarity (the longer lead is usually positive, and a stripe on the body indicates the negative lead, which aligns with the PCB marking).
- Solder Transistors and LEDs: Solder the transistors and LEDs. Ensure correct orientation for both. LEDs have a longer positive lead (anode) and a shorter negative lead (cathode), and often a flat edge on the body indicating the cathode.
- Install Relays and Transformer: Solder the relays and the transformer. These are typically larger components and should fit snugly into their designated spots.
- Solder Terminal Blocks: Attach the terminal blocks for power input, amplifier output, and speaker connections.
- Insert ICs: Once all soldering is complete and the board has cooled, carefully insert the Integrated Circuits (ICs) into their respective sockets. Ensure the notch on the IC aligns with the notch on the socket and the PCB. Bend the pins slightly inward if necessary to ensure a good fit, but do not force them.
- Visual Inspection: Thoroughly inspect all solder joints for bridges, cold joints, or unsoldered pins. Check component orientations again.

Image: The fully assembled Whadda WSAH4700 Speaker Protection circuit board, showing all components in place.

Image: A close-up of hands soldering components onto a circuit board, illustrating the assembly process.
Operating Instructions
The Whadda WSAH4700 Speaker Protection Kit is designed to operate automatically once correctly installed. It provides two main functions:
- Delay on Power-Up: Upon powering on your amplifier, the protection circuit introduces a short delay (typically a few seconds) before connecting the speakers. This prevents the "thump" or "click" sound often heard as amplifier circuits stabilize.
- DC Offset Protection: The circuit continuously monitors the amplifier's output for any DC voltage. If a significant DC component is detected (which can happen due to amplifier malfunction), the relays will immediately disconnect the speakers to prevent damage.
Connection:
- Connect the power input of the protection board to a suitable power supply (refer to specifications for voltage requirements).
- Connect the output of your stereo amplifier to the "Amplifier Input" terminals on the protection board.
- Connect your speakers to the "Speaker Output" terminals on the protection board.
Once connected and powered, the LEDs on the board will indicate its status. Typically, a power LED will illuminate, and after the delay, the protection relays will click, and another LED might indicate that the speakers are connected.
Maintenance
The Whadda WSAH4700 Speaker Protection Kit requires minimal maintenance once assembled and installed correctly.
- Keep Clean: Ensure the circuit board is kept clean and free from dust and debris. Use a soft, dry brush or compressed air for cleaning.
- Avoid Moisture: Protect the board from moisture and extreme temperatures.
- Periodic Inspection: Periodically inspect solder joints for any signs of cracking or corrosion, especially if the unit is subjected to vibrations or temperature changes. Re-solder any suspicious joints.
- Component Replacement: In case of component failure, identify the faulty component and replace it with an identical or equivalent part.
Troubleshooting
| Problem | Possible Cause | Solution |
|---|---|---|
| No power / LEDs do not light up |
|
|
| Speakers do not connect after power-up (no click from relays) |
|
|
| Speakers connect, but protection activates randomly |
|
|
Specifications
| Feature | Detail |
|---|---|
| Model | WSAH4700 |
| Brand | Whadda (Velleman Group nv) |
| Channels | Stereo (2 channels) |
| Function | Speaker protection against switch-on clicks and DC components |
| Included Components | Assembly kit (PCB, electronic components) |
| Product Dimensions | 3.8 x 15.8 x 15.5 cm; 191 g |
| Power Source | Requires external power supply (not included) |
| First Available Date | April 29, 2022 |
Warranty
This Whadda product comes with a limited warranty. For specific details regarding the warranty period and coverage, please refer to the documentation provided with your purchase or contact Whadda/Velleman Group customer support.
Support
For technical assistance, missing parts, or further inquiries regarding your Whadda WSAH4700 Speaker Protection Solder Kit, please contact Velleman Group nv, the manufacturer of Whadda products.
Manufacturer: Velleman Group nv
You can typically find contact information on the Whadda website or through your retailer. Please have your model number (WSAH4700) ready when contacting support.


