
1. Introduction
This manual provides comprehensive instructions for the installation, operation, and maintenance of your Real HD iDS-7208HUHI-M2/S 8 Channel 4K 8MP HD-TVI DVR. Please read this manual thoroughly before using the device to ensure proper functionality and safety.
The iDS-7208HUHI-M2/S is a versatile 8-channel hybrid video recorder supporting various camera types, including 8MP IP, 8MP HD-TVI, 5MP AHD, 4MP HD-CVI, and CVBS. It features H.265 Pro+ video compression for efficient storage and 4K HDMI output for high-resolution monitoring.

Figure 1: Front view of the Real HD iDS-7208HUHI-M2/S DVR.
2. Setup and Installation
Follow these steps to set up your DVR system:
- Unpacking and Inspection: Carefully unpack all components. Verify that all items listed in the packing list are present and undamaged.
- Hard Drive Installation (if applicable): If your DVR did not come with a pre-installed hard drive, refer to the separate hard drive installation guide. The DVR supports up to two SATA interfaces, each with a capacity of up to 10 TB.
- Connecting Cameras: Connect your surveillance cameras to the BNC video input ports on the rear panel. The DVR supports adaptive input for HDTVI, AHD, CVI, CVBS, and IP cameras.
- Connecting Display: Connect a monitor to the DVR using either the HDMI or VGA output port. The DVR supports 4K HDMI output.
- Network Connection: Connect an Ethernet cable from the DVR's LAN port to your network router or switch for remote access and network features.
- Audio Connections: If using external audio devices, connect them to the audio input/output ports.
- Power Connection: Connect the provided power adapter to the DVR's power input and then to a power outlet.

Figure 2: Rear panel connections of the DVR, including video inputs, HDMI, VGA, audio, network, and power ports.
3. Operating Instructions
3.1 Initial Power-Up and Configuration
After connecting all necessary cables, power on the DVR. Follow the on-screen prompts for initial setup, including setting up an administrator password, date/time, and network settings.
3.2 Live View and Playback
The DVR's interface, often referred to as HVR 4.0, allows for live viewing of all connected cameras and playback of recorded footage.

Figure 3: HVR 4.0 Live View interface, displaying real-time feeds from multiple surveillance cameras.

Figure 4: HVR 4.0 Playback interface, featuring a timeline and calendar for reviewing recorded video footage.
3.3 Remote Access via Hik-Connect App
The DVR supports remote access through the Hik-Connect phone app, allowing you to view live feeds and playback recordings from your smartphone, tablet, or PC.
- Connect to Internet: Ensure your DVR is connected to the internet via an Ethernet cable.
- Download Hik-Connect App: Download the Hik-Connect app from your device's app store (available for Android and iOS).
- Add Device: Open the app, create an account, and add your DVR by scanning the QR code found in the DVR's network settings or by manually entering the device details.
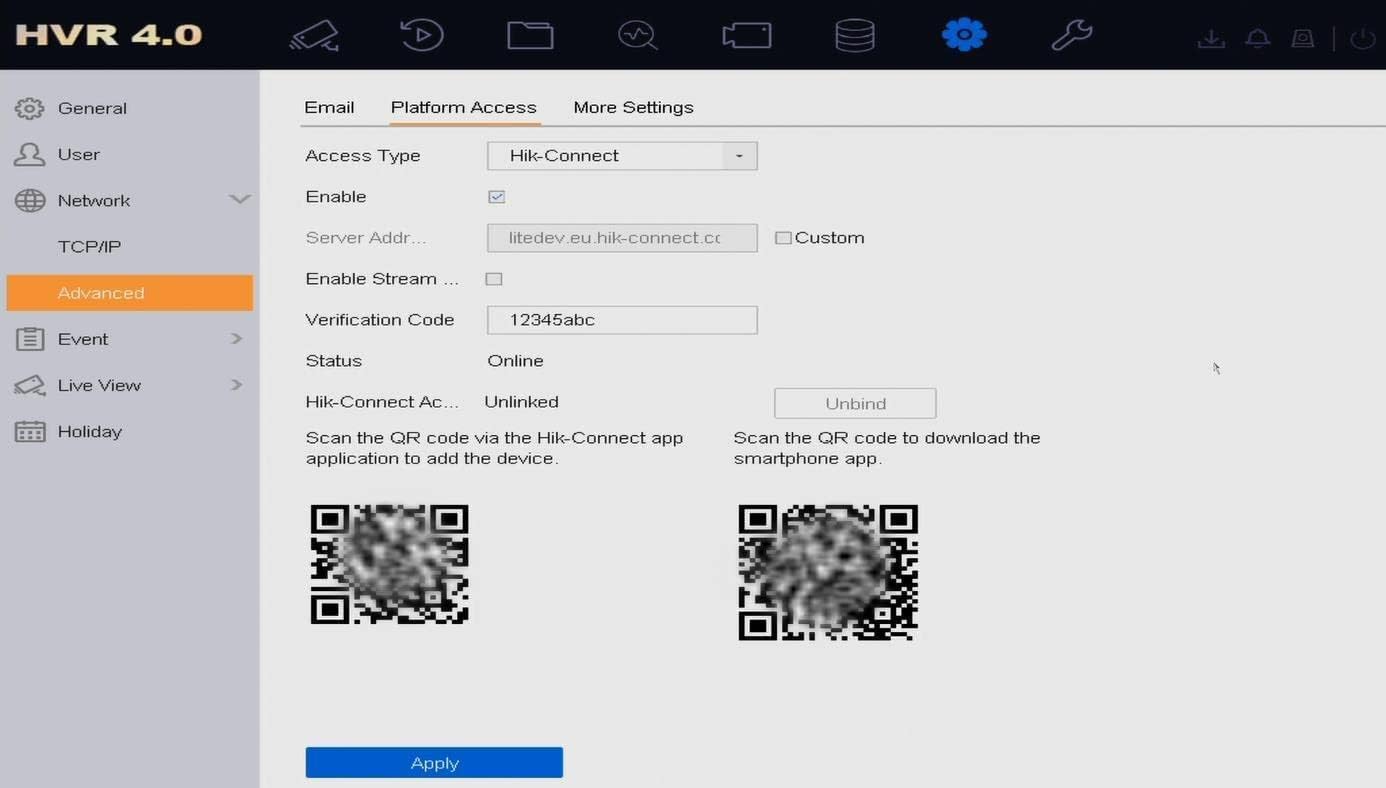
Figure 5: Easy 3-Step Remote Access diagram, showing how to connect the DVR to the internet, download the Hik-Connect app, and add the device for remote viewing.

Figure 6: HVR 4.0 Advanced Settings interface, displaying options for Hik-Connect setup, including verification code and QR codes for app download and device addition.
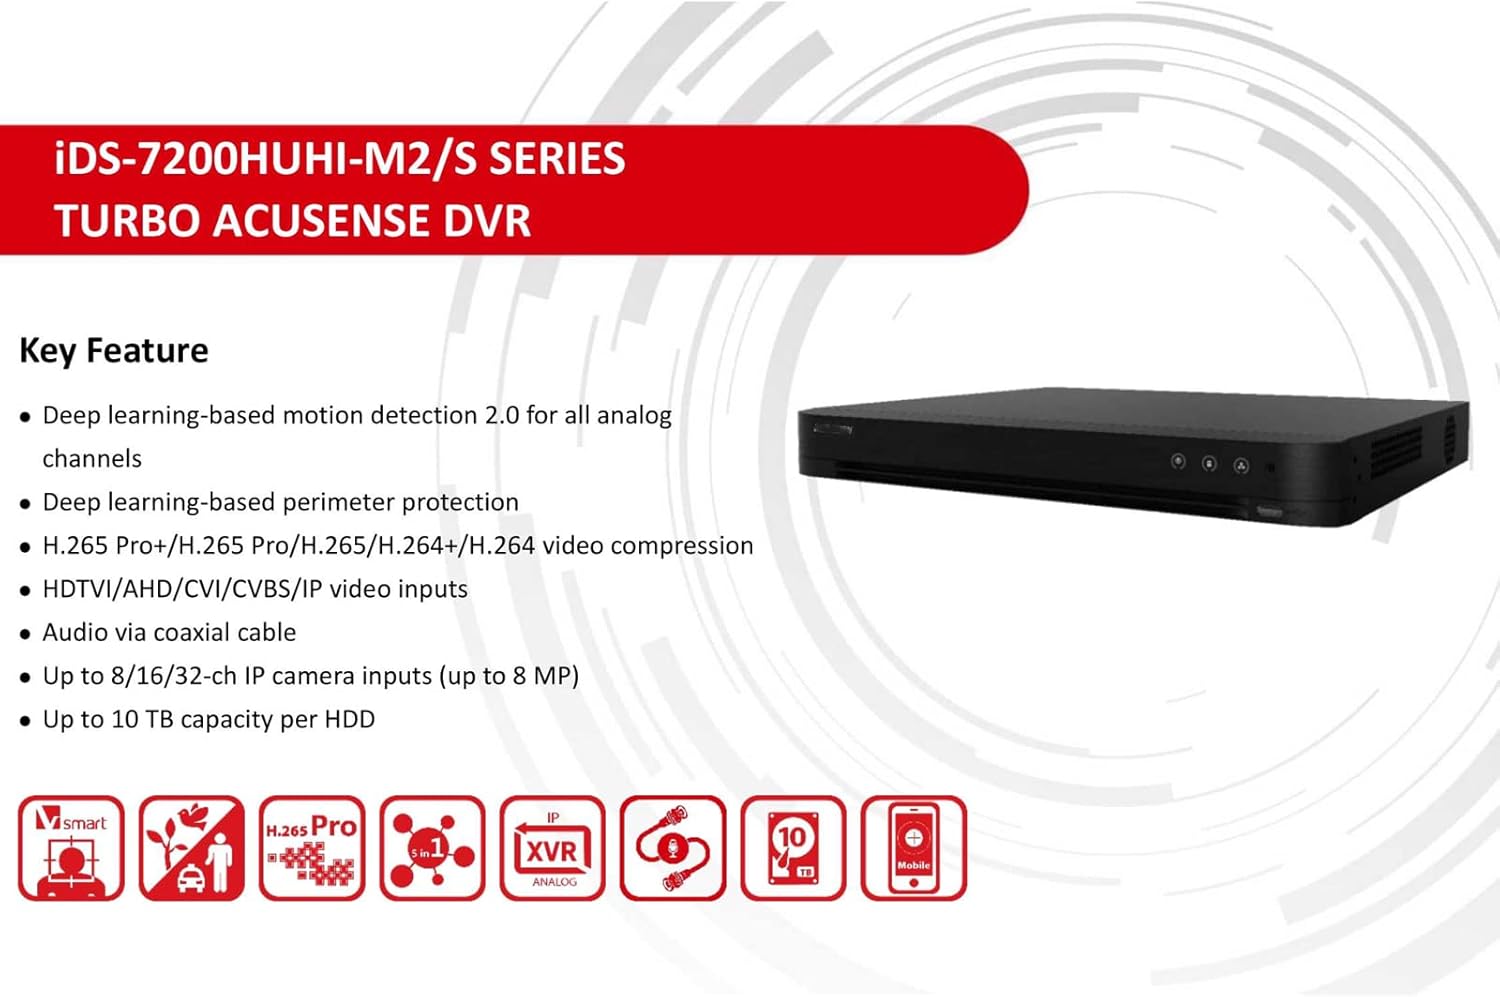
Figure 7: Hik-Connect mobile application interface, showing multiple camera feeds accessible remotely.
4. Maintenance
Regular maintenance ensures the longevity and optimal performance of your DVR system:
- Cleaning: Periodically clean the exterior of the DVR with a soft, dry cloth. Ensure ventilation openings are free from dust and obstructions to prevent overheating.
- Firmware Updates: Keep your DVR's firmware updated to benefit from the latest features and security enhancements. Contact the seller for assistance with firmware upgrades.
- Data Backup: Regularly back up important video footage to external storage devices to prevent data loss.
- Hard Drive Health: Monitor the health of your installed hard drives through the DVR's system settings. Replace drives if errors are detected.
5. Troubleshooting
If you encounter issues with your DVR, refer to the following common troubleshooting steps:
- No Power: Ensure the power adapter is securely connected to both the DVR and a working power outlet. Check the power indicator light on the DVR.
- No Video Output: Verify that the monitor is correctly connected to the HDMI or VGA port and is set to the correct input source. Try a different cable or monitor if possible.
- No Camera Feed: Check the BNC connections for each camera. Ensure cameras are powered on and functioning correctly. Verify camera compatibility with the DVR.
- Remote Access Issues: Confirm the DVR has a stable internet connection. Check network settings on the DVR and ensure the Hik-Connect app is correctly configured and the device is added.
- Recording Problems: Ensure a hard drive is installed and properly initialized. Check the hard drive status in the DVR's system settings. Verify recording schedules are correctly set.
- System Freezing/Lagging: Ensure adequate ventilation for the DVR. If the issue persists, a factory reset might be necessary (back up configurations first).
For persistent issues or advanced troubleshooting, please contact Real HD customer support or refer to the official product support resources.
6. Specifications
The Real HD iDS-7208HUHI-M2/S DVR offers the following technical specifications:

Figure 8: Key features and detailed specifications for the iDS-7200HUHI-M2/S series DVRs, including video compression, input types, and recording resolutions.
| Feature | Specification |
|---|---|
| Video Compression | H.265 Pro+/H.265 Pro/H.265/H.264+/H.264 |
| Video Bit Rate | 32 Kbps to 10 Mbps |
| Dual Stream | Supported |
| Stream Type | Video, Video & Audio |
| Audio Compression | G.711u |
| Audio Bit Rate | 64 Kbps |
| IP Video Input | 4-ch (up to 12-ch), Enhanced IP mode on: 8-ch (up to 16-ch), each up to 4 Mbps |
| Analog Video Input | 8-ch |
| HDTVI Input | 8 MP@15 fps, 5 MP@20 fps, 3K@20 fps, 4 MP@30 fps, 4 MP@25 fps, 3 MP@18 fps, 1080p@30 fps, 1080p@25 fps, 720p@60 fps, 720p@50 fps, 720p@30 fps, 720p@25 fps |
| AHD Input | 5 MP@20 fps, 4 MP@30 fps, 1080p@25 fps, 1080p@30 fps, 720p@25 fps, 720p@30 fps |
| HDCVI Input | 4 MP@30 fps, 4 MP@25 fps, 1080p@25 fps, 1080p@30 fps, 720p@25 fps, 720p@30 fps |
| HDMI/VGA Output | 4K HDMI, VGA |
| SATA Interfaces | 2 SATA interfaces |
| Max HDD Capacity | Up to 10 TB for each disk |
| Connectivity Technology | HDMI, VGA |
| Item Weight | 20 pounds |
| Package Dimensions | 20 x 18 x 8 inches |
7. Warranty Information
For detailed warranty terms and conditions, please refer to the documentation provided with your purchase or contact the seller directly. Protection plans may be available for extended coverage.
8. Customer Support
Real HD is committed to providing reliable products and after-sales service. If you require assistance with your iDS-7208HUHI-M2/S DVR, including firmware upgrades or technical support, please contact the seller or Real HD customer service. US local office support is available for quick responses to inquiries.
You can visit the Real HD Store on Amazon for more information and support resources.