
1. Safety Information
Please read and understand all instructions before assembly and use. Failure to follow these instructions may result in injury or property damage.
- Wear Protective Gloves: Metal components may have sharp edges. Always wear heavy-duty work gloves during assembly to prevent cuts and scratches.
- Seek Assistance: This product is large and requires at least two people for safe and efficient assembly. Do not attempt to assemble alone.
- Clear Work Area: Ensure your assembly area is clear of obstructions and provides ample space to move around the shed components.
- Level Surface: Assemble the shed on a firm, level surface to ensure stability and proper alignment of parts.
- Secure Installation: Once assembled, securely anchor the shed to the ground or a prepared base to prevent movement due to wind or other environmental factors.
- Children and Pets: Keep children and pets away from the assembly area to prevent accidents.
2. Product Overview
The Greesum Metal Outdoor Storage Shed (6FT x 4FT) is designed to provide secure and weather-resistant storage for your outdoor tools, equipment, and other items. Constructed from durable galvanized steel, it features a sloped roof for water drainage and a lockable door for enhanced security.

Image 1: Front view of the Greesum Metal Outdoor Storage Shed.
Key Features:
- Durable Construction: Made from galvanized steel for rust and UV resistance.
- Sloped Roof: Designed to prevent rainwater accumulation and reduce rusting.
- Lockable Door: Provides security for stored items and prevents unauthorized access.
- Multi-purpose Use: Suitable for backyard, garden, patio, or utility room storage. Can also serve as a pet house.
- Protective Film: Components are covered with a protective film to prevent scratches during handling.

Image 2: Overview of shed features including lock, edge protection, and water resistance.
3. Setup and Assembly
Assembly of the Greesum Metal Outdoor Storage Shed requires careful attention to detail and patience. It is strongly recommended to have at least one helper.
3.1 Before You Begin:
- Read Instructions Thoroughly: Review the entire installation manual before starting.
- Prepare the Base: Ensure a solid, level foundation for the shed. A concrete slab or a properly constructed wooden base is recommended.
- Unpack and Organize: Lay out all parts and verify against the parts list in your included manual. Group similar components together.
- Remove Protective Film: Each metal panel is covered with a protective film. It is easier to remove this film before assembly, especially from areas that will be covered by screws or other parts.
- Required Tools (Not Included): You will need a screwdriver (manual or low-torque power drill), work gloves, and potentially a rubber mallet.

Image 3: Reminder to organize parts and seek assistance for assembly.
3.2 Assembly Tips:
- Patience is Key: Do not rush the assembly process. Metal edges can be sharp, and rushing can lead to errors or injury.
- Screw Fasteners: Use caution when using power tools for screws to avoid stripping. A ratcheting screwdriver may offer better control.
- Part Alignment: Some holes may require slight adjustment or gentle prying to align correctly. Do not force components.
- Fastener Count: The kit typically includes the exact number of fasteners needed. Be careful not to lose any small parts.
- Working Space: Ensure at least 2 feet of working space around the shed, especially when installing roof panels.
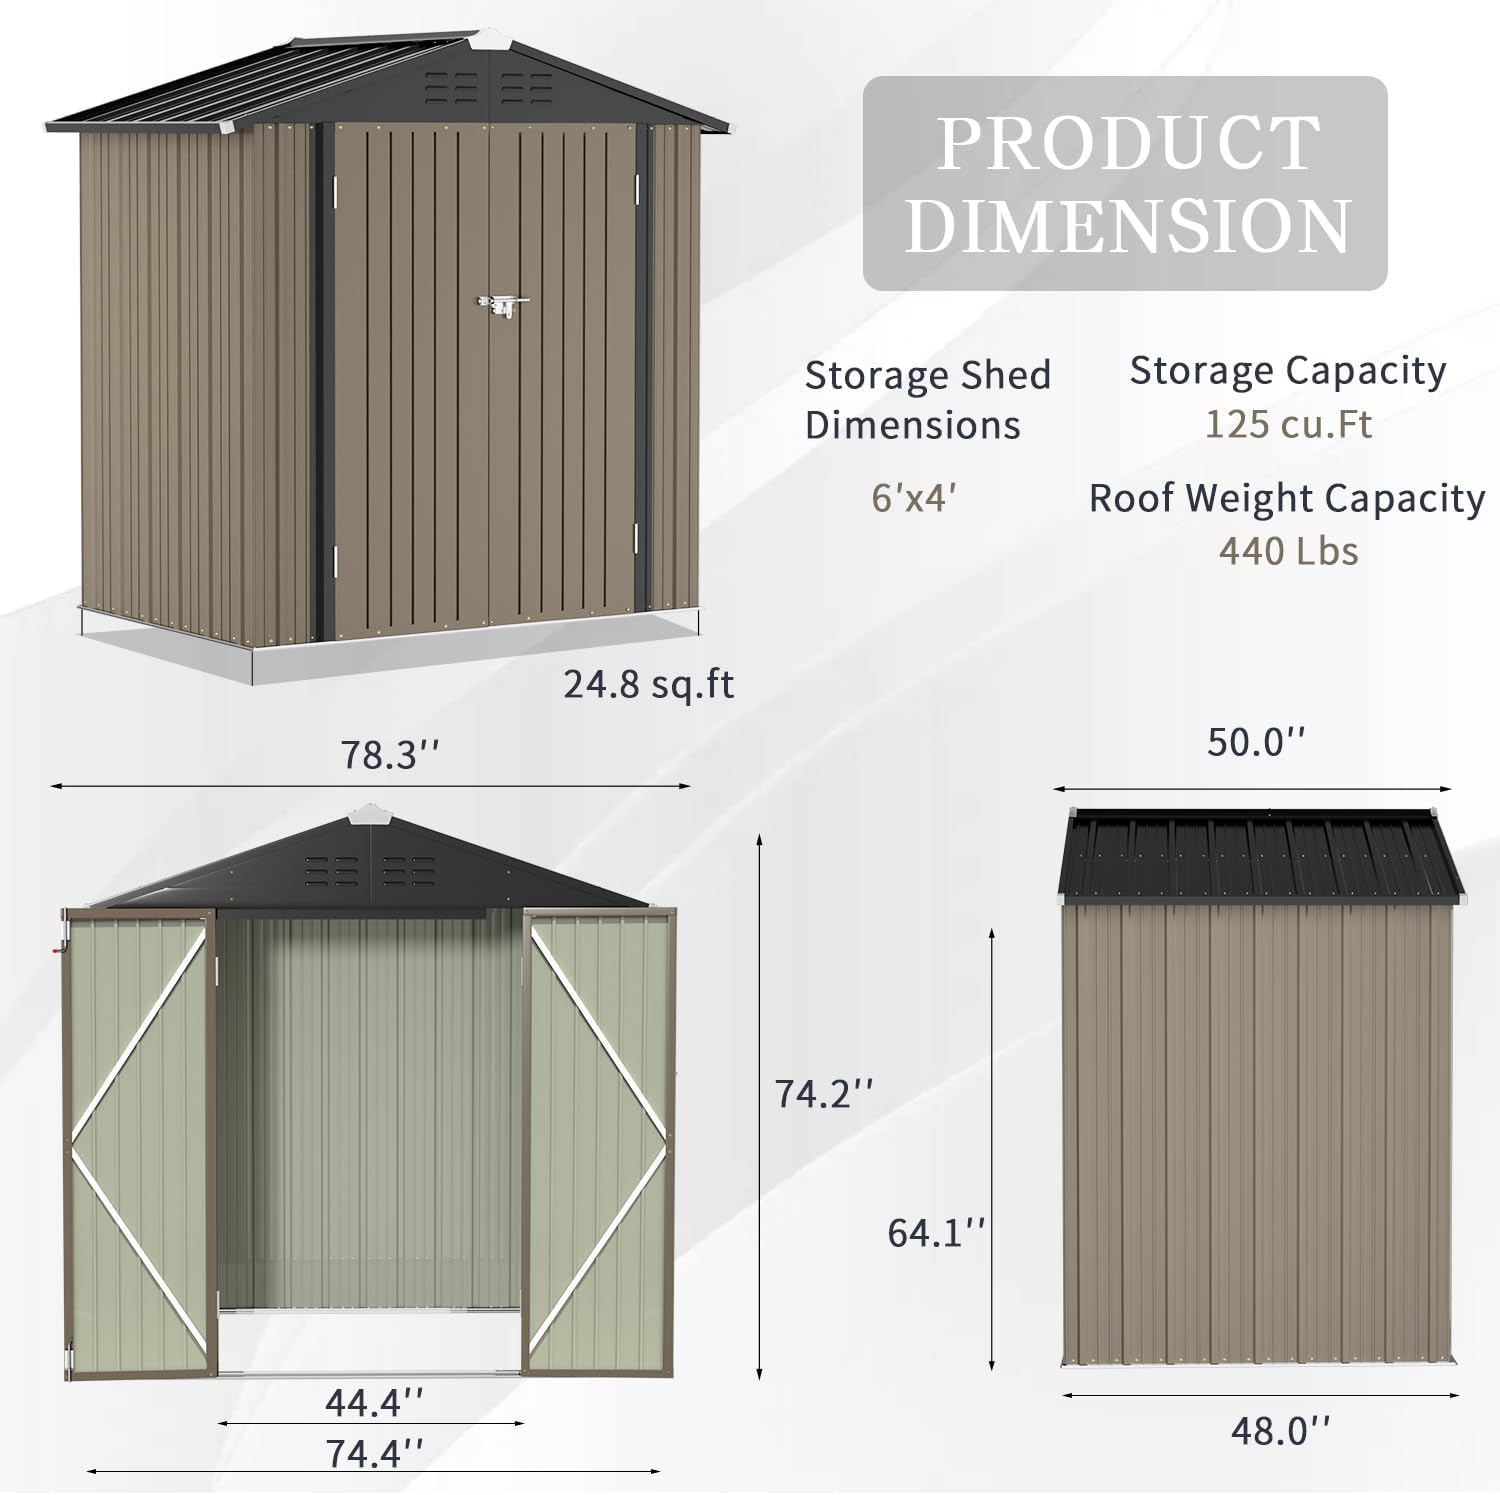
Image 4: Product dimensions for planning your installation space.
4. Operating Instructions
The Greesum storage shed is designed for straightforward operation.
- Opening/Closing the Door: The shed features a sliding door mechanism. Gently slide the door open or closed. Avoid forcing the door.
- Using the Lock: The door is equipped with a latch for a padlock (padlock not included). Ensure the latch is properly engaged when securing the shed.
- Storage Capacity: Utilize the interior space efficiently. Consider adding shelving or hooks for organization.

Image 5: Example of organized interior storage.
5. Maintenance
Regular maintenance will help prolong the life and appearance of your storage shed.
- Cleaning: Periodically clean the exterior with mild soap and water. Avoid abrasive cleaners or harsh chemicals that could damage the finish.
- Inspect for Damage: Regularly check for any signs of rust, dents, or loose fasteners. Address any issues promptly to prevent further damage.
- Drainage: Ensure the sloped roof remains clear of debris (leaves, snow) to allow for proper water drainage.
- Door Mechanism: Keep the door tracks clean and free of debris to ensure smooth operation. Lubricate if necessary.

Image 6: Illustration of the shed's weather resistance and roof design for drainage.
6. Troubleshooting
This section addresses common issues that may arise during assembly or use.
- Missing Parts: If you find any parts missing upon unboxing, please contact Greesum customer support immediately with your purchase details.
- Misaligned Holes: During assembly, if holes do not align perfectly, gently adjust the panels or use a rubber mallet to tap components into place. Avoid excessive force. In some cases, a small drill bit may be needed to slightly widen a hole, but proceed with caution.
- Shed Instability: Ensure the shed is assembled on a completely level surface. Verify all fasteners are tightened securely. If the shed still feels unstable, ensure it is properly anchored to its base or the ground.
- Door Not Sliding Smoothly: Check the door tracks for any debris or obstructions. Clean the tracks and apply a silicone-based lubricant if needed. Ensure the door panels are correctly installed and aligned.
7. Specifications
| Feature | Specification |
|---|---|
| Brand | Greesum |
| Model Number | PS |
| Product Dimensions | 50"D x 78.3"W x 74.2"H |
| Style | 6' x 4' |
| Material | Aluminum, Metal (Alloy Steel Frame) |
| Color | Light Brown |
| Item Weight | 48.9 Pounds |
| Floor Area | 24.8 Square Feet |
| Water Resistance Level | Water Resistant |
| Door Style | Sliding Doors |
| Assembly Required | Yes |
| UPC | 760606407602 |
8. Warranty and Support
For warranty information, please refer to the documentation included with your purchase or contact the retailer directly. For product support, missing parts, or assembly assistance, please reach out to Greesum customer service or the seller from whom you purchased the product.
You can visit the official Greesum store for more information: Greesum Store
