1. Introduction
Thank you for choosing the Vrabocry 11-Key RF Remote USB LED Strip Controller. This manual provides essential information for the safe and efficient use of your device. Please read these instructions carefully before installation and operation, and retain them for future reference.
2. Product Overview
The Vrabocry 11-Key RF Remote USB LED Strip Controller is designed to manage single-color LED strips (such as 5050, 3528, 2835, 5630 types) with a convenient RF wireless remote. It features a USB interface for power and connectivity.
2.1 Components
- USB LED Controller Module
- 11-Key RF Wireless Remote Control (CR2025 battery not included)
2.2 Key Features
- RF Wireless Remote Control for flexible operation.
- USB 5V power input, compatible with various USB power sources.
- Maximum load current: 12A.
- Maximum control distance: 30 meters (9.8 feet).
- Multiple static brightness levels and dynamic lighting modes.
- Adjustable brightness and speed for dynamic modes.

Image: The Vrabocry USB LED Strip Controller module connected to a USB cable, alongside its 11-key RF wireless remote control.
3. Specifications
| Type | RF Wireless Remote Mini Dimmer |
| Voltage Input | USB 5V (5-24V compatible) |
| Max Load Current | 12A |
| Max Control Distance | 30 meters (9.8 feet) |
| Working Temperature | -20°C to 60°C |
| Remote Battery Type | 1 x CR2025 (not included) |
| Compatible LED Strips | Single Color 5050, 3528, 2835, 5630 LED Light Strips |
| Specific Uses | Indoor use only |
4. Setup Instructions
Follow these steps to set up your LED strip controller:
- Install Remote Battery: Open the battery compartment on the back of the RF remote control. Insert one CR2025 coin cell battery, ensuring correct polarity (+/-). Close the compartment securely.
- Connect LED Strip: Connect your single-color LED strip to the output connector of the USB LED Controller module. Ensure a secure connection.
- Connect Power: Plug the USB connector of the controller module into a compatible USB 5V power source (e.g., USB wall adapter, power bank, computer USB port).
- Power On: Once connected, the LED strip should illuminate or be ready for control via the RF remote.

Image: The back of the RF remote control, illustrating the battery compartment for a CR2025 battery. Note: Battery is not included.
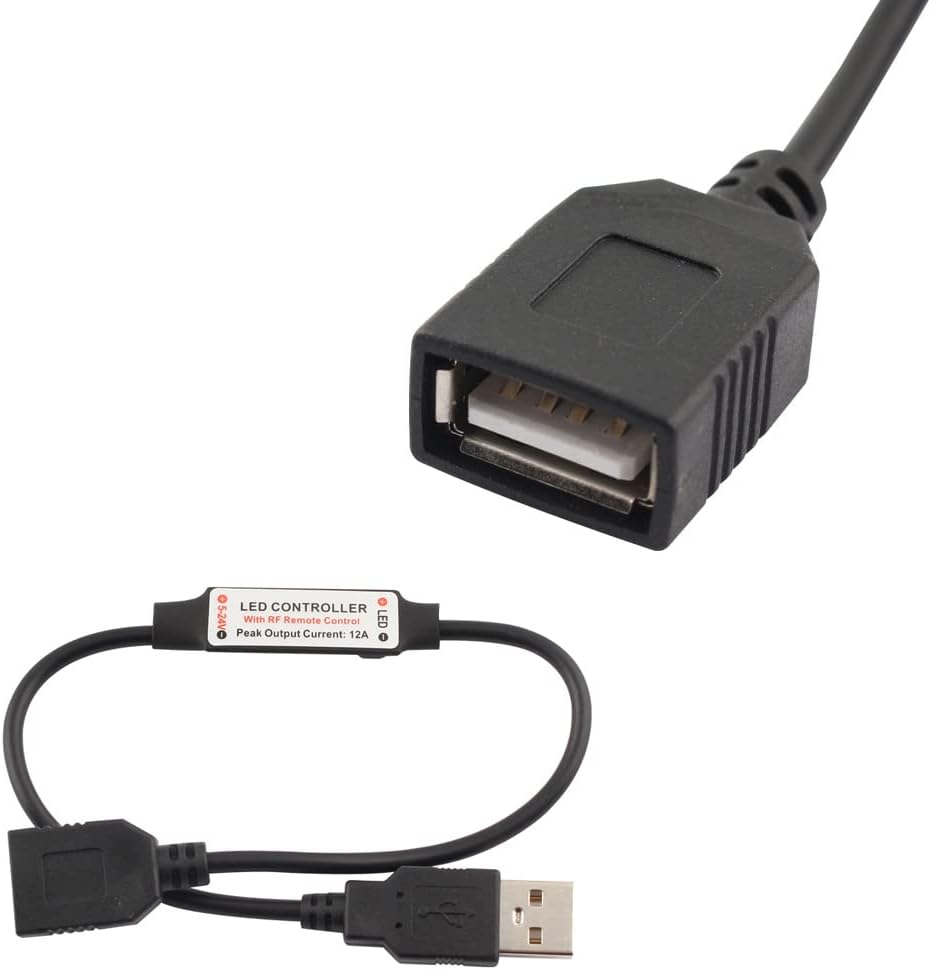
Image: Close-up view of the USB LED Controller module, showing the USB male connector for power input and the USB female connector for LED strip connection.
5. Operating Instructions
Use the 11-key RF remote control to operate your LED strip. The remote operates wirelessly, so direct line-of-sight to the controller is not required.
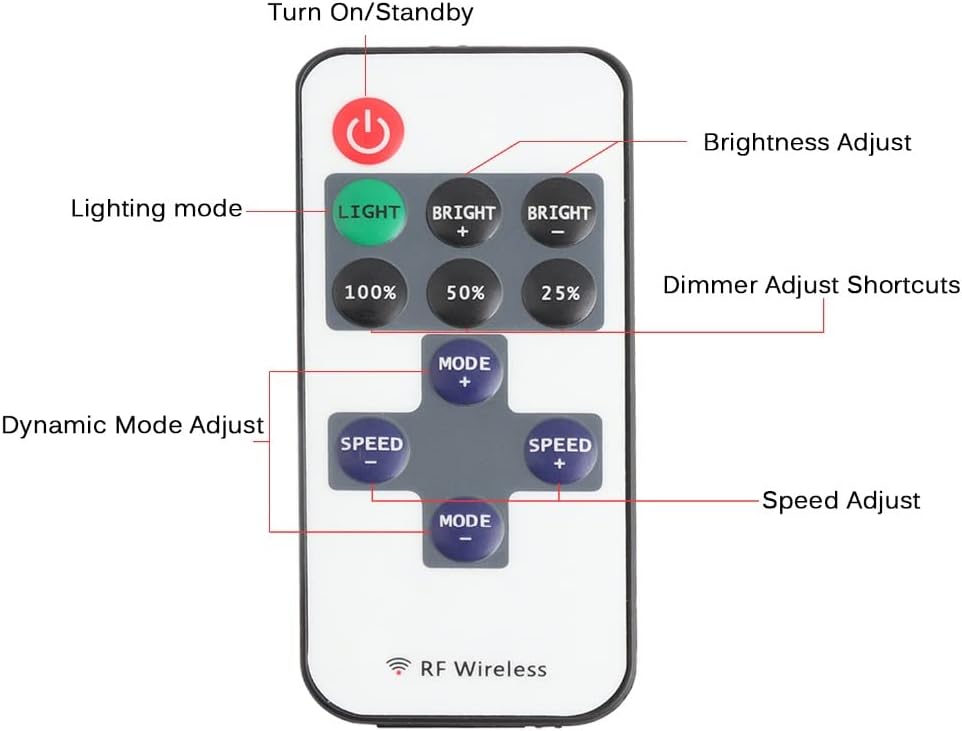
Image: The 11-key RF remote control, clearly showing the function of each button for controlling the LED strip.
5.1 Remote Control Functions
- ON/STANDBY (): Press to turn the LED strip on or switch to standby mode.
- LIGHT: Switches to static lighting mode from any dynamic mode.
- BRIGHT+ / BRIGHT-: Adjusts the brightness level of the current lighting mode (both static and dynamic).
- 100% / 50% / 25%: Shortcut buttons to set the static lighting mode brightness to 100%, 50%, or 25% respectively.
- MODE+ / MODE-: Switches to dynamic mode from static lighting mode, or cycles through different dynamic modes.
- SPEED+ / SPEED-: Adjusts the speed of the current dynamic lighting mode.
5.2 Dynamic Modes
The controller offers several dynamic lighting modes, accessible via the MODE+ / MODE- buttons:
- Normal Bright
- Fast Flashing
- Slow Flashing
- Jump Slow Flashing
- Jump Fast Flashing
- Fast Flashing-off (approx. 0.1 second interval)
- Fast Flashing-off (approx. 1 second interval)
- On-off (approx. 0.5 second interval)
- Strobe
- Strobe-On (approx. 0.5 second interval)
6. Maintenance
- Cleaning: Use a soft, dry cloth to clean the controller and remote. Do not use liquid cleaners or solvents.
- Battery Replacement: Replace the CR2025 battery in the remote control when its range decreases or it stops responding. Ensure correct polarity during installation.
- Storage: Store the device in a cool, dry place away from direct sunlight and extreme temperatures when not in use for extended periods.
7. Troubleshooting
| Problem | Possible Cause | Solution |
|---|---|---|
| LED strip does not light up. | No power to controller; incorrect connection; faulty LED strip. | Check USB power source. Ensure LED strip is correctly connected to the controller. Test LED strip with another power source if possible. |
| Remote control not responding. | Remote battery is dead or incorrectly installed; remote is too far from controller. | Replace the CR2025 battery, ensuring correct polarity. Move closer to the controller (within 30m). |
| LED strip flickers or behaves erratically. | Insufficient power supply; loose connection; faulty controller. | Ensure USB power source provides stable 5V. Check all connections for tightness. If problem persists, the controller may be faulty. |
| Cannot turn off LED strip completely (only dims). | This controller is designed primarily for dimming and dynamic effects. For complete power cut-off, disconnect the USB power source. | This is a characteristic of some dimmer controllers. To fully turn off, unplug the USB power. |
8. Safety Information
- This device is intended for indoor use only. Do not expose to water, moisture, or high humidity.
- Ensure the power supply voltage is 5V USB. Do not exceed the maximum load current of 12A.
- Do not attempt to disassemble or modify the controller or remote. This may void the warranty and pose a safety risk.
- Keep out of reach of children.
- Dispose of batteries properly according to local regulations.
9. Warranty & Support
Vrabocry products are manufactured to high-quality standards. For any questions, technical support, or warranty inquiries, please contact your retailer or the manufacturer directly. Please have your model number (11KEYUSB) and purchase information ready.