
1. Product Overview
The Abovsare 16.2-inch LED Digital Wall Clock features a large, high-contrast display with 4-inch jumbo digits for easy readability from a distance. This versatile clock provides time, date, day of the week, and temperature information. It includes an automatic brightness dimmer and is operated via a remote control for convenient adjustments.

Figure 1: Abovsare 16.2-inch LED Digital Wall Clock with remote control.
2. What's in the Box
- 1 x Abovsare 16.2-inch LED Digital Wall Clock
- 1 x Remote Control
- 1 x USB Power Cable (Note: Power adapter not included. Use a 5V/1A or 5V/2A adapter.)
- 1 x Mounting Template
- 2 x Wall Mounting Pins
- 1 x User Manual
3. Setup
- Power Connection: Connect the provided USB power cable to the DC 5V port on the back of the clock. Plug the other end into a compatible 5V/1A or 5V/2A USB power adapter (not included) or a USB port. The clock must be plugged in to operate.
- Memory Battery (Optional): For retaining time settings during power outages, insert a CR2032 button cell battery (not included) into the battery compartment on the back of the clock. This battery only stores settings and does not power the display.
- Remote Control: Ensure the remote control has batteries installed (usually 2x AAA, not included, or a pre-installed button cell).

Figure 2: Remote control for easy operation.
4. Operating Instructions
4.1 Setting Time, Date, and Day
- Press the 'SET' button on the remote control. The hour digits will start blinking.
- Use the '+' and '-' buttons to adjust the hour.
- Press 'SET' again to move to minute adjustment. Use '+' and '-' to set minutes.
- Continue pressing 'SET' to cycle through year, month, date, and day of the week adjustments, using '+' and '-' for each.
- Press 'OK' or wait a few seconds for the settings to save automatically.
4.2 Brightness Adjustment
The clock features 10 levels of adjustable brightness and an automatic dimming sensor.
- Manual Adjustment: Use the 'Light' button on the remote to cycle through brightness levels (L-01 to L-10).
- Automatic Dimming: The clock has a built-in sensor that automatically adjusts brightness based on ambient light. This feature can be toggled on/off via the remote.

Figure 3: Visual representation of 10-level automatic brightness dimmer.
4.3 Alarm Setting
The clock supports two separate alarms.
- Press the 'AL1 SET' or 'AL2 SET' button on the remote.
- Use '+' and '-' to set the desired alarm time.
- Press 'OK' to confirm.
- To enable/disable an alarm, press 'AL1 ON/OFF' or 'AL2 ON/OFF'.
4.4 Timer/Countdown Function
The clock includes a count-up and count-down timer (up to 99 minutes and 99 seconds).
- Set Timer: Press the 'Timer' button on the remote. Use '+' and '-' to set the desired time for countdown or to start count-up from zero.
- Start/Stop: Press 'OK' to start or pause the timer.
- Reset: Press 'Timer Reset' to clear the timer.

Figure 4: Timer functions for various activities.
4.5 12/24 Hour Mode
Toggle between 12-hour (with AM/PM indicator) and 24-hour (military time) display by pressing the '12H/24H' button on the remote.
4.6 Temperature Unit
Switch between Celsius (°C) and Fahrenheit (°F) for temperature display by pressing the '°C/°F' button on the remote.
5. Mounting
The Abovsare digital clock can be either wall-mounted or placed on a tabletop.
5.1 Wall Mounting
- Use the provided mounting template to mark the desired positions for the two wall mounting pins on your wall.
- Gently tap the mounting pins into the marked spots until secure.
- Align the keyhole slots on the back of the clock with the installed pins and slide the clock down to secure it.
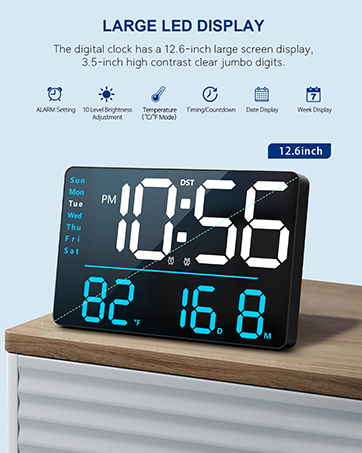
Figure 5: Wall-mounted or desktop placement options.
5.2 Tabletop Placement
The clock can be placed on any flat surface such as a desk, shelf, or nightstand.
6. Maintenance
- Clean the clock display and body with a soft, dry cloth. Avoid abrasive cleaners or solvents.
- Ensure the clock is kept in a dry environment and away from direct sunlight or extreme temperatures.
7. Troubleshooting
- Clock not turning on: Ensure the USB power cable is securely connected to both the clock and a working 5V/1A or 5V/2A power adapter/USB port.
- Settings lost after power outage: Verify that a CR2032 button cell battery is correctly installed in the memory battery compartment.
- Remote control not working: Check the remote control batteries and ensure there are no obstructions between the remote and the clock's sensor.
- Blinking colon: Some users have noted the colon between hours and minutes blinks. This is a design feature and cannot be disabled.
8. Specifications
| Feature | Detail |
|---|---|
| Brand | Abovsare |
| Model | B09Y3JMJXD |
| Display Type | Digital LED |
| Display Size | 16.2 inches |
| Digit Height | 4 inches |
| Product Dimensions | 15.2"W x 5.1"H |
| Power Source | Corded Electric (USB 5V/1A or 5V/2A adapter required) |
| Memory Function | Yes (requires CR2032 battery, not included) |
| Brightness | 10-level adjustable, automatic dimming sensor |
| Special Features | Time, Date, Week, Temperature, Remote Control, Two Alarms, Count-up/Count-down Timer |
9. Official Product Videos
Large Digital Wall Clock with Remote Control
This video provides a detailed overview of the Abovsare 16.2-inch LED Digital Wall Clock, highlighting its large display, remote control functionality, and various features including time, date, and temperature display. It demonstrates the ease of setting up and using the clock in a home environment.
Digital Wall Clock Large Display
This video showcases the large digital display of the Abovsare wall clock, emphasizing its clear visibility and the various information it presents, such as time, day of the week, and temperature. It provides a quick look at the clock's aesthetic and functional aspects.
10. Warranty and Support
For warranty information or technical support, please refer to the contact details provided in your product packaging or visit the official Abovsare website. Keep your purchase receipt for warranty claims.