1. Product Overview
This manual provides detailed instructions for the safe installation, operation, and maintenance of your Machine Rectangle Flush Mount LED Ceiling Light. This contemporary LED fixture is designed for indoor lighting in various rooms such as living rooms, bedrooms, dining rooms, and study areas. It features an energy-efficient LED light source and a minimalist design with an acrylic diffuser and aluminum frame.

Image 1.1: The Machine Rectangle Flush Mount LED Ceiling Light illuminating a living room.

Image 1.2: The Machine Rectangle Flush Mount LED Ceiling Light providing ambient light in a bedroom.
2. Safety Information
For your safety and to ensure proper installation, please read and follow all instructions carefully. It is highly recommended that installation be performed by a licensed electrician.
- Ensure the electrical box to which this fixture will be mounted is properly attached to a structural member of the building.
- All wires are connected. When unpacking, be careful not to pull with wires as a bad connection may result.
- Do not connect electricity until your fixture is fully assembled.
- To reduce the risk of fire, electrical shock, or personal injury, always turn off and unplug the fixture and allow it to cool prior to replacing light bulb (not applicable for integrated LED).
- Do not touch the light source when the fixture is turned on or look directly at the lit LED. Keep flammable materials away from the lit fixture.
- Always turn off the main power supply at the circuit breaker before beginning any electrical work.
3. Package Contents
Verify that all components are present before beginning installation:
- LED Ceiling Light Fixture (1 unit)
- Mounting Hardware (screws, wire nuts, etc.)
- Instruction Manual (this document)
4. Specifications
| Feature | Specification |
|---|---|
| Brand | Machine |
| Model | Rectangle Flush Mount Ceiling Light |
| Fixture Width | 25.5 inches (65 cm) |
| Fixture Length | 36 inches (93 cm) |
| Shipping Weight | 3 KG |
| Light Source | Integrated LED |
| Total Wattage | 72W |
| Material | Acrylic, Aluminum |
| Color | Silver |
| Control Method | Touch (via wall switch) |
| Mounting Type | Ceiling Mount |
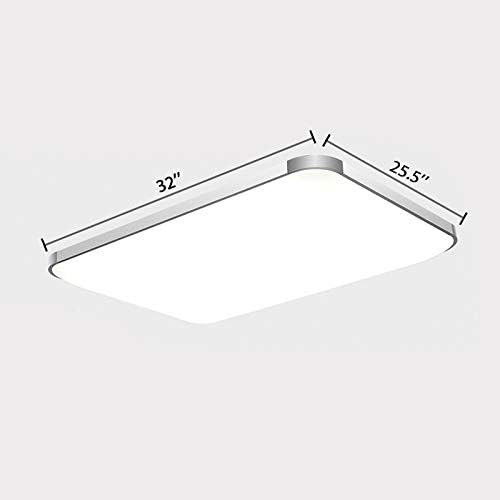
Image 4.1: Dimensional diagram of the ceiling light fixture.
5. Installation
Follow these steps for safe and proper installation. If you are unsure about any step, consult a licensed electrician.
- Turn Off Power: Before starting any electrical work, ensure the main power supply to the installation area is turned off at the circuit breaker.
- Prepare Mounting Location: Ensure the electrical box is securely mounted to a structural member of the ceiling. Remove any existing fixture and its mounting bracket.
- Attach Mounting Bracket: Secure the new mounting bracket (if provided and different from existing) to the electrical box using the screws provided.
- Make Electrical Connections: Carefully connect the wires from the ceiling fixture to the wires in the electrical box. Match the colors:
- Connect the black wire (live) from the fixture to the black wire (live) from the electrical box.
- Connect the white wire (neutral) from the fixture to the white wire (neutral) from the electrical box.
- Connect the green or bare copper wire (ground) from the fixture to the green or bare copper wire (ground) from the electrical box.
- Secure the Fixture: Carefully tuck all wires into the electrical box. Align the fixture with the mounting bracket and secure it to the ceiling using the provided screws. Ensure the fixture is flush against the ceiling.
- Restore Power: Once the fixture is securely installed, turn the main power supply back on at the circuit breaker.
- Test the Light: Turn on the wall switch to test the functionality of your new ceiling light.

Image 5.1: Internal view of the LED strip, highlighting the integrated light source.
6. Operation
The Machine Rectangle Flush Mount LED Ceiling Light is operated via a standard wall switch. Simply toggle the wall switch to turn the light on or off.
7. Maintenance
To maintain the appearance and performance of your ceiling light, follow these guidelines:
- Cleaning: Ensure the power is off before cleaning. Wipe the fixture with a soft, dry, or slightly damp cloth. Do not use abrasive cleaners, solvents, or polishes as they may damage the finish or acrylic diffuser.
- LEDs: The LED light source is integrated and not user-replaceable. Do not attempt to disassemble the LED module.

Image 7.1: Detail of the fixture's aluminum frame and acrylic diffuser.
8. Troubleshooting
If your ceiling light is not functioning as expected, refer to the following common issues and solutions:
- Light does not turn on:
- Check if the power supply at the circuit breaker is on.
- Ensure the wall switch is in the 'ON' position.
- Verify all wire connections are secure and correct (refer to Section 5).
- Light flickers:
- Check for loose wire connections.
- Ensure the voltage supply is stable and within the fixture's operating range.
- Light is dim:
- Ensure the fixture is receiving full power.
- Clean the acrylic diffuser if it appears dirty.
If these steps do not resolve the issue, please contact customer support.
9. Warranty and Support
This product comes with a standard manufacturer's warranty. For specific warranty details, please refer to the product packaging or contact the seller directly. For technical support or assistance with installation, please reach out to the customer service department of the retailer or manufacturer.


