1. Safety Instructions
Always observe basic safety precautions when using electric power tools to reduce the risk of fire, electric shock, and personal injury. Read all instructions before operating this tool.
- Work Area Safety: Keep the work area clean and well-lit. Cluttered or dark areas invite accidents. Do not operate power tools in explosive atmospheres, such as in the presence of flammable liquids, gases, or dust.
- Electrical Safety: Power tool plugs must match the outlet. Never modify the plug in any way. Avoid body contact with earthed or grounded surfaces such as pipes, radiators, ranges, and refrigerators.
- Personal Safety: Always wear eye protection. Use safety glasses, goggles, or a face shield. Wear hearing protection when operating the tool for extended periods. Dress properly; do not wear loose clothing or jewelry. Keep hair, clothing, and gloves away from moving parts.
- Tool Use and Care: Do not force the power tool. Use the correct power tool for your application. Disconnect the plug from the power source before making any adjustments, changing accessories, or storing power tools.
- Maintenance: Have your power tool serviced by a qualified repair person using only identical replacement parts. This will ensure that the safety of the power tool is maintained.
2. Product Overview
The INGCO RGH6528 Rotary Hammer Drill is a versatile tool designed for drilling, hammer drilling, and chiseling in various materials. Familiarize yourself with its components for safe and effective operation.

Figure 1: Main components of the INGCO RGH6528 Rotary Hammer Drill. Key parts include the Depth Stop, Button 4 Function Selector (Hammer Drilling, Drilling, Vario-Lock, Chiseling), Rotational Direction Switch, Auxiliary Handle, ON/OFF Switch, and Lock-on Button.
- Depth Stop: Used to set the desired drilling depth.
- Function Selector: Allows selection between four operating modes: Hammer Drilling, Drilling, Chiseling, and Vario-Lock.
- Rotational Direction Switch: Controls the direction of rotation (forward or reverse).
- Auxiliary Handle: Provides additional grip and control during operation.
- ON/OFF Switch: Activates and deactivates the tool.
- Lock-on Button: Locks the ON/OFF switch for continuous operation.
- SDS Plus Chuck System: Enables quick and tool-free bit changes.
3. Specifications
The following table details the technical specifications of the INGCO RGH6528 Rotary Hammer Drill:
| Feature | Specification |
|---|---|
| Brand | Ingco |
| Model Number | RGH6528 |
| Power Source | Corded Electric |
| Maximum Power | 650 Watts |
| Voltage | 220 Volts |
| Amperage | 16 Amps |
| Maximum Rotational Speed | 1700 RPM |
| Impact Rate | 0-5500 BPM |
| Impact Energy | 1.7 Joules |
| Number of Speeds | 4 (Modes) |
| Drilling Capacity (Wood) | 25 mm |
| Drilling Capacity (Steel) | 10 mm |
| Drilling Capacity (Concrete) | 22 mm |
| Chuck Type | SDS Plus |
| Product Dimensions | 28L x 18W x 8H Centimeters |
| Item Weight | 1 kg |
| Material | Plastic |
| Included Components | Adapter, 3 SDS-PLUS drills |

Figure 2: The INGCO RGH6528 Rotary Hammer Drill shown with its carrying case and included SDS-PLUS drill bits.
4. Setup
4.1 Attaching the Auxiliary Handle
The auxiliary handle provides better control and stability. It can be rotated to various positions for optimal comfort and safety.
- Loosen the auxiliary handle by rotating it counter-clockwise.
- Slide the handle to the desired position on the tool's barrel.
- Rotate the handle clockwise to tighten it securely.

Figure 3: The auxiliary handle can be rotated 360 degrees for ergonomic use.
4.2 Setting the Depth Stop
The depth stop allows for precise drilling to a predetermined depth.
- Insert the depth stop rod into the hole on the auxiliary handle.
- Adjust the rod until the desired drilling depth is achieved, measuring from the tip of the drill bit.
- Tighten the auxiliary handle to secure the depth stop in place.
4.3 Inserting and Removing SDS Plus Drill Bits
The SDS Plus chuck system allows for quick and secure bit changes without additional tools.
- Clean the shank of the SDS Plus drill bit.
- Pull back the chuck sleeve on the front of the tool.
- Insert the drill bit into the chuck until it clicks into place. Release the chuck sleeve.
- Pull on the bit to ensure it is securely locked. There will be a slight axial play, which is normal for SDS Plus systems.
- To remove, pull back the chuck sleeve and pull the bit out.

Figure 4: Demonstrating the SDS Plus chuck system for quick bit changes.
5. Operating Instructions
5.1 Selecting Operating Mode
The INGCO RGH6528 offers four operating modes, selected via the function adjustment knob:

Figure 5: The function adjustment knob for selecting the desired operating mode.
- Drilling Mode (Drill icon): For drilling in wood, metal, ceramics, and plastics without impact.
- Hammer Drilling Mode (Hammer and Drill icon): For drilling in concrete, masonry, and stone with impact.
- Chiseling Mode (Chisel icon): For light chiseling work in masonry and concrete.
- Vario-Lock Mode (Arrow icon): Allows adjustment of the chisel angle for optimal working position.
To change the mode, rotate the function adjustment knob to the desired setting. Ensure the tool is unplugged or switched off before changing modes.
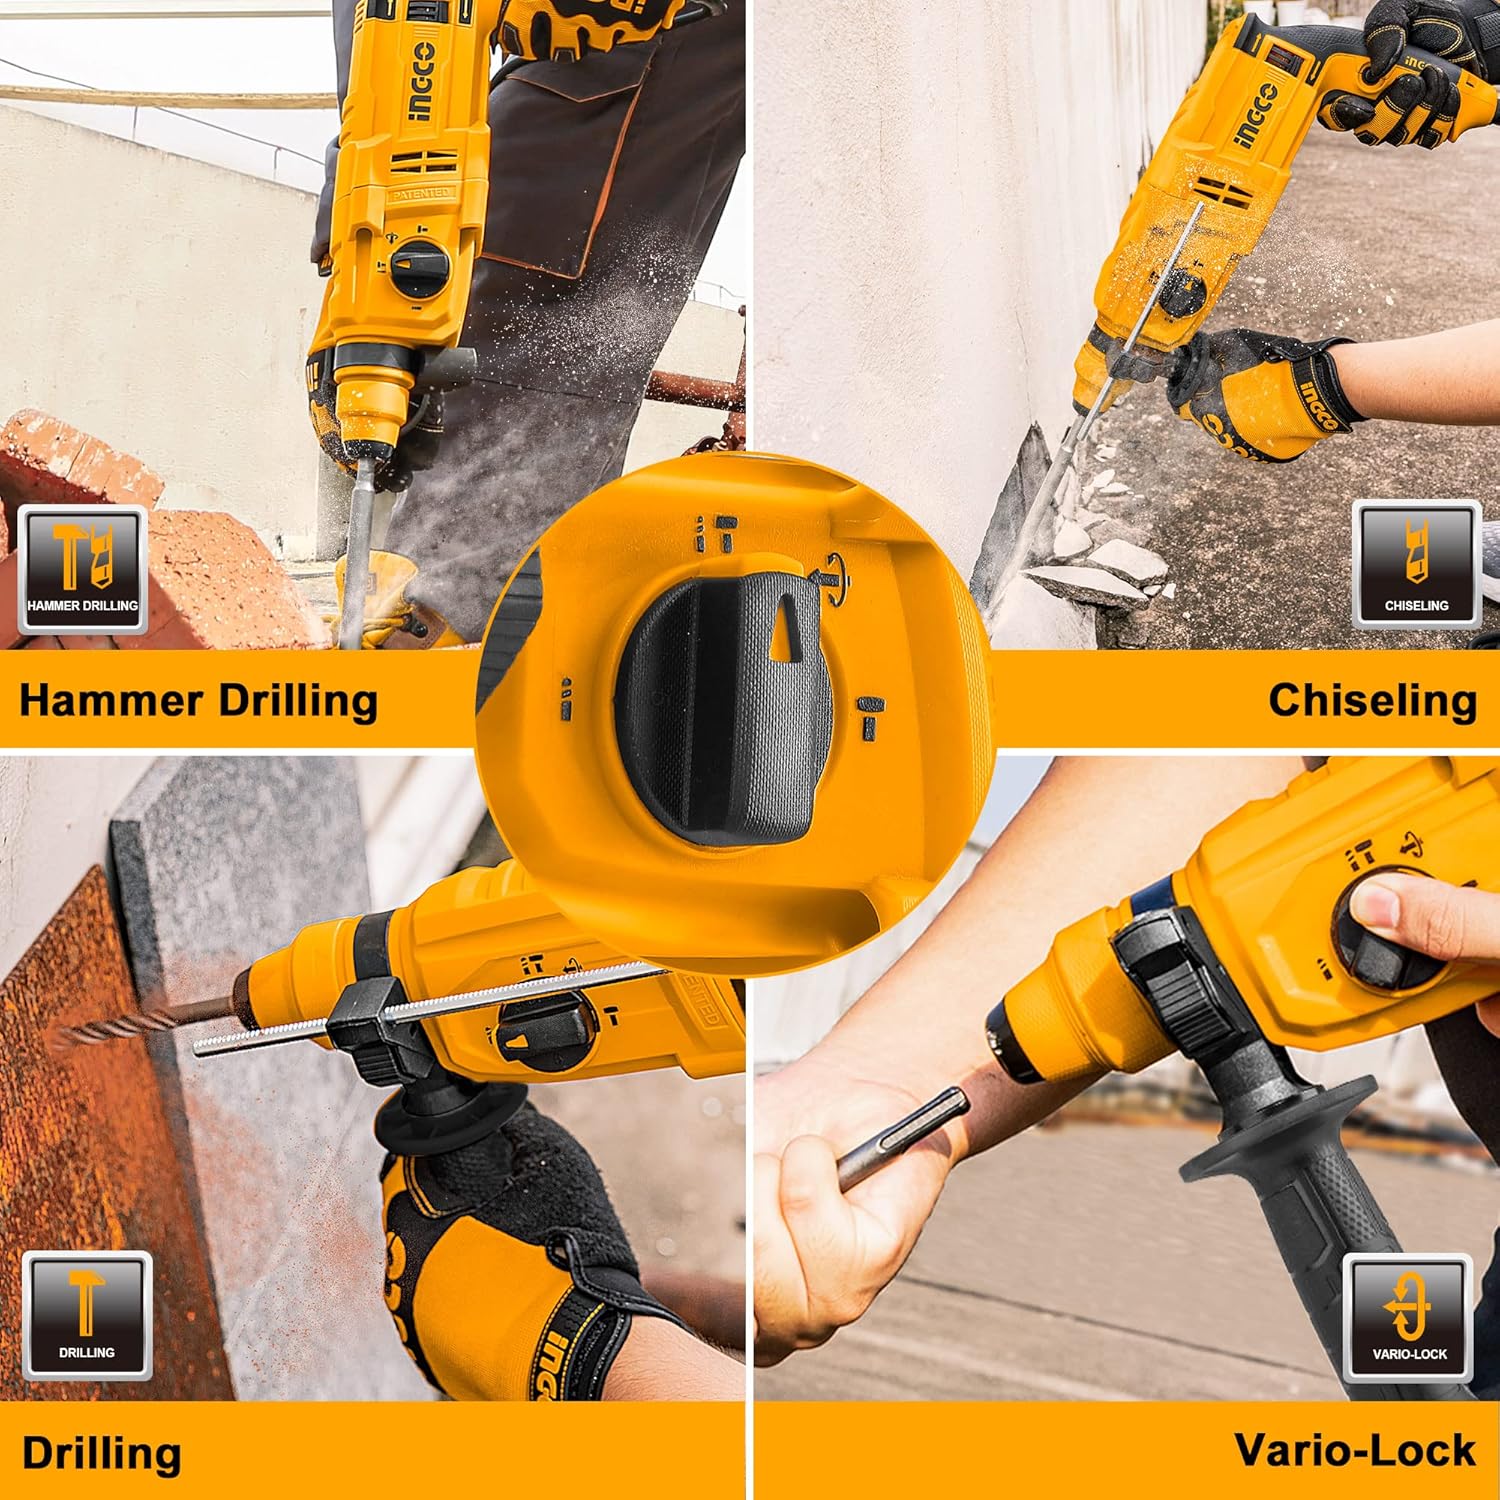
Figure 6: The INGCO RGH6528 in action, demonstrating its four operational modes.
5.2 ON/OFF Switch and Lock-on Button
To start the tool, press the ON/OFF switch. The tool features a variable speed trigger, allowing you to control the speed by varying the pressure on the switch.
For continuous operation, press the Lock-on Button while the ON/OFF switch is depressed. To release, press the ON/OFF switch again.

Figure 7: The Lock-on Button for continuous operation.
5.3 Rotational Direction Switch
The rotational direction switch is located near the ON/OFF switch. Push it to the left for forward rotation (clockwise) and to the right for reverse rotation (counter-clockwise). Use reverse rotation for removing jammed bits or fasteners.
Figure 8: The rotational direction switch allows for forward and reverse operation.
6. Maintenance
Regular maintenance ensures the longevity and optimal performance of your INGCO RGH6528 Rotary Hammer Drill.
- Cleaning: After each use, clean the tool's ventilation slots and housing with a soft brush or compressed air. Do not use water or chemical cleaning agents.
- Chuck Maintenance: Keep the SDS Plus chuck clean and lightly lubricated to ensure smooth bit insertion and removal.
- Carbon Brushes: The carbon brushes are wear parts. If the motor sparks excessively or the tool stops working, the carbon brushes may need replacement. This should be performed by a qualified service technician.
- Storage: Store the tool in a dry, secure place, out of reach of children.

Figure 9: Proper ventilation is crucial for motor cooling and tool longevity.
7. Troubleshooting
If you encounter issues with your rotary hammer drill, refer to the following common problems and solutions:
- Tool does not start:
- Check if the power cord is securely plugged into a working outlet.
- Inspect the power cord for damage.
- Ensure the ON/OFF switch is fully depressed.
- Loss of power or intermittent operation:
- Check for loose connections.
- The carbon brushes may be worn out and require replacement.
- Ensure the ventilation slots are not blocked, as overheating can cause the tool to shut down.
- Bit not locking into chuck:
- Ensure the SDS Plus bit shank is clean and free of debris.
- Pull the chuck sleeve back completely before inserting the bit.
- Excessive vibration or noise:
- Ensure the drill bit is correctly inserted and not bent or damaged.
- Check if the auxiliary handle is securely tightened.
For problems not listed here or if solutions do not resolve the issue, contact customer support.
8. Warranty and Support
The INGCO RGH6528 Rotary Hammer Drill comes with a standard manufacturer's warranty. Please refer to your purchase documentation for specific warranty terms and conditions.
For technical assistance, spare parts, or warranty claims, please contact INGCO customer support through their official website or the retailer where the product was purchased. Always provide your model number (RGH6528) and purchase date when seeking support.