Introduction
This manual provides detailed instructions for the safe installation, operation, and maintenance of your Innovations Lighting Cindyrella 1-Light Mini Pendant. Please read this manual thoroughly before beginning installation and retain it for future reference. This pendant light features an industrial-inspired design with a satin gold finish and clear glass shade, compatible with incandescent, LED, fluorescent, and halogen bulbs up to 100 watts.
Safety Information
WARNING: Risk of electric shock. Disconnect power at the fuse box or circuit breaker before installation or servicing. All electrical connections must be in accordance with local codes, ordinances, or the National Electric Code (NEC). If you are unfamiliar with proper electrical wiring connections, consult a qualified electrician.
- Do not install this fixture in wet locations. It is UL/CUL Damp Rated for indoor use.
- Ensure the mounting surface can support the weight of the fixture.
- Use only the specified bulb type and wattage. Exceeding the maximum wattage may cause overheating and damage to the fixture.
- Do not connect this fixture to an ungrounded electrical system.
- Handle glass components with care to prevent breakage.
- Keep flammable materials away from the light bulb.
Package Contents
Verify that all components are present before discarding packaging materials. If any parts are missing or damaged, contact Innovations Lighting customer support.
- Pendant Fixture Assembly (Canopy, Cord, Socket)
- Glass Shade
- Mounting Hardware Kit (Crossbar, Mounting Screws, Wire Nuts)
- Instruction Manual

Figure 1: Innovations Lighting Cindyrella Mini Pendant Light. This image displays the complete pendant light assembly, featuring a satin gold canopy, black fabric cord, satin gold socket, and a clear glass shade with an exposed bulb.
Specifications
| Model Number | 616-1P-SG-G652-12 |
| Brand | Innovations Lighting |
| Finish | Satin Gold |
| Shade Material | Clear Glass |
| Dimensions (Assembled) | 12 x 12 x 13.75 inches (Length x Width x Height) |
| Item Weight | 2.6 Pounds |
| Power Source | Corded Electric |
| Voltage | 120 Volts |
| Wattage (Max) | 100 Watts |
| Light Source Type | Incandescent, LED, Fluorescent, Halogen (ST64 recommended) |
| Number of Light Sources | 1 |
| Rating | UL/CUL Damp Rated |
| Cord Length | 10 feet (fabric cord) |
| UPC | 729625114618 |
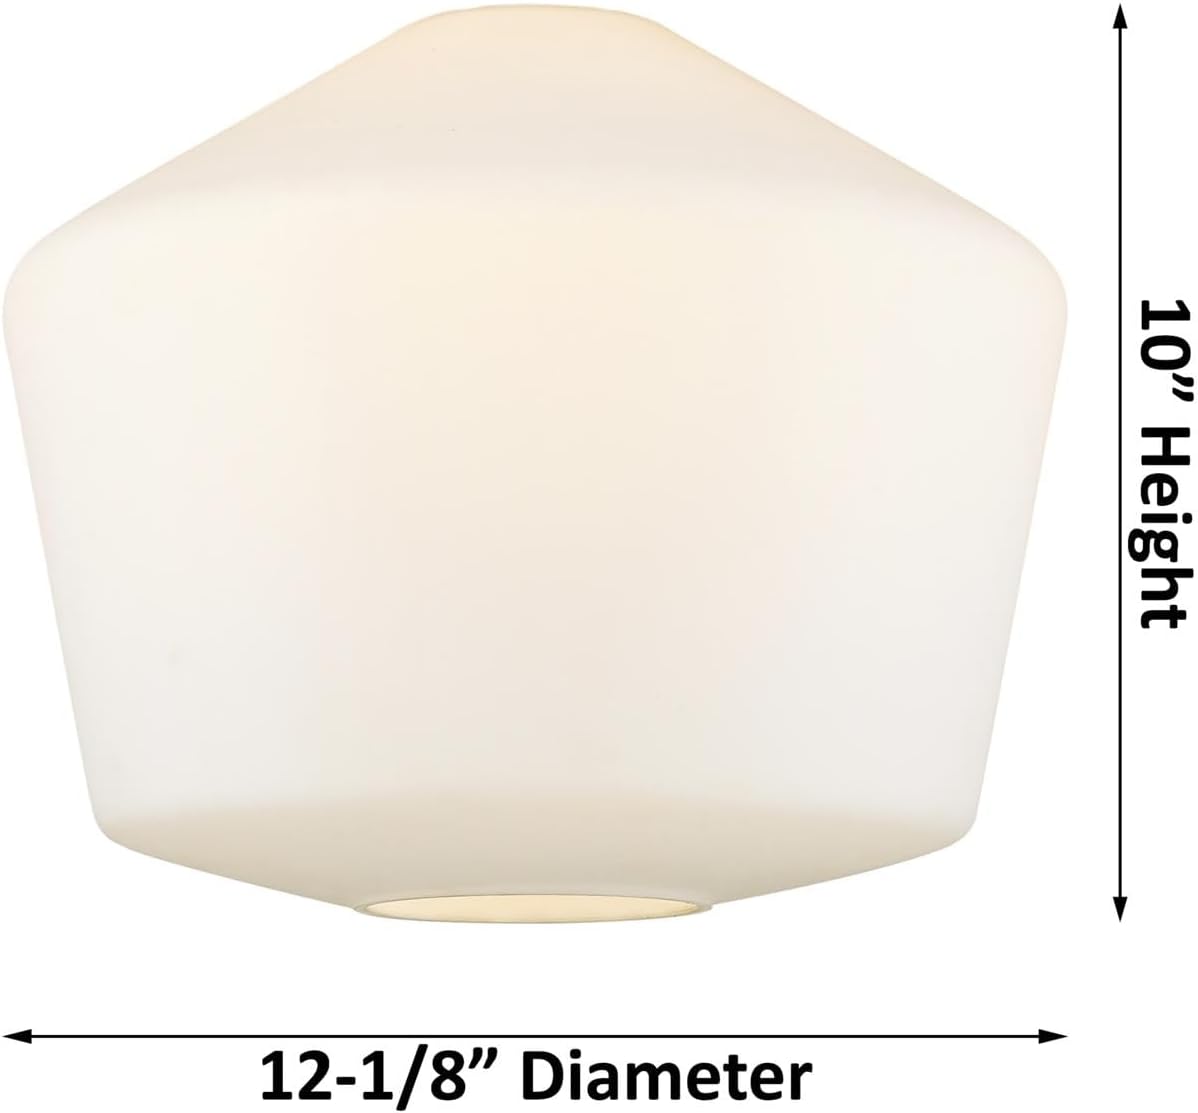
Figure 2: Dimensions of the Cindyrella Mini Pendant Light Shade. This image shows the clear glass shade with measurements indicating a 10-inch height and 12-1/8-inch diameter.
Setup and Installation
Tools Required: Phillips screwdriver, flathead screwdriver, wire strippers, electrical tape, safety glasses, ladder.
- Turn Off Power: Locate the circuit breaker or fuse box that supplies power to the light fixture location. Turn off the power completely to prevent electrical shock.
- Prepare Mounting: Remove the existing fixture (if any). Attach the mounting crossbar to the electrical junction box using the provided mounting screws. Ensure the crossbar is securely fastened.
- Adjust Cord Length: The pendant comes with 10 feet of fabric cord. Determine the desired hanging height for your fixture. Carefully feed the excess cord into the canopy or trim it to the appropriate length, ensuring enough wire remains for electrical connections.
- Make Electrical Connections:
- Connect the green or bare copper ground wire from the fixture to the ground wire from the junction box (usually bare copper or green) using a wire nut.
- Connect the white wire from the fixture to the white (neutral) wire from the junction box using a wire nut.
- Connect the black wire from the fixture to the black (hot) wire from the junction box using a wire nut.
- Ensure all connections are secure and insulated with electrical tape if necessary.
- Mount Canopy: Carefully push the wired connections into the junction box. Align the canopy with the mounting screws on the crossbar and secure it in place with the decorative nuts or screws provided.
- Install Glass Shade: Carefully attach the clear glass shade to the fixture according to the design. This typically involves threading it onto the socket or securing it with a retaining ring.
- Install Bulb: Screw in a light bulb (not included) into the socket. Ensure the bulb does not exceed the maximum wattage of 100 watts.
- Restore Power: Once installation is complete, turn the power back on at the circuit breaker or fuse box.
Operating Instructions
The Innovations Lighting Cindyrella Mini Pendant Light operates like a standard hardwired light fixture. It is controlled by the wall switch connected to its electrical circuit.
- Turning On/Off: Use the wall switch to turn the light fixture on or off.
- Bulb Replacement: To replace the bulb, ensure the power is turned off at the wall switch and preferably at the circuit breaker. Allow the bulb to cool completely before unscrewing it. Install a new bulb of the correct type and wattage (max 100W).
Maintenance
Regular maintenance will help preserve the appearance and functionality of your pendant light.
- Cleaning: Turn off the power before cleaning. Wipe the fixture with a soft, dry cloth. Do not use abrasive cleaners, solvents, or polishes as they may damage the finish. For the glass shade, a mild glass cleaner applied to a cloth (not directly to the fixture) can be used.
- Bulb Care: Replace bulbs promptly when they burn out. Always use bulbs that meet the specified wattage and type.
- Inspections: Periodically check all electrical connections and mounting hardware for tightness.
Troubleshooting
If your pendant light is not functioning correctly, refer to the following common issues and solutions:
- Light does not turn on:
- Check if the power is on at the wall switch and the circuit breaker.
- Ensure the bulb is screwed in tightly and is not burnt out. Replace the bulb if necessary.
- Verify electrical connections are secure (turn off power before checking).
- Light flickers:
- Ensure the bulb is screwed in tightly.
- Check for loose wire connections (turn off power before checking).
- The bulb may be faulty or incompatible with a dimmer switch (if installed).
- Fixture hums:
- Some LED bulbs or dimmer switches can cause humming. Try a different bulb or dimmer.
If these steps do not resolve the issue, contact a qualified electrician or Innovations Lighting customer support.
Warranty and Support
This Innovations Lighting product comes with a Lifetime Warranty as specified in the product details. For warranty claims or technical support, please contact Innovations Lighting directly.
You can visit the official Innovations Lighting store for more information and support: Innovations Lighting Store


