1. Safety Instructions
Always read and understand all safety warnings, instructions, illustrations, and specifications provided with this power tool. Failure to follow all instructions listed below may result in electric shock, fire, and/or serious injury.
- Keep children and bystanders away: Do not allow children or other persons to approach the machine during operation.
- Wear appropriate personal protective equipment (PPE): Always wear safety glasses, sturdy footwear, and hearing protection when operating the lawnmower.
- Inspect the area: Before mowing, clear the area of objects such as stones, sticks, wires, bones, and other debris that could be thrown by the blade.
- Never operate in wet conditions: Avoid using the lawnmower in rain or on wet grass.
- Disconnect power before maintenance: Always remove the batteries before cleaning, adjusting, or performing any maintenance on the lawnmower.
- Use only recommended batteries: This lawnmower requires two 20 V (4 Ah) batteries for operation. Do not use other battery types.
2. Product Overview
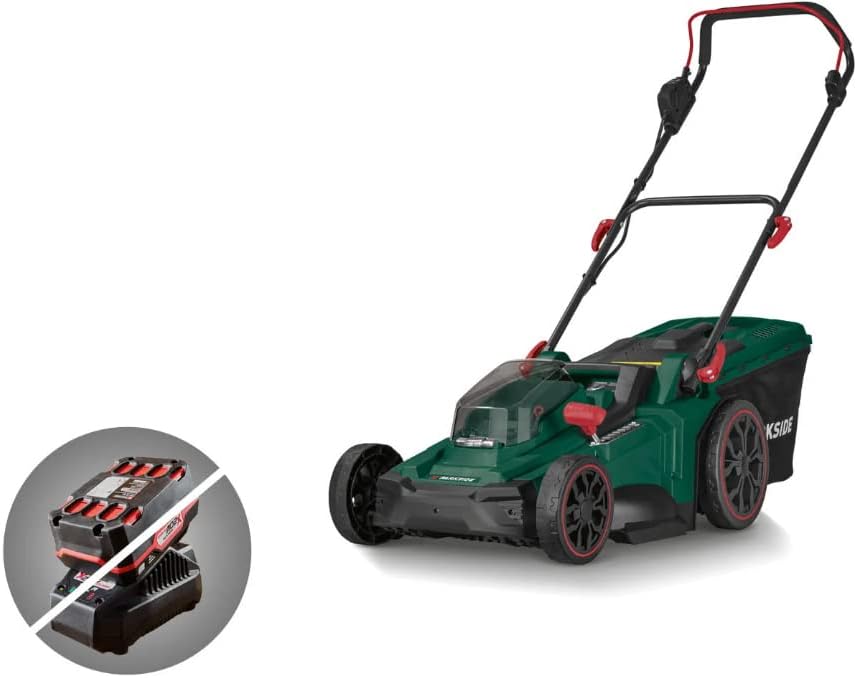
Familiarize yourself with the components of your Parkside® Cordless Lawnmower.


3. Setup
3.1 Handle Assembly
Unfold the handle and secure it in place using the quick-release levers or knobs provided. Ensure the handle is firmly locked before use.
3.2 Grass Collection Box Assembly
Assemble the grass collection box according to the diagrams in the separate assembly guide. Once assembled, attach it to the rear of the lawnmower.

3.3 Battery Installation
This lawnmower requires two 20 V (4 Ah) batteries for operation. Ensure batteries are fully charged before installation.
- Open the battery compartment cover located on the top of the lawnmower.
- Insert two charged 20 V batteries into their respective slots until they click into place.
- Close the battery compartment cover securely.

4. Operating Instructions
4.1 Starting the Lawnmower
To start the lawnmower, press the safety button and then pull the bail switch lever towards the handle. Release the safety button once the motor starts.
4.2 Adjusting Cutting Height
The lawnmower features a central 7-stage cutting height adjustment. This allows for precise control over the grass length.
- Ensure the lawnmower is turned off and batteries are removed before adjusting the height.
- Locate the red lever on the side of the mower deck.
- Pull the lever outwards and move it up or down to select the desired cutting height (from 25mm to 75mm).
- Release the lever to lock it into position.

4.3 Mowing Modes
The lawnmower offers two distinct mowing modes:
- Automatic Mode: Provides maximum performance and cutting efficiency, ideal for dense or long grass.
- ECO Mode: Designed for lighter cuts, optimizing battery life for less demanding tasks.
Select the appropriate mode based on your lawn conditions to achieve optimal results and battery efficiency.
5. Maintenance
Regular maintenance ensures the longevity and optimal performance of your lawnmower.
5.1 Cleaning
- Always remove batteries before cleaning.
- Clean the exterior of the lawnmower with a damp cloth. Do not use harsh chemicals or abrasive cleaners.
- Remove grass clippings from the underside of the deck and around the blade after each use.
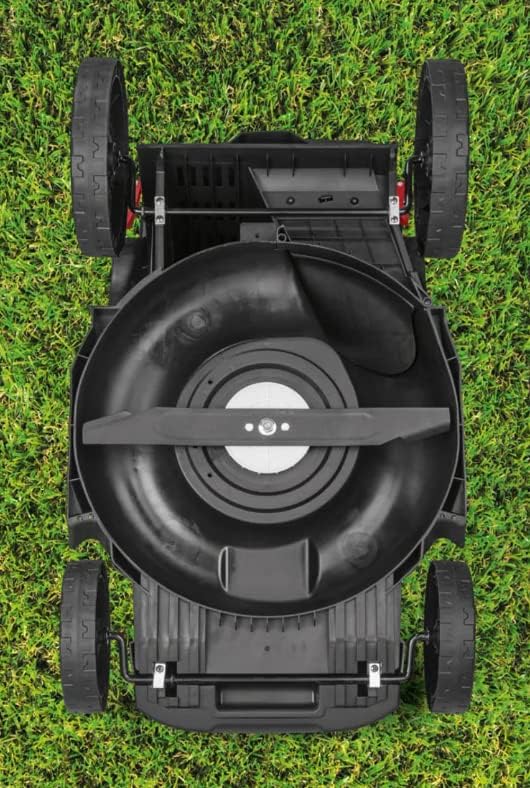
5.2 Blade Care
- Regularly inspect the blade for sharpness and damage. A dull blade can tear grass, leading to an unhealthy lawn.
- If the blade is dull, it can be sharpened by a qualified professional or replaced with a genuine Parkside® replacement blade.
- Ensure the blade is balanced after sharpening or replacement to prevent vibration.
6. Troubleshooting
| Problem | Possible Cause | Solution |
|---|---|---|
| Lawnmower does not start | Batteries not inserted correctly or discharged. Safety button/bail switch not engaged. | Ensure batteries are fully charged and properly seated. Engage safety button and pull bail switch simultaneously. |
| Poor cutting performance | Dull or damaged blade. Grass too long or wet. | Sharpen or replace blade. Mow more frequently or in drier conditions. Adjust cutting height. |
| Excessive vibration | Damaged or unbalanced blade. Loose components. | Inspect blade for damage and balance. Check all fasteners for tightness. |
| Motor stops during operation | Overload due to thick grass. Batteries discharged. | Raise cutting height or reduce mowing speed. Recharge batteries. |
7. Specifications
- Model: PRMA 40-Li B3
- Power Source: Battery-powered (2 x 20 V, 4 Ah recommended, not included)
- Motor Type: Innovative Brushless Motor
- Cutting Width: 43 cm
- Cutting Height Adjustment: Central, 7-stage (25 mm - 75 mm)
- Mowing Modes: Automatic / ECO
- Product Dimensions: 142 x 103 x 48 cm (L x H x W)
- Product Weight: 14.7 kg
- Material: Plastic
- Color: Green
8. Warranty and Support
For warranty information and customer support, please refer to the documentation provided at the time of purchase or contact your local Parkside® service center. Keep your proof of purchase for any warranty claims.
For further assistance or to purchase replacement parts, please visit the official Parkside® website or contact their customer service department. Always use genuine Parkside® replacement parts to ensure compatibility and maintain product performance.