1. Introduction
The Thinkrider X5-2 Smart Bike Trainer is designed to provide an immersive and effective indoor cycling experience. This direct-drive trainer offers realistic road feel and precise power measurement, making it suitable for training, virtual racing, and fitness maintenance during any season. It connects wirelessly to various cycling applications, allowing users to engage with interactive training platforms.

Image 1.1: The Thinkrider X5-2 Smart Bike Trainer, showcasing its compact design and integrated cassette. This image provides an overview of the trainer unit.
2. Safety Information
- Always ensure the trainer is placed on a stable, level surface to prevent tipping.
- Keep children and pets away from the trainer during operation.
- Ensure your bicycle is securely mounted to the trainer before beginning any workout.
- Do not touch moving parts, such as the cassette or flywheel, while the trainer is in use.
- Use only the provided power adapter. Disconnect power when not in use or during maintenance.
- Maintain adequate ventilation in the training area.
3. Package Contents
Verify that all components are present in the package:
- Thinkrider X5-2 Smart Bike Trainer Unit
- Power Adapter
- Quick Release Skewer
- Quick Release Adapters (130mm/135mm)
- Thru-Axle Adapters (142mm/148mm) - Note: May be sold separately or included depending on package variant.
- User Manual (this document)
4. Setup
4.1 Unpacking and Stabilization
- Carefully remove the trainer from its packaging.
- Unfold the stabilizer legs until they lock into position, ensuring the trainer is stable.
- Place the trainer on a flat, non-slip surface.
4.2 Cassette Installation (if not pre-installed)
The Thinkrider X5-2 is a direct-drive trainer, requiring a bicycle cassette to be installed directly onto the trainer's freehub body. Ensure your cassette matches your bike's drivetrain speed (e.g., 8, 9, 10, 11, or 12-speed).
- Slide the cassette onto the freehub body, aligning the splines.
- Secure the cassette with the lockring, tightening it with a cassette lockring tool and wrench.
4.3 Bicycle Mounting
The trainer supports both quick release and thru-axle bicycles. Select the appropriate adapters for your bike.
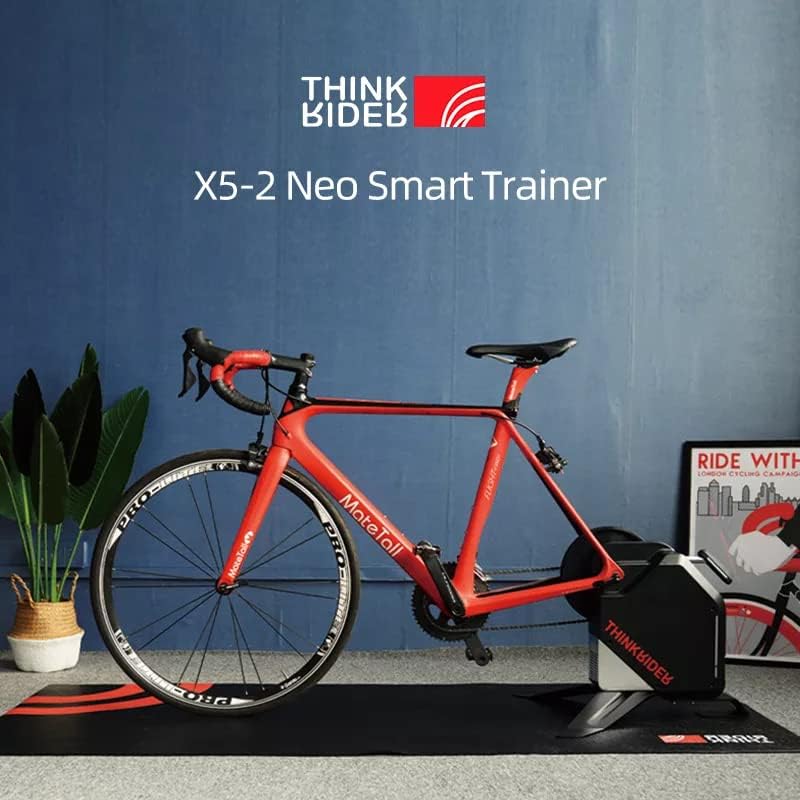
Image 4.1: A road bike securely mounted on the Thinkrider X5-2 trainer, ready for indoor cycling. This illustrates the trainer's compatibility with standard bicycles.
- Remove the rear wheel from your bicycle.
- Install the correct quick release or thru-axle adapters onto the trainer's axle.
- Carefully align your bike's rear dropouts with the trainer's axle and cassette.
- Lower the bike onto the trainer, ensuring the chain engages with the cassette.
- Secure the bike using the quick release skewer or thru-axle, tightening it firmly.
4.4 Power Connection
Connect the power adapter to the trainer's power port and then plug it into a standard electrical outlet (100-240V~1.5A 50-60 Hz).
5. Operating Instructions
5.1 Powering On and Indicator Lights
Once connected to power, the trainer will power on automatically. Refer to the trainer's indicator lights (if present) for status (e.g., power, ANT+, Bluetooth connection).
5.2 Connecting to Cycling Applications
The Thinkrider X5-2 supports ANT+ FE-C and Bluetooth Low Energy (BLE) protocols, allowing connection to various cycling software and devices.

Image 5.1: This image displays the compatible bike computers (Garmin, Bryton), wireless protocols (BLE, ANT+, FE-C), compatible systems (Apple, Android, Windows), and compatible software applications (Powerfun, Zwift, TrainerRoad, Onelap, PerfPro, ERCVideo) for the Thinkrider X5-2 Smart Bike Trainer.
- Ensure your device (computer, tablet, smartphone) has Bluetooth or an ANT+ dongle enabled.
- Open your preferred cycling application (e.g., Zwift, Powerfun, TrainerRoad).
- Navigate to the device pairing or sensor connection menu within the application.
- Search for available devices. The Thinkrider X5-2 should appear as a power meter, speed/cadence sensor, and controllable trainer.
- Select and pair the trainer. For interactive training, ensure you connect it as a controllable trainer (ANT+ FE-C or BLE FTMS).
5.3 Calibration
For optimal accuracy, it is recommended to perform a spindown calibration periodically, especially after initial setup or if you notice inconsistencies in power readings. This procedure is typically initiated through the connected cycling application.
- Warm up the trainer for 5-10 minutes.
- Follow the calibration instructions within your chosen cycling application. This usually involves accelerating to a certain speed and then coasting, allowing the trainer to measure the deceleration time.
6. Maintenance
- Cleaning: Wipe down the trainer regularly with a damp cloth to remove sweat and dust. Avoid using harsh chemicals.
- Cassette: Keep the cassette clean and lubricated, similar to your bike's drivetrain.
- Storage: When not in use, store the trainer in a dry, cool place. The legs can be folded for more compact storage.
- Inspection: Periodically check all bolts and connections to ensure they are secure.
7. Troubleshooting
- No Power: Ensure the power adapter is securely connected to both the trainer and a working electrical outlet.
- Connection Issues (ANT+/BLE):
- Ensure the trainer is powered on.
- Check that Bluetooth or ANT+ is enabled on your device.
- Close and reopen the cycling application.
- Move your device closer to the trainer.
- Ensure no other devices are actively paired with the trainer.
- Inaccurate Power Readings: Perform a spindown calibration as described in Section 5.3.
- Unusual Noise:
- Check that your bike's chain and cassette are clean and properly lubricated.
- Ensure the bike is securely mounted and the quick release/thru-axle is tight.
- Verify that the trainer is on a stable, level surface.

Image 7.1: This image illustrates the professional noise test results, indicating the trainer's quiet operation (typically below 55dB). It also highlights the carbon fiber frame friendly design, which includes a ±8° lateral swing to protect the bike frame and rider's knees during intense use.
8. Specifications
Detailed technical specifications for the Thinkrider X5-2 Smart Bike Trainer:
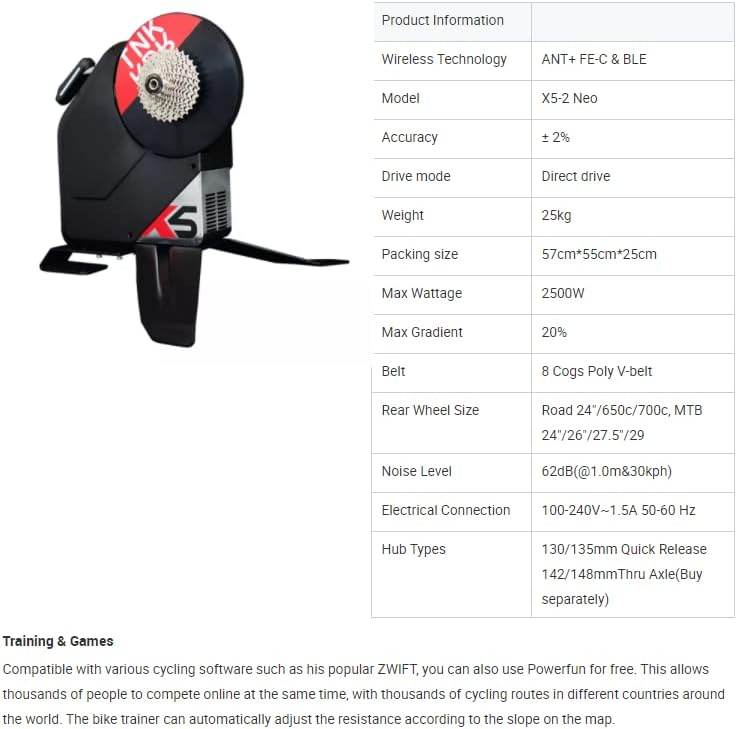
Image 8.1: A table summarizing key product information and specifications for the Thinkrider X5-2 Neo Smart Trainer.
| Feature | Specification |
|---|---|
| Model | X5-2 NEO |
| Wireless Technology | ANT+ FE-C & BLE (Bluetooth Low Energy) |
| Accuracy | ± 2% |
| Drive Mode | Direct Drive |
| Weight | 25 kg |
| Max Wattage | 2500W |
| Max Gradient Simulation | 20% |
| Belt | 8 Cogs Poly V-belt |
| Rear Wheel Size Compatibility | Road: 24"/650c/700c, MTB: 24"/26"/27.5"/29" |
| Noise Level | 62dB (@1.0m & 30kph), typically below 55dB during normal operation. |
| Electrical Connection | 100-240V~1.5A 50-60 Hz |
| Hub Types Supported | 130/135mm Quick Release, 142/148mm Thru Axle (adapters may be sold separately) |
| Compatible Bike Computers | GARMIN, Bryton |
| Compatible Systems | Apple iOS, Android, Windows |
| Compatible Software | Powerfun, Zwift, TrainerRoad, Onelap, PerfPro, ERCVideo |
| Frame Material | Aluminum, Carbon Fiber friendly design |
9. Warranty and Support
For warranty information, technical support, or service inquiries, please refer to the documentation included with your purchase or contact Nick Pro Cycling customer support directly. Keep your proof of purchase for warranty claims.
Contact information can typically be found on the manufacturer's official website or on the product packaging.


