
OMTech USB-0302-D2
Contents
OMTech K40+ CO2 Laser Engraver 40W 200x300mm User Manual
Model: USB-0302-D2
1. Introduction
Welcome to the OMTech K40+ CO2 Laser Engraver user manual. This guide provides essential information for the safe and effective operation, maintenance, and troubleshooting of your 40W CO2 laser engraving machine. Please read this manual thoroughly before operating the device to ensure safety and optimal performance.
The OMTech K40+ is a versatile laser engraver capable of engraving and cutting various materials such as wood, glass, acrylic, and leather, with a work area of 200x300mm. It features an adjustable laser head, a removable base for larger objects, and is compatible with popular software like LightBurn and LaserGRBL.
Safety Warnings
- Laser Radiation: This product contains a Class 4 laser. Avoid direct exposure to the laser beam. Always wear appropriate laser safety glasses.
- Ventilation: Ensure adequate ventilation to remove fumes and smoke generated during operation. Use the integrated air assist and exhaust fan.
- Fire Hazard: Certain materials can ignite during laser processing. Never leave the machine unattended while operating. Keep a fire extinguisher nearby.
- Water Cooling: The CO2 laser tube requires constant water cooling. Ensure the water pump is functioning correctly and the water temperature is maintained.
- Electrical Safety: Connect the machine to a properly grounded power outlet. Do not operate with wet hands or in damp environments.
- Material Compatibility: Only engrave or cut materials specified as safe for CO2 lasers. Avoid materials that produce toxic fumes or are highly reflective.
2. Setup and Installation
2.1 Unboxing and Component Check
Carefully unpack all components and verify against the packing list. The package should include:
- 1x OMTech K40+ 40W CO2 Laser Engraver
- 1x Water Pump
- 1x Exhaust Hose
- 1x USB Key
- 1x Power Cord
- 1x USB Cable
- 1x Clamp
- 1x Silicone Insulation Tube
- 1x Ceramic Resistor
- 1x Roll of Gradation Paper
- 1x User Manual (this document)
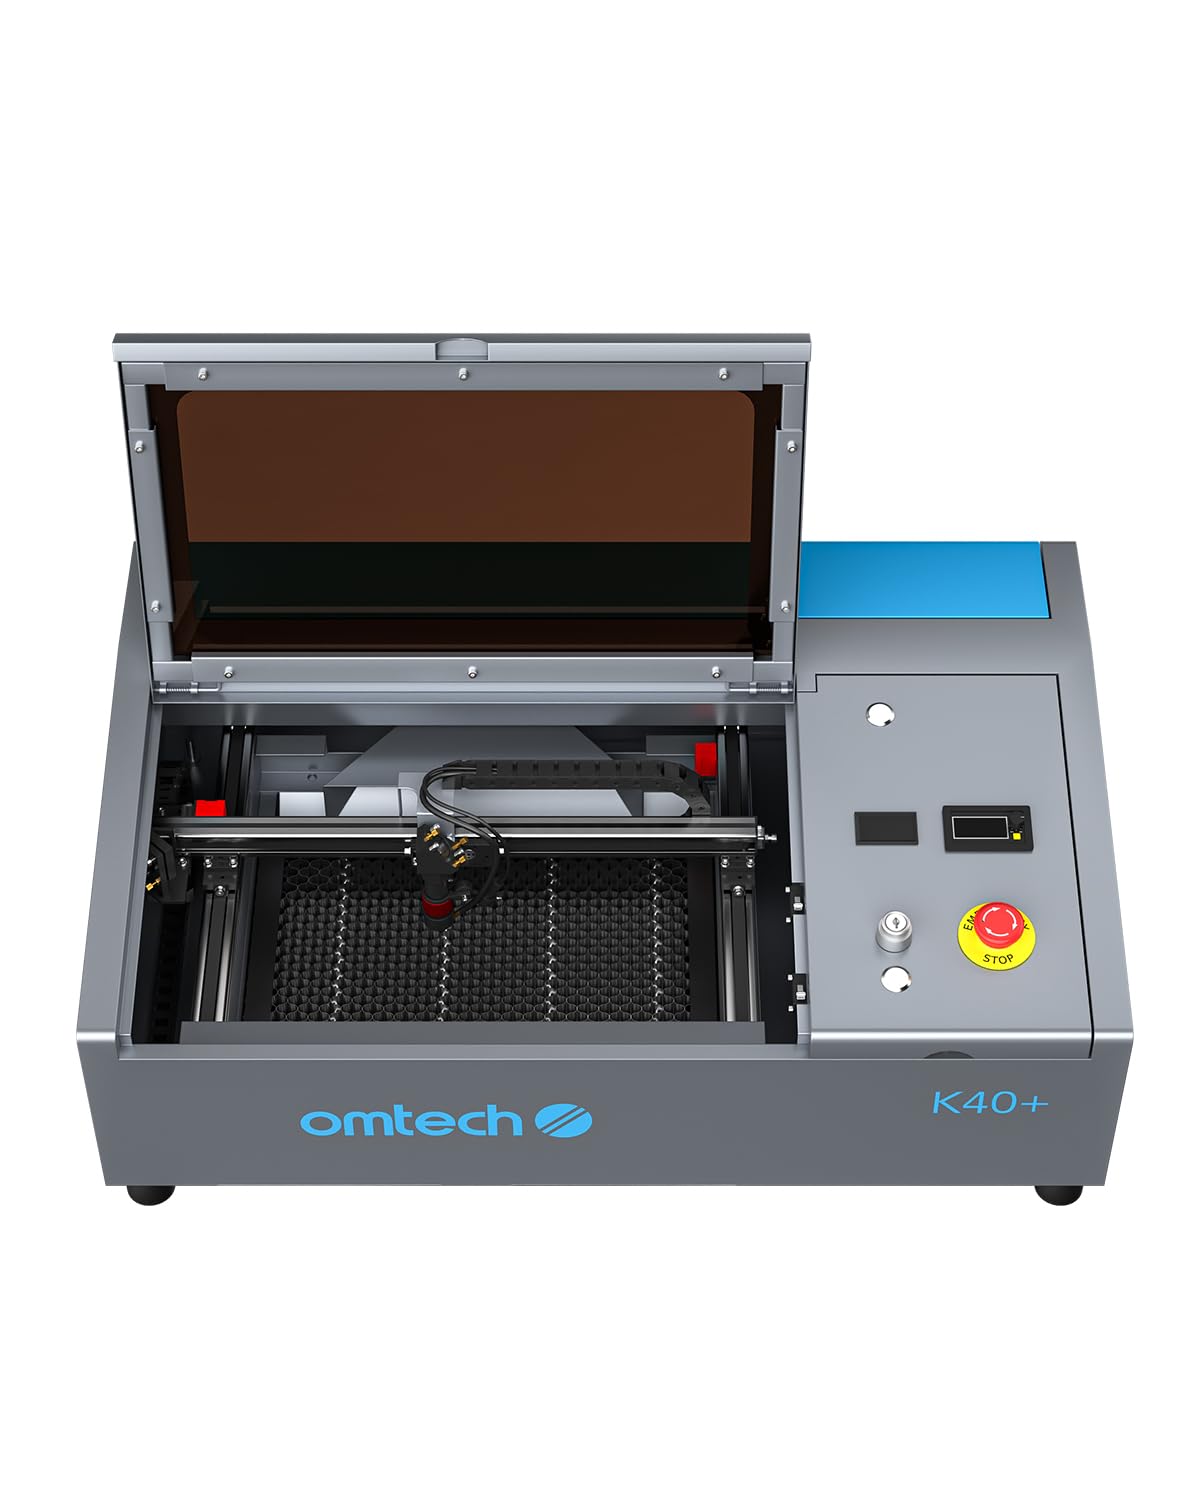
Figure 2.1: The OMTech K40+ CO2 Laser Engraver main unit.
2.2 Connecting the Water Cooling System
The CO2 laser tube generates heat and requires continuous water cooling. Connect the provided water pump to the laser tube's inlet and outlet ports using the silicone tubes. Place the water pump in a bucket of distilled water (not included). Ensure water flows freely through the laser tube before powering on the machine.
2.3 Exhaust System Installation
Attach the exhaust hose to the machine's exhaust port and direct the other end to an outdoor vent or a dedicated fume extractor. Proper ventilation is crucial to remove smoke and debris during operation.

Figure 2.3: Schematic illustrating the air assist and exhaust system for effective fume and debris removal.
2.4 Power and USB Connections
Connect the power cord to the machine and a grounded electrical outlet. Connect the USB cable from the engraver to your computer. Ensure all connections are secure before proceeding.
3. Operating Instructions
3.1 Powering On and Initial Checks
- Ensure the water pump is running and water is circulating through the laser tube.
- Turn on the main power switch on the laser engraver.
- Observe the digital ammeter. For LightBurn software, turn the ammeter dial fully clockwise to ensure proper current output.

Figure 3.1: Digital ammeter displaying current output in mA, essential for monitoring laser power.
3.2 Software Compatibility
The OMTech K40+ is compatible with various laser engraving software, including LightBurn and LaserGRBL. These programs allow for precise control over the engraving process, design creation, and workflow optimization.

Figure 3.2: Software interfaces for LightBurn and LaserGRBL, demonstrating compatibility for design and control.
3.3 Material Placement and Work Area
The machine features a 200 x 300 mm work bed, suitable for a wide range of objects. Place your material securely on the honeycomb work table. The honeycomb design aids in heat dissipation and debris removal, improving engraving quality.

Figure 3.3: The spacious 300x200mm work area of the OMTech K40+ laser engraver.

Figure 3.4: Durable honeycomb work table for optimal heat dissipation and debris removal.
3.4 Adjustable Laser Head and Removable Base
The laser head can be adjusted up to 3 cm to accommodate materials of varying thicknesses. The machine's base is also removable, allowing for the processing of larger or irregularly shaped objects.

Figure 3.5: The adjustable laser head, extending up to 3 cm for various material thicknesses.
3.5 Rotary Axis Compatibility
For engraving on curved surfaces, the K40+ supports an external rotary axis (sold separately). The work table can be easily removed to install your rotary attachment.

Figure 3.6: The OMTech K40+ is compatible with rotary axes for engraving cylindrical objects.
3.6 Material Processing Capabilities
The 40W CO2 laser can engrave up to 3mm deep on various materials. Always test settings on scrap material before final engraving.
- Engraving: Wood, Acrylic, Leather, Glass, Rubber, Stone, Ceramics, Fabric, Coated Metals.
- Cutting: Wood (thin), Acrylic (thin), Leather, Paper, Fabric.
- Avoid: PVC/Vinyl (produces chlorine gas), ABS, HDPE, Polycarbonate, Carbon Fiber, Metals (without special coating).

Figure 3.7: Example of the OMTech K40+ processing a complex design on wood.

Figure 3.8: Examples showcasing the ultra-fine engraving precision of the OMTech K40+.
4. Maintenance
Regular maintenance ensures the longevity and optimal performance of your laser engraver. Always power off and unplug the machine before performing any maintenance.
4.1 Cleaning Lenses and Mirrors
The laser path contains several mirrors and a focusing lens that can accumulate dust and debris, affecting laser performance. Clean these optical components regularly using lens cleaning solution and specialized wipes. Handle with extreme care to avoid scratches.
4.2 Water Cooling System Maintenance
- Water Replacement: Change the distilled water in the cooling bucket every 1-2 weeks, or more frequently with heavy use.
- Algae Prevention: Consider adding a small amount of algaecide (non-corrosive) to the water to prevent algae growth.
- Pump Check: Periodically check the water pump for blockages or reduced flow.
4.3 Exhaust System Cleaning
The exhaust fan and hose can become clogged with smoke residue and debris. Clean them regularly to maintain efficient fume extraction and prevent buildup that could pose a fire risk.
4.4 Laser Tube Care
The CO2 laser tube is a delicate component. Avoid physical shocks and ensure it is always properly cooled. Do not operate the laser if the water cooling system is not functioning.

Figure 4.1: The powerful and efficient CO2 laser tube, requiring proper cooling and care.
5. Troubleshooting
This section addresses common issues you might encounter with your OMTech K40+ laser engraver.
| Problem | Possible Cause | Solution |
|---|---|---|
| Laser not firing |
|
|
| Poor engraving/cutting quality |
|
|
| Engravings are distorted or not straight |
|
|
| Excessive smoke/fumes |
|
|
6. Specifications
| Feature | Detail |
|---|---|
| Manufacturer | OMTech |
| Model | USB-0302-D2 |
| Product Dimensions (L x W x H) | 81 x 50 x 25 cm |
| Weight | 30 Kilograms |
| Color | Grey |
| Style | 40W IT |
| Power Type | AC |
| Voltage | 220 Volts |
| Wattage | 40 Watts |
| Work Area | 200 x 300 mm |
| Special Features | Adjustable Laser Head, Air Assist |
| Included Components | 1x 40W CO2 Laser Engraver, 1x Water Pump, 1x Exhaust Hose, 1x USB Key, 1x Power Cord, 1x USB Cable, 1x Clamp, 1x Silicone Insulation Tube, 1x Ceramic Resistor, 1x Roll of Gradation Paper, 1x User Manual |
7. Warranty Information
Specific warranty details are typically provided with your purchase documentation. Please refer to the warranty card or contact OMTech customer service for comprehensive information regarding your product's warranty period and coverage.
8. Customer Support and Resources
OMTech is dedicated to providing quality products and excellent customer service. If you encounter any issues or have questions not covered in this manual, please contact OMTech customer support.
- Online Resources: Visit the official OMTech website for FAQs, software downloads, and additional guides.
- Technical Assistance: Contact OMTech technical support for assistance with setup, operation, or troubleshooting.
- Community Forums: Engage with other OMTech users in online forums for tips, tricks, and project inspiration.
You can find more information and contact details on the OMTech Brand Store on Amazon.
Ask a question about this manual
Ask about setup, troubleshooting, compatibility, parts, safety, or missing instructions. Manuals+ will review the question and use this page’s manual context to help answer it.