1. Product Overview
The Hantek HDP135V6 is a single-channel programmable DC power supply designed for various electronic applications. It offers precise control over voltage and current output, with a maximum output of 35V and 6A. Key features include a clear 4-digit display, multiple protection mechanisms, and memory settings for frequently used configurations.
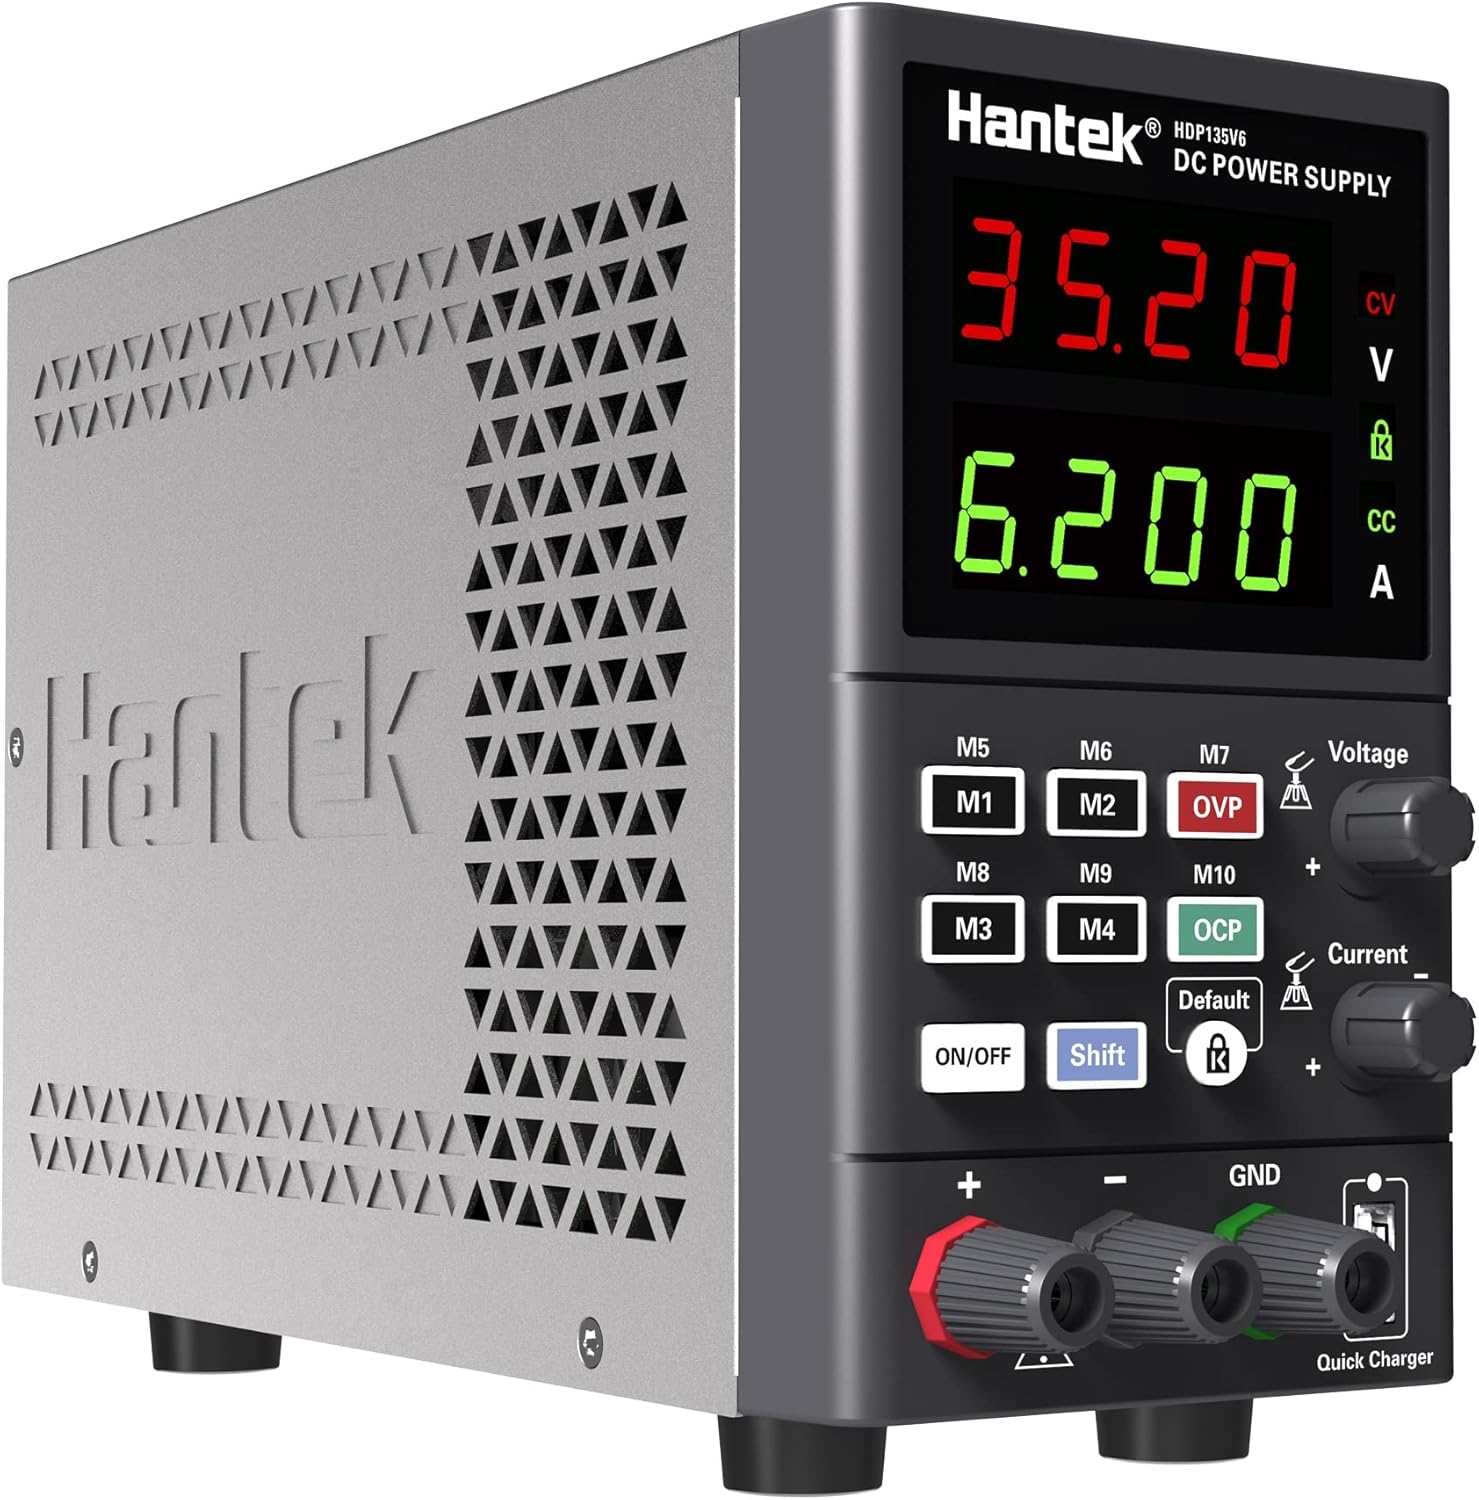
Figure 1.1: Front view of the Hantek HDP135V6 Programmable DC Power Supply, showing the display, control knobs, and output terminals.
Key Features:
- Easy setup with two separate rapid adjustment knobs for voltage and current.
- 4-digit display for voltage and current, with 10mV/1mA resolution.
- Selectable 230V/115V input voltage.
- Maximum output of 35V/6A.
- Standard 5~12V USB quick charge port.
- 10 save/recall memory settings (M1-M10).
- Comprehensive protection features: Over Current (OC), Over Voltage (OV), Overload, Overheat, and Short-circuit protection.
- Key lock function to prevent accidental changes.
- Output ON/OFF switch lock.
- Smart temperature-controlled cooling fan.
- Compact and lightweight design for portability.
2. Safety Instructions
To ensure safe operation and prevent damage to the device or connected equipment, please read and follow these safety instructions carefully.
- Power Source: Ensure the power supply is connected to a grounded AC outlet with the correct voltage. Verify the AC selector switch on the rear panel is set to the appropriate voltage (115V or 230V) for your region before connecting the power cord.
- Ventilation: Do not block the ventilation openings on the device. Ensure adequate airflow around the unit to prevent overheating.
- Environment: Operate the power supply in a dry, well-ventilated area, away from direct sunlight, high temperatures, humidity, and dust.
- Load Connection: Always connect the load to the output terminals before turning on the output. Ensure the load is within the specified voltage and current limits of the power supply.
- Output Terminals: Do not touch the output terminals when the power supply is operating.
- Maintenance: Refer all servicing to qualified personnel. Do not attempt to open or repair the unit yourself.
- Fuse: Replace fuses only with the specified type and rating.
3. Setup
3.1 Unpacking and Inspection
Upon receiving your Hantek HDP135V6, carefully unpack the unit and inspect it for any signs of damage during transit. Retain the packaging materials for future transport or storage.
3.2 Power Connection
- Locate the AC selector switch on the rear panel of the power supply.
- Set the switch to the appropriate voltage for your region (115V or 230V). Incorrect setting can cause damage to the unit.
- Connect the provided AC power cord to the power input socket on the rear panel and then to a grounded AC outlet.

Figure 3.1: Rear view of the Hantek HDP135V6, highlighting the AC selector switch, power input, and cooling fan.
3.3 Front Panel Controls and Indicators
The front panel provides all necessary controls and displays for operating the power supply.
- Voltage Display: Shows the set or actual output voltage.
- Current Display: Shows the set or actual output current.
- Voltage Adjustment Knob: Used to set the output voltage.
- Current Adjustment Knob: Used to set the output current limit.
- M1-M10 Buttons: Memory buttons for saving and recalling settings.
- ON/OFF Button: Toggles the output power.
- Shift Button: Used in combination with other buttons for advanced functions.
- Lock Button: Activates/deactivates the key lock function.
- Output Terminals (+, -, GND): Connect your load here.
- Quick Charger USB Port: Provides 5~12V USB output.
4. Operating Instructions
4.1 Basic Operation
- Ensure the power supply is properly connected to AC power.
- Press the main power switch on the rear panel to turn on the unit. The display will illuminate.
- Setting Voltage: Rotate the Voltage Adjustment Knob to set the desired output voltage.
- Setting Current Limit: Rotate the Current Adjustment Knob to set the desired maximum output current. This acts as a current limit for your connected load.
- Connecting Load: Connect your device or circuit to the output terminals (Red for positive '+', Black for negative '-', Green for Ground 'GND').
- Activating Output: Press the ON/OFF button on the front panel to enable the output. The display will show the actual output voltage and current.
- Deactivating Output: Press the ON/OFF button again to disable the output.
4.2 Memory Functions (M1-M10)
The power supply allows you to save and recall up to 10 sets of voltage and current settings.
- Saving Settings: Set the desired voltage and current. Press and hold the Shift button, then press one of the M1-M10 buttons until the display indicates the setting is saved.
- Recalling Settings: Press the desired M1-M10 button to recall the saved voltage and current settings.
4.3 Protection Functions
The HDP135V6 includes several protection features to safeguard the unit and connected devices:
- Over Current Protection (OCP): Automatically limits or shuts down output if current exceeds the set limit.
- Over Voltage Protection (OVP): Shuts down output if voltage exceeds a preset limit.
- Overload Protection: Protects against excessive power draw.
- Overheat Protection: Activates the cooling fan and may shut down if internal temperature is too high.
- Short-Circuit Protection: Immediately cuts off output in case of a short circuit.
4.4 Key Lock Function
To prevent accidental changes to settings during operation, you can activate the key lock function.
- Activate Lock: Press the Lock button. A lock icon will appear on the display.
- Deactivate Lock: Press the Lock button again. The lock icon will disappear.
4.5 USB Quick Charge
The front panel features a USB port for quick charging compatible devices. This port provides a variable output from 5V to 12V, depending on the connected device's charging protocol.
5. Maintenance
5.1 Cleaning
To clean the exterior of the power supply, use a soft, damp cloth. Do not use abrasive cleaners or solvents. Ensure the unit is powered off and disconnected from the AC supply before cleaning.
5.2 Fuse Replacement
If the power supply fails to power on, the fuse may need replacement. The fuse holder is located on the rear panel, integrated with the AC input socket.
- Disconnect the power supply from the AC outlet.
- Using a small flat-head screwdriver, gently pry open the fuse compartment within the AC input socket.
- Remove the old fuse and replace it with a new fuse of the same type and rating (e.g., 5.0AT/250V for 110V/115V input, or 3.15AT/250V for 220V/230V input). Refer to the rating label on the rear panel.
- Close the fuse compartment securely.
6. Troubleshooting
If you encounter issues with your Hantek HDP135V6, refer to the following common problems and solutions:
| Problem | Possible Cause | Solution |
|---|---|---|
| Unit does not power on. | No AC power, faulty power cord, blown fuse, incorrect AC selector setting. | Check AC power connection. Verify AC selector switch is correct. Replace fuse if blown (refer to Section 5.2). |
| No output voltage/current. | Output is OFF, OCP/OVP activated, short circuit in load. | Press the ON/OFF button to enable output. Check for OCP/OVP indicators. Disconnect load and check for short circuits. |
| Output voltage/current is unstable or incorrect. | Loose connections, faulty load, internal issue. | Check all connections. Test with a different load. If problem persists, contact support. |
| Unit overheats. | Blocked ventilation, excessive load. | Ensure ventilation openings are clear. Reduce load or operate in a cooler environment. |
| Unexpected voltage spikes on output activation. | Characteristic of power supply design, especially with very light or no load. | Always connect a suitable load before activating output. Monitor output carefully, especially with sensitive devices. If critical, consider adding a dummy load or using a power supply with soft-start features. |
7. Specifications
| Parameter | Value |
|---|---|
| Model | HDP135V6 |
| Output Voltage | 0-35V |
| Output Current | 0-6A |
| Voltage Resolution | 10mV |
| Current Resolution | 1mA |
| Input Voltage | 115V/230V AC (Switchable) |
| Output Wattage | 210 Watts |
| USB Quick Charge Output | 5~12V |
| Product Dimensions (L x W x H) | 5.91 x 3.35 x 9.06 inches (150 x 85 x 230 mm) |
| Item Weight | 4.44 pounds (2.01 kg) |
| Manufacturer | Qingdao Hantek Electronic Co., Ltd. |
8. Warranty and Support
8.1 Warranty Information
Hantek products are typically covered by a manufacturer's warranty against defects in materials and workmanship. Please refer to the warranty card included with your product or contact Hantek customer service for specific warranty terms and conditions.
8.2 Customer Support
For technical assistance, troubleshooting, or service inquiries, please contact Hantek customer support. Contact information can usually be found on the manufacturer's official website or on the product packaging.


