
1. Product Overview
This manual provides detailed instructions for the installation, operation, and maintenance of your maXpeedingrods Height Adjustable Coilovers Suspension Kit. These coilovers are designed to enhance your vehicle's handling and allow for customized ride height adjustment.
Compatibility:
- For BMW 3 Series E90 (2004-2011)
- For BMW 3 Touring E91 (2004-2012)
- For BMW 3 Coupe E92 (2005-2013)
- For BMW 3 Convertible E93 (2006-2013)
Note: This product is designed for RWD vehicles only and is not compatible with M3 models.
2. Package Contents
Please verify that all components listed below are present and undamaged before beginning installation.

Image: Overview of the complete maXpeedingrods coilover kit, including front and rear coilovers, springs, sway bar links, and adjustment wrenches.
- 2x Front Coil-overs
- 2x Rear Shock Absorbers
- 2x Rear Spring Kits
- 2x Upper Spring Seats
- 2x Lower Spring Pads
- 2x Sway Bar Links
- 2x Bushings
- Adjustment Wrenches
- Installation Instructions (printed manual)
3. Technical Specifications
Understanding the specifications of your coilovers is crucial for proper installation and performance tuning.
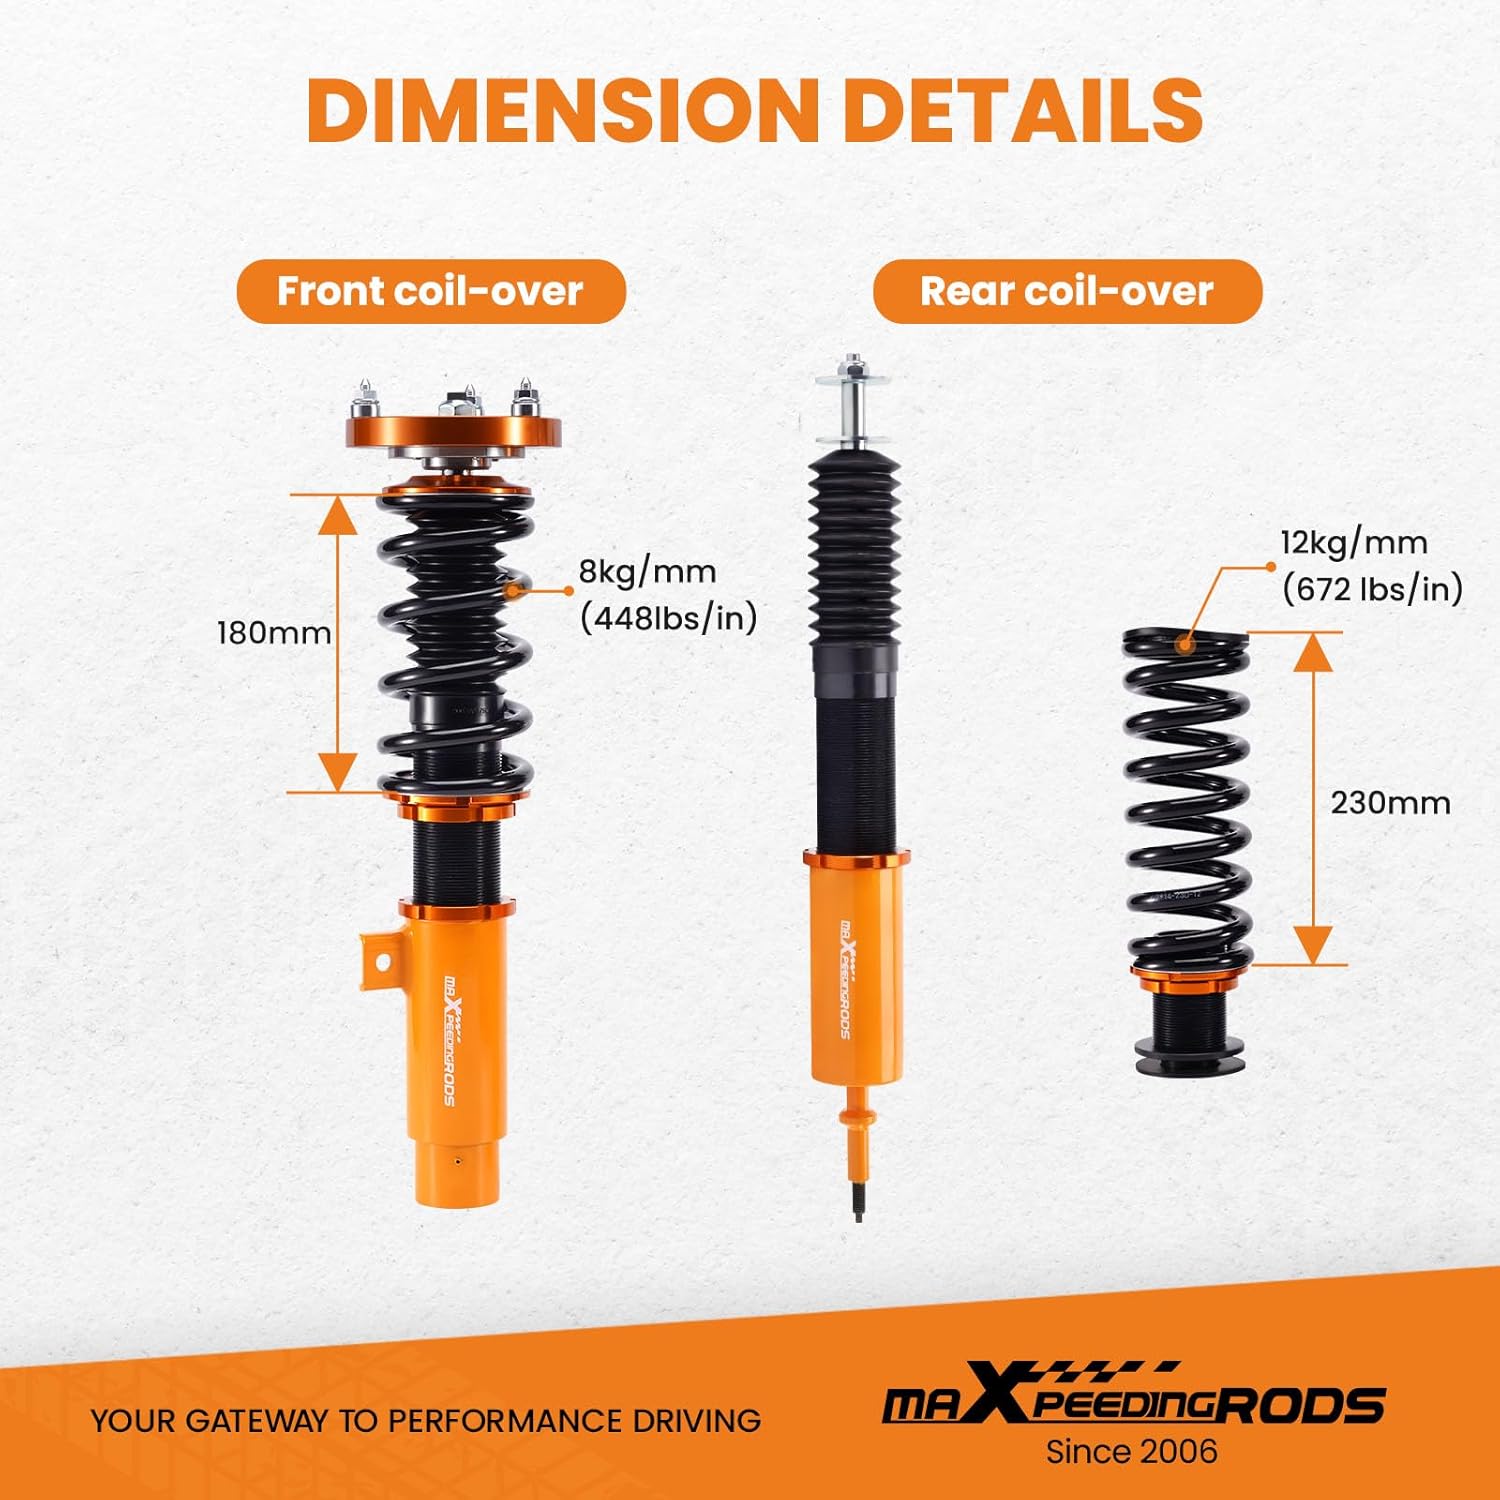
Image: Detailed diagram showing the dimensions and spring rates for both front and rear coilover components. Front spring length is 180mm with a rate of 8 kg/mm (448 lbs/in), and rear spring length is 230mm with a rate of 12 kg/mm (672 lbs/in).
| Feature | Specification |
|---|---|
| Front Spring Rate | 8 kg/mm (448 lbs/in) |
| Rear Spring Rate | 12 kg/mm (672 lbs/in) |
| Front Spring Length | 180mm |
| Rear Spring Length | 230mm |
| Height Adjustment Range | 1-3 inches (lowering) |
| Structure Type | Twin-tube |
| Material | 6061 Aluminum Alloy (T6), 55CrSi Steel (Springs), Rubber |
| Front Rod Diameter | 22mm |
| Item Weight | 62.1 pounds |
| Product Dimensions | 24.8 x 20.08 x 7.87 inches |

Image: An exploded view of a coilover, highlighting key components such as the camber plate top mount (6061-T6 Aluminum), upper spring seat with radial bearing, full-length dust boot, high rigidity 55CrSi steel cold-bent coil springs, 6061-T6 AL perch, anodized shock body with anti-corrosion coating, and powder-coated lower mount.
4. Installation Guide
Warning: Professional installation is highly recommended. Improper installation can lead to vehicle damage or personal injury. Always use appropriate safety equipment and follow vehicle-specific service manual procedures.
General Installation Steps:
- Safely lift and support the vehicle on jack stands.
- Remove the wheels.
- Carefully remove the original suspension components (struts, springs, shocks).
- Install the new maXpeedingrods coilovers. Ensure all bolts are torqued to manufacturer specifications.
- Adjust the ride height as desired (refer to 'Operation and Adjustment' section).
- Reinstall wheels and lower the vehicle.
- Perform a wheel alignment after installation to ensure proper vehicle handling and tire wear.

Image: A visual guide demonstrating the process of adjusting the coilover height. It shows loosening the lower mount (A) and locking ring (B), then rotating the shock body to increase or decrease the thread distance (D) to change the ride height, and finally tightening the lower mount and locking ring.
5. Operation and Adjustment
Ride Height Adjustment:
The coilovers allow for 1-3 inches of lowering from the original ride height. To adjust, use the provided wrenches to:
- Loosen the lower mount and the locking ring.
- Rotate the coilover body to increase or decrease the threaded distance, thereby adjusting the ride height.
- Once the desired height is achieved, securely tighten both the lower mount and the locking ring.
Important: Ensure both sides of the vehicle are adjusted to the same height for balanced handling.
Camber Plate Adjustment:
The front coilovers feature adjustable camber plates, which provide sharp and precise handling by allowing fine-tuning of the wheel's camber angle.

Image: A close-up view of the adjustable camber plate at the top of the coilover, showing the bolts that allow for precise adjustment of the wheel's camber angle to optimize handling.
Consult a professional alignment specialist for optimal camber settings for your driving style and vehicle use.
Radial Bearing:
The upper spring seat incorporates a radial bearing to reduce friction during steering, improving steering feel and response and helping to eliminate turning noise.

Image: A view of the coilover assembly, specifically highlighting the radial bearing located within the upper spring seat, which facilitates smoother steering.
6. Maintenance
Regular maintenance will ensure the longevity and optimal performance of your coilovers.
- Regular Inspection: Periodically inspect the coilovers for any signs of damage, leaks, or loose components. Check for wear on bushings and dust boots.
- Cleaning: Keep the coilovers clean, especially the threaded sections and dust boots, to prevent dirt and debris buildup that could affect adjustment or cause premature wear.
- Lubrication: Apply a suitable lubricant to the threaded sections if they become stiff during adjustment.
- Dust Boots: The durable TPV full-length dust boots protect the piston shafts from dirt and debris. Ensure they are intact and properly seated.

Image: A visual representation highlighting the durable TPV full-length dust boots, which protect the piston shafts, and the powder-coated lower mount, designed for anti-rust and anti-corrosion performance.
7. Troubleshooting
If you encounter issues with your coilovers, refer to the following common problems and solutions:
| Problem | Possible Cause | Solution |
|---|---|---|
| Unusual Noises (clunking, squeaking) | Loose mounting bolts, worn bushings, improper installation, debris in spring. | Check all mounting points for proper torque. Inspect and replace worn bushings. Re-check installation steps. Clean coilovers. |
| Uneven Ride Height | Incorrect height adjustment, uneven spring preload. | Re-measure and adjust height on both sides. Ensure spring preload is consistent. |
| Poor Handling/Steering Response | Incorrect alignment (camber/toe), improper height setting, damaged component. | Perform a professional wheel alignment. Verify height settings. Inspect for damaged components. |
| Shock Leaking Fluid | Seal failure, internal damage. | Contact customer support for assistance. This indicates a component failure. |
If troubleshooting steps do not resolve the issue, please contact maXpeedingrods customer support.
8. Warranty and Support
maXpeedingrods is committed to providing high-quality products and excellent customer service.
Returns:
This product is eligible for 30-day easy returns. Please refer to your purchase platform's return policy for detailed instructions.
Customer Support:
For any technical assistance, installation queries, or warranty claims, please contact the maXpeedingrods customer support team. Our engineering team is available to provide expert assistance.

Image: Illustrates the availability of easy installation guidance, expert support from the maXpeedingrods engineering team, and customer-centric 24/7 service and support.
You can find more information and contact details on the official maXpeedingrods Store.