1. Introduction
The POMIACAM X9-MOVTADHS Pro is an advanced 8-inch retina touch screen IP camera tester designed for comprehensive surveillance system installation and maintenance. This all-in-one device supports a wide range of camera technologies including 8K H.265/H.264 IP, 8MP TVI/AHD/CVI, CVBS, and SDI. It integrates multiple essential tools such as a digital multimeter, TDR cable diagnostics, optical power meter (OPM), visual fault locator (VFL), PoE power output, 4K HDMI input/output, and a Wi-Fi analyzer. This manual provides detailed instructions for the safe and effective use of your device.
2. Safety Information
Please read and understand all safety warnings and instructions before operating this device. Failure to follow these instructions may result in electric shock, fire, or serious injury.
- Do not expose the device to rain or moisture.
- Avoid operating the device in environments with extreme temperatures or high humidity.
- Use only the provided power adapter and accessories.
- Do not attempt to disassemble or modify the device. Refer all servicing to qualified personnel.
- Exercise caution when working with electrical circuits, especially when using the multimeter functions.
3. Package Contents
Verify that all items are present in your package:
- POMIACAM X9-MOVTADHS Pro IP Camera Tester Unit
- Power Adapter
- Lithium Polymer Battery (pre-installed)
- Multimeter Test Leads
- BNC Cables
- RS485 Cable
- Audio Cable
- DC Power Cable
- Cable Tracer
- Safety Strap
- Carrying Case
- User Manual (this document)
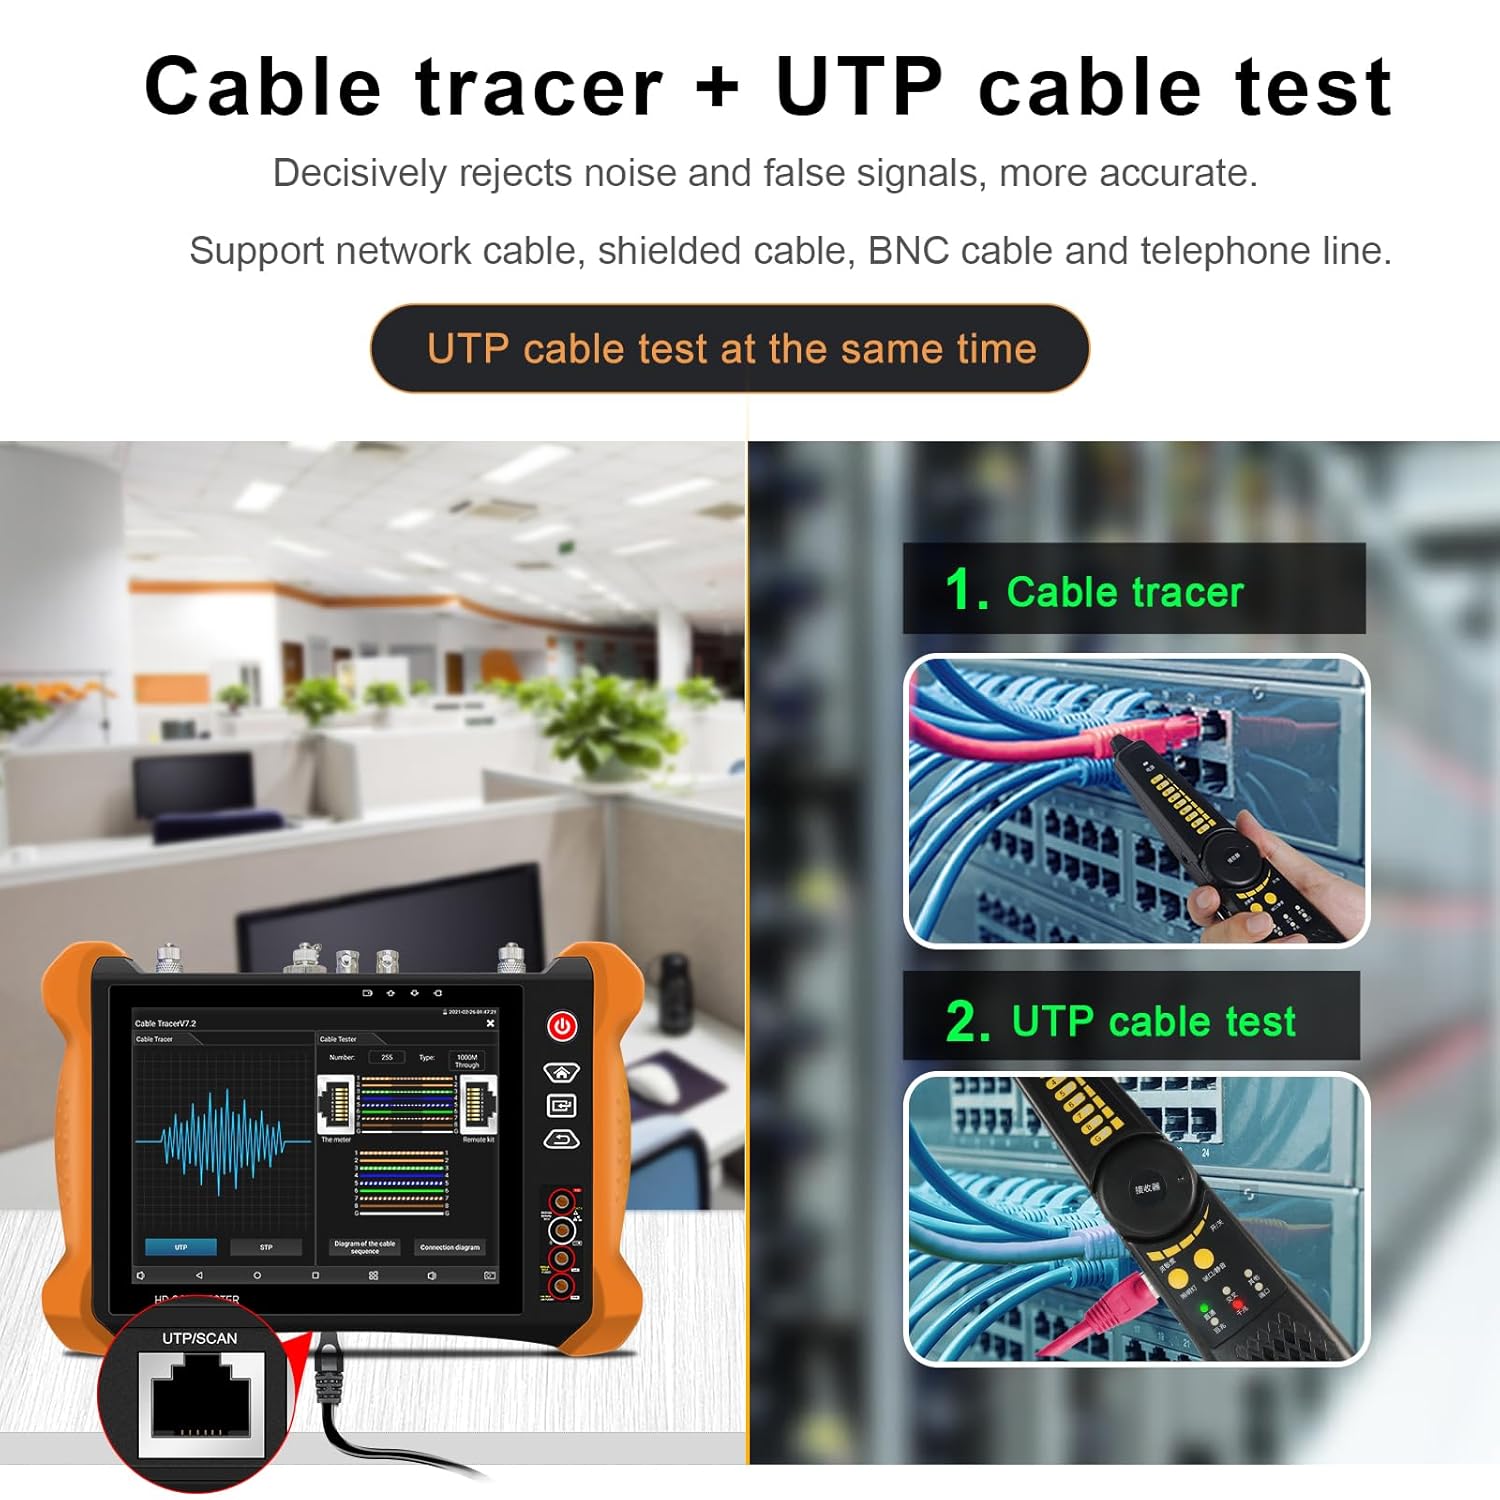
Figure 3.1: The complete package of the POMIACAM X9-MOVTADHS Pro IP Camera Tester, including the main unit, various testing cables, power adapter, and a protective carrying case, illustrating all components provided with the product.

Figure 3.2: A different perspective of the product and its accessories, clearly showing the included cable tracer, multimeter probes, and various connection cables, highlighting the comprehensive toolkit provided for diverse testing scenarios.
4. Device Overview and Interface
The X9-MOVTADHS Pro features an 8-inch retina touch screen and a robust design for field use. Familiarize yourself with the device's layout and ports.

Figure 4.1: Side view of the tester with its protective cover opened, revealing the 8-inch screen displaying a live video feed from a connected camera, demonstrating its real-time monitoring capability.

Figure 4.2: This diagram illustrates the various input and output ports on the POMIACAM X9-MOVTADHS Pro, including connections for optical power meter, PoE power output, network testing, SDI input, TDR cable test, DC power inputs/outputs, video and audio connections, micro SD card slot, and network cable ports, providing a comprehensive overview of its connectivity.
Key Interface Components:
- Optical Power Meter (OPM) Port: For fiber optic power testing.
- PoE Power Output / Network Testing Port: Provides PoE power and network connectivity.
- PSE/PoE Voltage Measurement: Measures Power Sourcing Equipment voltage.
- Visual Fault Locator (VFL) Port: For fiber optic fault detection.
- LED Lamp: Integrated light source.
- SDI IN: Serial Digital Interface input.
- TDR Cable Test Port: For Time Domain Reflectometer cable diagnostics.
- DC12V/3A Output Power: Power output for cameras.
- Video Input/HD IN: Connects to various video signals.
- Video Out: Video signal output.
- RS 485 Port: For PTZ control and data communication.
- DC5V/2A Power Output: Additional power output.
- DC24V/2A Power Output: Additional power output.
- 12V/3A Input: Main power input.
- Audio In/Out: For audio testing.
- Micro SD Card Slot: For storage.
- HD Out: HDMI output.
- UTP / Cable Tracer Port: For tracing network cables.
- Network Cable TDR Test Port: Dedicated port for network cable TDR.
5. Setup
5.1 Initial Charging
Before first use, fully charge the device using the provided power adapter. Connect the adapter to the 12V/3A input port and plug it into a power outlet. The charging indicator will show the charging status.
5.2 Power On/Off
- Power On: Press and hold the power button (usually located on the side or top) until the screen illuminates.
- Power Off: Press and hold the power button until a power-off menu appears, then select 'Power Off'. A short press will typically put the device into sleep mode.
5.3 Basic Navigation
The device operates via an 8-inch retina touch screen. Tap icons to open applications, swipe to navigate menus, and use the physical buttons for quick access to common functions.

Figure 5.1: The POMIACAM X9-MOVTADHS Pro IP Camera Tester being held, with its vibrant 8-inch retina touch screen displaying the main interface, including options for IP Camera Test, CVBS & HD Camera, Cable Test, Media Player, Tools, My APPS, Manual, and Update.
6. Operating Instructions
6.1 IP Camera Test
This function allows testing of IP cameras, supporting 8K H.265/H.264 video formats and ONVIF auto-detection.
- Connect the IP camera to the tester's network port.
- Select 'IP Camera Test' from the main menu.
- The tester will automatically detect ONVIF cameras. Select the camera from the list.
- View live video, configure camera settings, and perform network diagnostics.
6.2 Analog Camera Test (HD Coaxial Test)
The device supports 8MP TVI/AHD/CVI, CVBS, and SDI camera testing.
- Connect the analog camera to the appropriate BNC input (TVI/AHD/CVI or SDI IN).
- Select 'CVBS & HD Camera' from the main menu.
- The tester will automatically detect the camera type and display the video feed.
- Utilize coaxial PTZ control and OSD menu access for camera configuration.

Figure 6.1: Table outlining the HD Coaxial 4.0 test functionalities, specifying the supported resolutions and frame rates for various camera types including CVI, TVI, AHD, HD-SDI, and EX-SDI, demonstrating the tester's compatibility with a wide range of coaxial camera systems up to 8MP.
6.3 Digital Multimeter Function
The integrated digital multimeter allows for various electrical measurements.
- Connect the multimeter test leads to the designated ports on the tester.
- Select the 'Multimeter' application from the 'Tools' menu.
- Choose the desired measurement type: DC/AC voltage, resistance, continuity, diode, or capacitance.
- Perform measurements and record data as needed.
6.4 TDR Cable Test
The Time Domain Reflectometer (TDR) function measures cable length and identifies faults like short circuits or breaks up to 1200 meters.
- Connect the cable to be tested to the TDR cable test port.
- Select 'Cable Test' from the main menu and then choose 'TDR'.
- Initiate the test. The device will display cable length and fault locations.

Figure 6.2: The TDR 2.0 cable test screen, illustrating how the device measures cable length and identifies short circuits or breaks, with a visual representation of the cable's integrity and fault distance.

Figure 6.3: Different types of cables that the tester can work with, such as telephone, BNC, network, elevator, RVV, and power cables, indicating its versatility in cable testing applications.
6.5 Optical Power Meter (OPM) & Visual Fault Locator (VFL)
These tools are used for fiber optic cable testing.
- OPM: Connect the fiber optic cable to the OPM port. Select the OPM function from 'Tools' to measure optical power at various wavelengths (1625, 1550, 1490, 1310, 1300, 850nm).
- VFL: Connect the fiber optic cable to the VFL port. Activate the 10mW VFL (650nm wavelength) to visually locate bends and breaks in multi-mode and single-mode fibers up to 10KM.
6.6 PoE Power Output
The tester can provide Power over Ethernet (PoE) to power compatible devices.
- Connect the network cable from the tester's PoE output port to the PoE-compatible device (e.g., an IP camera).
- Activate the PoE output function from the menu. The tester will supply power to the connected device.
6.7 HDMI Input/Output
The device supports 4K HDMI input and output for connecting to external displays or receiving video signals.
- HDMI Input: Connect an HDMI source to the HDMI IN port to display its video on the tester's screen.
- HDMI Output: Connect an external monitor to the HD OUT port to display the tester's screen content.
6.8 Wi-Fi Analyzer
Analyze Wi-Fi signal strength and stability.
- Select the 'Wi-Fi Analyzer' application from the 'Tools' menu.
- The device will scan for available Wi-Fi networks and display their signal strength, channel usage, and stability.
- Use this information to optimize Wi-Fi channel selection for better performance.

Figure 6.4: This image illustrates the dual 1000M Ethernet ports for connecting and testing network devices, alongside a visual representation of the Wi-Fi Analyzer feature, which helps in optimizing wireless network performance by showing signal strength and channel usage.
6.9 HD Coaxial Level Meter
Measure video signal quality for coaxial systems.
- Connect the coaxial cable to the appropriate input.
- Access the 'HD Coaxial Level Meter' function.
- The device will display peak level, sync level, and burst level, allowing for quick diagnosis of signal issues.

Figure 6.5: The HD coaxial level meter interface, providing critical video signal quality measurements such as peak level, sync level, and burst level, which are essential for diagnosing and ensuring optimal performance of coaxial camera systems.
6.10 Coaxial HD Focus and Video Signal Quality Test
This feature assists in achieving optimal camera focus and assessing image quality.
- While viewing a coaxial HD camera feed, access the focus and quality test function.
- Adjust the camera's focal length while observing the 'Current Value' and 'Peak Value' indicators. The closer the current value is to the peak, the clearer the image.
- Image quality indicators (Dark, Normal, Brighter) provide feedback on the overall video signal quality.

Figure 6.6: The coaxial HD focus and video signal quality test screen, which assists users in achieving optimal camera focus and assessing the overall image quality, with indicators for current and peak focus values.
7. Maintenance
7.1 Cleaning
- Wipe the device with a soft, dry cloth. For stubborn dirt, use a slightly damp cloth and then dry thoroughly.
- Do not use abrasive cleaners, solvents, or strong chemicals, as these can damage the screen or casing.
- Keep the ports free of dust and debris. Use compressed air if necessary.
7.2 Battery Care
The device is equipped with a 7.4V 7000mAh Lithium Polymer battery.
- To prolong battery life, avoid fully discharging the battery frequently.
- Charge the device regularly, even if not in use, to maintain battery health.
- Store the device in a cool, dry place when not in use for extended periods.

Figure 7.1: The device's internal 7.4V 7000mAh Lithium Polymer battery, emphasizing its long-lasting power, and also shows the anti-sunlight screen protecting cover, designed to improve screen visibility in bright outdoor conditions.
8. Troubleshooting
This section addresses common issues you might encounter with the POMIACAM X9-MOVTADHS Pro.
- Device does not power on:
- Ensure the battery is charged. Connect the power adapter and try again.
- Press and hold the power button for at least 10 seconds to perform a hard reset.
- No video display from camera:
- Check all cable connections to ensure they are secure and correctly plugged into the appropriate ports.
- Verify the camera is powered on and functioning correctly.
- Ensure the correct camera type (IP, AHD, TVI, CVI, SDI, CVBS) is selected in the tester's menu.
- For IP cameras, confirm network settings (IP address, subnet mask) are compatible.
- Touch screen unresponsive:
- Restart the device.
- Ensure the screen is clean and free of moisture or debris.
- TDR or Multimeter readings are inaccurate:
- Ensure test leads and cables are properly connected and not damaged.
- Calibrate the device if a calibration option is available in the settings.
9. Specifications
| Feature | Specification |
|---|---|
| Model | X9-MOVTADHS |
| Display | 8-inch Retina Touch Screen, 2048*1536 Resolution |
| IP Camera Test | 8K H.265/H.264, ONVIF Auto-detection |
| Analog Camera Test | 8MP TVI/AHD/CVI, CVBS, SDI |
| Multimeter | DC/AC Voltage, Resistance, Continuity, Diode, Capacitance |
| TDR Cable Test | Measurement Range up to 1200 meters |
| Optical Power Meter (OPM) | Wavelengths: 1625, 1550, 1490, 1310, 1300, 850nm; Range: -70 ~ +10 dBm |
| Visual Fault Locator (VFL) | 10mW, 650nm Wavelength, Test Range 10KM |
| PoE Power Output | Yes, DC48V |
| HDMI | 4K HDMI Input/Output |
| Wi-Fi | Built-in Wi-Fi, Wi-Fi Analyzer, Hotspot Function |
| Battery | 7.4V 7000mAh Lithium Polymer (13-hour runtime) |
| Dimensions | 13.78 x 12.01 x 3.94 inches |
| Weight | 6.27 Pounds |
| Operating Voltage (Min.) | 12 Volts (DC) |
10. Warranty and Support
The POMIACAM X9-MOVTADHS Pro IP Camera Tester comes with a one-year warranty from the date of purchase. This warranty covers manufacturing defects and malfunctions under normal use. Please retain your proof of purchase for warranty claims.
For technical support, troubleshooting assistance, or warranty inquiries, please contact POMIACAM customer service. Our support team is available to assist you with any questions or issues you may encounter.
Contact Information: Refer to the product packaging or the official POMIACAM website for the most current customer support contact details.


