
U.S. Solid USS-DBS00061
U.S. Solid Electronic Precision Balance 1200g User Manual
Model: USS-DBS00061
Introduction
This manual provides detailed instructions for the safe and efficient operation of your U.S. Solid Electronic Precision Balance 1200g. Please read this manual thoroughly before using the device to ensure proper functionality and to prevent damage.
The U.S. Solid Electronic Precision Balance is designed for accurate weighing in industrial and laboratory environments, offering a capacity of 1200g with a 0.01g resolution. Key features include an LCD display with backlight, dual power options (AC/battery), 19 measurement units, and an RS232 interface for data communication.
Safety Information
- Always operate the balance on a stable, level surface free from vibrations.
- Avoid exposing the balance to extreme temperatures, humidity, or direct sunlight.
- Do not overload the balance beyond its maximum capacity of 1200g.
- Keep the balance clean and free from dust and corrosive substances.
- Use only the provided AC adapter or specified batteries (4xDC1.5V) for power.
- Disconnect power before cleaning or if the balance will not be used for an extended period.
Package Contents
Verify that all items are present and undamaged upon unpacking:
- U.S. Solid Electronic Precision Balance (Model USS-DBS00061)
- Stainless Steel Weighing Pan
- AC Power Adapter (100V-240V)
- Dust Protective Cover
- User Manual

Image: The U.S. Solid Electronic Precision Balance shown with its stainless steel weighing pan, AC power adapter, and dust protective cover.
Product Overview
Familiarize yourself with the main components of the balance:
- Weighing Pan: Stainless steel platform for placing items to be weighed.
- LCD Display: Digital screen with blue backlight for displaying weight and other information.
- Control Panel: Buttons for Power, Counting (COU), Unit (UNIT), and Tare/Calibration (TARE/CAL).
- RS232 Port: For connecting to a computer or printer.
- Leveling Feet: Adjustable feet for ensuring the balance is level.
- Bubble Level: Indicator to assist with proper leveling.
- Power Input: Port for AC adapter or battery compartment.

Image: A close-up view of the balance's LCD display and control buttons, including Power, COU, UNIT, and TARE/CAL.

Image: Side view of the balance, highlighting the RS232 communication port for external device connection.
Setup
1. Unpacking and Placement
Carefully remove the balance from its packaging. Place the balance on a firm, level, and vibration-free surface. Ensure it is away from direct sunlight, drafts, and sources of heat or cold that could affect accuracy.
2. Power Connection
The balance can be powered by either the AC adapter or 4xDC1.5V batteries.
- AC Power: Connect the provided AC adapter to the power input port on the rear of the balance, then plug it into a suitable AC 100V-240V power outlet.
- Battery Power: Open the battery compartment on the underside of the balance and insert 4xDC1.5V batteries, ensuring correct polarity.

Image: Rear view of the balance, showing the power input port.

Image: Underside of the balance with the battery compartment open, showing where to insert batteries.
3. Leveling the Balance
Accurate measurements require the balance to be perfectly level. Adjust the leveling feet located at the bottom of the balance until the bubble in the bubble level indicator is centered within the circle.

Image: A visual guide demonstrating the process of leveling the balance using the bubble indicator and adjustable feet.
4. Warm-up Time
For optimal accuracy, allow the balance to warm up for at least 30 minutes after initial power-on or after a power loss. This stabilizes the internal components.
Operating Instructions
1. Power On/Off
- Press the Power button () to turn the balance on.
- Press and hold the Power button for a few seconds to turn the balance off.
2. Unit Conversion
The balance supports 19 different measurement units. Press the UNIT button to cycle through the available units (e.g., g, kg, ct, oz, lb, etc.).

Image: An illustration of the balance display and a list of 19 selectable measurement units.
3. Tare Function
To subtract the weight of a container, place the empty container on the weighing pan and press the TARE/CAL button. The display will reset to zero, allowing you to weigh only the contents.
4. Calibration
Recalibration is recommended after moving the balance or if accuracy is in question. Refer to the specific calibration procedure in the full manual for your model. Typically, this involves pressing and holding the TARE/CAL button and following on-screen prompts with a known calibration weight.

Image: A visual representation of the calibration function, indicating the TARE/CAL button and the need for a calibration weight.
5. Counting Function (COU)
The balance can count items of uniform weight. To use this function:
- Place a known quantity of items (e.g., 10, 20, 50, 100, 150, 200, 250, or 500) on the pan.
- Press the COU button.
- Select the corresponding sample quantity using the UNIT button, then confirm.
- The balance will now display the count of items placed on the pan.

Image: An illustration demonstrating the piece counting feature, showing various sample quantities for setup.
6. RS232 Communication
The RS232 interface allows for serial data exchange with a computer or printer. This is useful for recording weighing results and minimizing manual data entry errors. Consult your computer or printer's manual for specific connection and software requirements.
Maintenance
- Cleaning: Wipe the balance with a soft, damp cloth. Do not use abrasive cleaners or solvents. Ensure no liquid enters the internal components.
- Storage: When not in use, cover the balance with the provided dust protective cover. Store in a dry, stable environment.
- Battery Replacement: If using batteries, replace all four batteries when the low battery indicator appears on the display.
Troubleshooting
| Problem | Possible Cause | Solution |
|---|---|---|
| Display shows "Err" or unstable readings | Overload, unstable surface, drafts, or magnetic interference. | Remove excess weight. Ensure balance is level and on a stable surface. Relocate away from drafts or magnetic fields. |
| Balance does not turn on | No power, dead batteries, or faulty AC adapter. | Check AC adapter connection. Replace batteries if using battery power. |
| Inaccurate readings | Not leveled, not warmed up, needs calibration, or environmental factors. | Level the balance. Allow warm-up time. Perform calibration. Ensure stable environment. |
| RS232 communication failure | Incorrect cable, driver issues, or software settings. | Verify cable connection. Install necessary drivers. Check software settings. |
Specifications
- Model: USS-DBS00061
- Capacity: 1200g
- Resolution: 0.01g
- Display: LCD with Backlight
- Power Supply: AC 100V-240V (adapter included) or 4xDC1.5V Batteries
- Measurement Units: 19 switchable units (g, kg, ct, Tola, TAR, Dram, PKT, Grain, TMR, gsm, tlJ, mo, Penny weight, Ounce, Pound, Taiwan Tael, Troy-Ounce, Hong Kong Tael, %)
- Interface: RS232 Port
- Special Features: Bubble leveling, height adjustable feet, dust protective cover, counting function.
- Dimensions: Approximately 11" (L) x 7.1" (W) x 3.2" (H)
- Weight: Approximately 2.73 Pounds
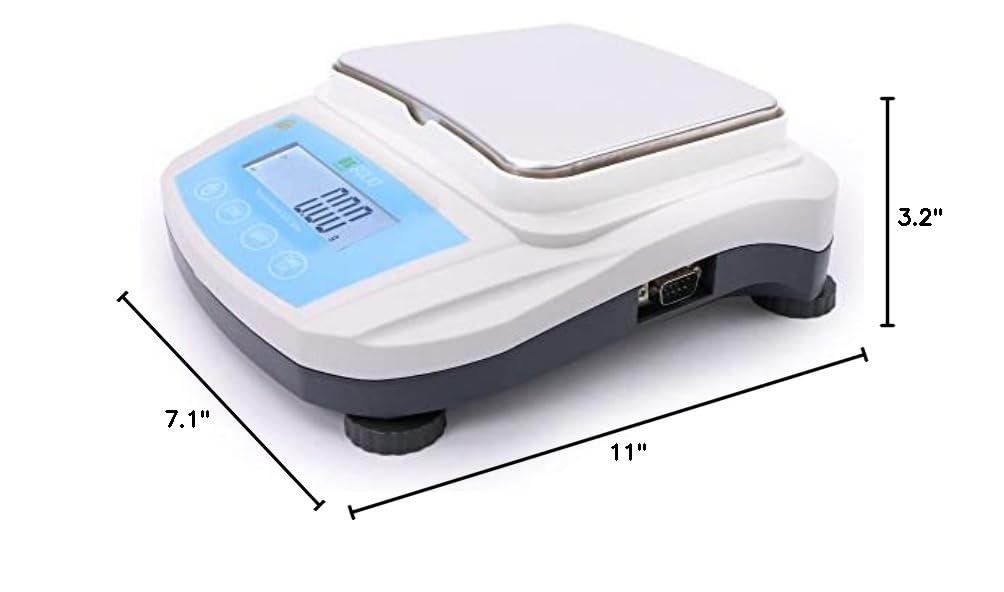
Image: Diagram showing the approximate dimensions of the balance: 11 inches long, 7.1 inches wide, and 3.2 inches high.
Warranty and Support
U.S. Solid products are designed for reliability and performance. For warranty information, technical support, or service inquiries, please refer to the contact information provided with your purchase documentation or visit the official U.S. Solid website.
Please retain your proof of purchase for warranty claims.
Ask a question about this manual
Ask about setup, troubleshooting, compatibility, parts, safety, or missing instructions. Manuals+ will review the question and use this page’s manual context to help answer it.