Introduction
This manual provides detailed instructions for the safe and effective operation of your LaView Home Planetarium Star Projector. Please read this manual thoroughly before use and retain it for future reference.
The LaView Star Projector features an ultra-clear optical lens system and adjustable green laser light, projecting realistic celestial images across an area of up to 130 square feet. Its user-friendly design includes an infrared remote control and a 0-90° adjustable projection angle, allowing for versatile placement on ceilings or walls. The device also incorporates an auto-off timer for convenience.
Package Contents
Verify that all items are present in your package:
- LaView Home Planetarium Star Projector Unit
- Infrared Remote Control
- 4 x Mini 6K HD Realistic Planetarium Discs (Milky Way, Earth & Moon, Carina Nebula, Orbiting the Moon)
- Power Adapter (Corded Electric)
- User Manual (this document)

The package includes the main projector unit, a remote control, and four high-definition planetarium discs, ready for immediate use.
Setup
1. Unpacking
Carefully remove all components from the packaging. Ensure no packing materials remain in or around the projector's lens or disc slot.
2. Power Connection
Connect the provided power adapter to the projector's power input port and then plug it into a standard electrical outlet (240 Volts, 4 Watts).
3. Disc Installation
To install a planetarium disc:
- Locate the disc slot on the side of the projector.
- Gently insert one of the 6K HD planetarium discs into the slot until it clicks into place. Ensure the disc is oriented correctly as indicated on the projector.
- Before first use, please tear off the protective film from the disc.
The projector features a dedicated slot for easy insertion and removal of the planetarium discs. Ensure the disc is fully seated for optimal projection.

The projector utilizes an advanced 8-set high light transmission optical lens system for ultra-clear image projection.
Operating Instructions
1. Power On/Off
Press the Power Button on the projector or the remote control to turn the unit on or off.
2. Adjusting Projection Angle
The projector features a 0-90° adjustable base. Gently tilt the projector body to achieve the desired projection angle on your ceiling or wall.
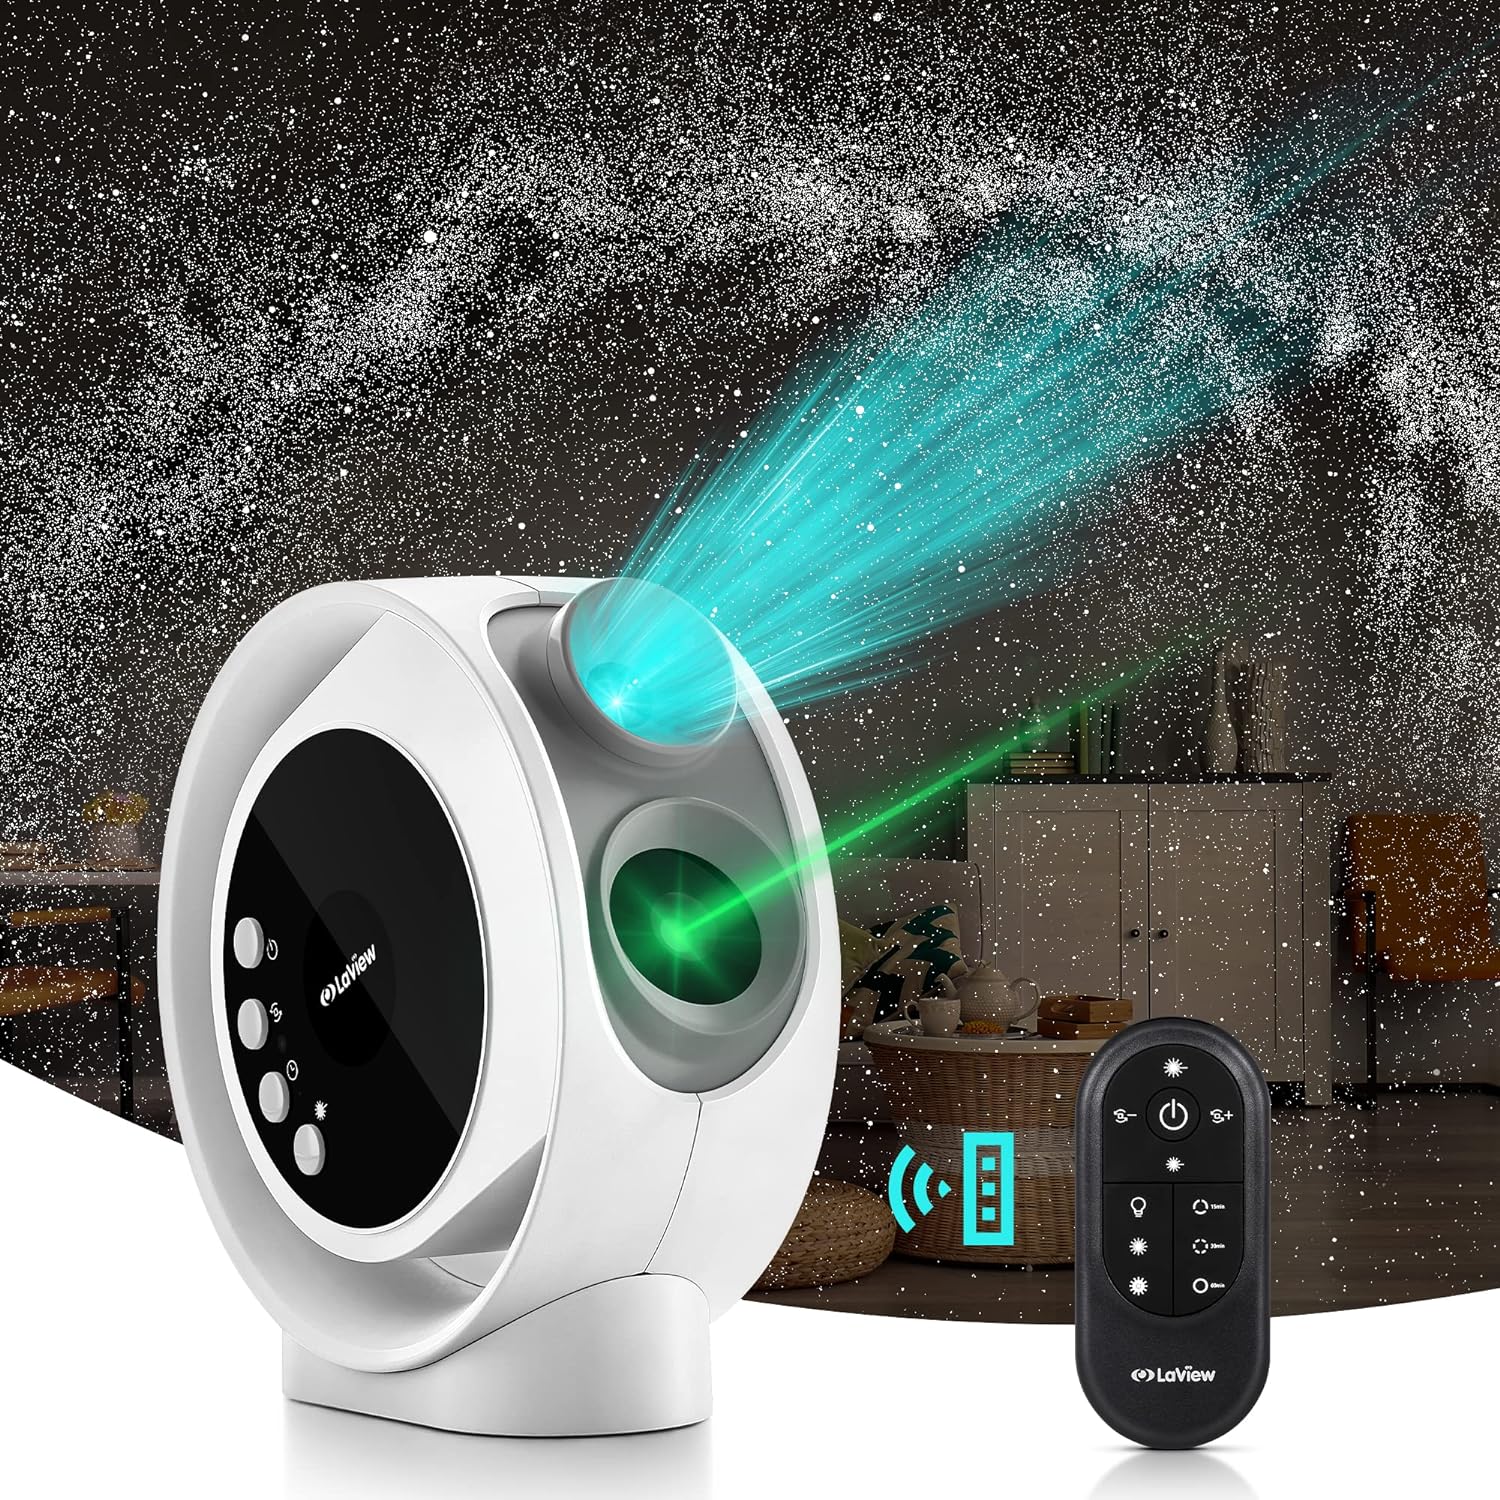
The projector's adjustable base allows you to direct the celestial display onto any surface, from ceilings to walls, creating an immersive experience.
3. Focus Adjustment
Rotate the focus ring around the projection lens to achieve a clear and sharp image. This is crucial for optimal viewing, especially when changing projection distances.

Experience an expansive and detailed star field, covering up to 130 square feet, transforming your room into a personal planetarium.
4. Rotation Control
Use the Rotation Button on the projector or remote to control the image rotation speed:
- Press once for low rotation speed.
- Press twice for medium rotation speed.
- Press three times for high rotation speed.
- Press four times to turn rotation off.
5. Timer Function
The projector includes an auto-off timer. Press the Timer Button on the projector or remote to set the duration:
- Press once for 15 minutes (indicator blinks every 3 seconds).
- Press twice for 30 minutes (indicator blinks every 1.5 seconds).
- Press three times for 60 minutes (indicator on constantly).
- Press four times to turn the timer off.
6. Laser Brightness Control
Adjust the brightness of the green laser effect using the Laser Button on the projector or remote:
- Press once for low laser brightness.
- Press twice for medium laser brightness.
- Press three times for high laser brightness.
- Press four times for blinking laser effect.
- Press five times to turn the laser off.

The projector offers three levels of brightness for the green laser effect, allowing you to customize the ambiance.
7. Changing Discs
To change the projected image, remove the current disc from the slot and insert a new one. The projector comes with four distinct discs:
- Milky Way: A detailed view of our home galaxy.
- The Earth & Moon: A realistic depiction of Earth and its lunar companion.
- Carina Nebula: A vibrant and colorful cosmic cloud.
- Orbiting the Moon: A close-up perspective of the moon's surface.


These images show the four distinct planetarium discs included with your projector, each offering a unique celestial view.
Maintenance
Cleaning the Projector
To maintain optimal performance and image clarity, regularly clean the projector:
- Use a soft, dry, lint-free cloth to wipe the exterior of the projector.
- For the lens, use a specialized lens cleaning cloth and solution. Avoid abrasive materials or harsh chemicals.
- Keep the disc slot free from dust and debris.
Storage
When not in use, store the projector and discs in a cool, dry place, away from direct sunlight and extreme temperatures. Keep discs in their protective cases to prevent scratches and dust accumulation.
Troubleshooting
| Problem | Possible Cause | Solution |
|---|---|---|
| No projection/Power off | Power cable disconnected; Unit not powered on. | Ensure power cable is securely connected and unit is plugged into a working outlet. Press the Power Button. |
| Image is blurry | Focus not adjusted; Disc not properly inserted; Protective film on disc. | Rotate the focus ring until the image is clear. Re-insert the disc correctly. Remove the protective film from the disc. |
| Image not rotating | Rotation function is off. | Press the Rotation Button to activate rotation. |
| Laser not visible | Laser function is off or brightness is too low. | Press the Laser Button to turn on the laser or increase brightness. |
Specifications
- Brand: LaView
- Model Number: LV-X2-W-EU
- Color: White + 4 discs
- Shape: Round
- Material: Plastic
- Light Source Type: LED
- Power Source: Corded Electric
- Voltage: 240 Volts
- Wattage: 4 Watts
- Item Weight: 2.82 Pounds
- Product Dimensions: 3.7"L x 11.26"W x 8.72"H
- Included Components: Remote Control
- Special Features: Timer
Warranty and Support
This LaView Home Planetarium Star Projector comes with a 1-year limited warranty from the date of purchase. This warranty covers defects in materials and workmanship under normal use.
For technical support, warranty claims, or additional information, please visit the official LaView website or contact their customer service. You can also refer to the official User Manual (PDF) for further details.
For more products and information, visit the LaView Store on Amazon.


