1. Introduction
Thank you for choosing the Jansite Electric Air Pump. This portable air compressor is designed for convenient and efficient inflation of various items, including car tires, bicycle tires, motorcycle tires, and sports balls. Featuring a high-capacity 4000mAh battery, a large LCD digital display, and automatic shut-off, it provides a reliable solution for your inflation needs. Please read this manual thoroughly before use to ensure proper operation and to maximize the product's lifespan.

Image 1.1: The Jansite Electric Air Pump, showcasing the main unit, inflation hose, USB-C charging cable, and various nozzle adapters for different applications.
2. Safety Information
To prevent injury or damage, always observe the following safety precautions:
- Keep out of reach of children: This device is not a toy.
- Avoid over-inflation: Do not exceed the recommended pressure for any item. Over-inflation can cause bursting and serious injury.
- Monitor during operation: Do not leave the pump unattended while it is operating.
- Avoid extreme temperatures: Do not expose the pump to direct sunlight, high temperatures, or freezing conditions.
- Do not disassemble: Unauthorized disassembly voids the warranty and can lead to malfunction or injury.
- Use in well-ventilated areas: The pump generates heat during operation. Ensure adequate ventilation.
- Protect from moisture: Do not immerse the pump in water or expose it to rain.
- Charging safety: Use only the provided charging cable and a compatible power adapter. Do not charge near flammable materials.
3. Product Components and Features
3.1 Package Contents
- Jansite Electric Air Pump (Model JM-TC17-EU2)
- Inflation Hose
- USB-C Charging Cable
- Various Nozzle Adapters (Presta valve adapter, needle valve for balls, wide nozzle for inflatables)
- User Manual
3.2 Key Features
- High-Capacity Battery: Integrated 4000mAh (2x 2000mAh) lithium battery for extended use.
- Powerful Inflation: Maximum pressure of 150 PSI and airflow of 30 L/min.
- Large LCD Digital Display: Provides real-time pressure readings and battery status.
- Automatic Shut-off: Stops inflation automatically once the preset pressure is reached.
- Five Inflation Modes: Pre-set modes for car, motorcycle, bicycle, ball, and custom pressure.
- Integrated LED Light: For emergency lighting during nighttime use.
- Efficient Cooling System: Designed with multiple cooling holes for heat dissipation.
- Compact and Portable: Lightweight design for easy carrying and storage.

Image 3.1: Illustration of the pump's capacity, showing it can inflate approximately 6 car tires, 15 motorcycle tires, 20 bicycle tires, or 60 balls on a single charge.
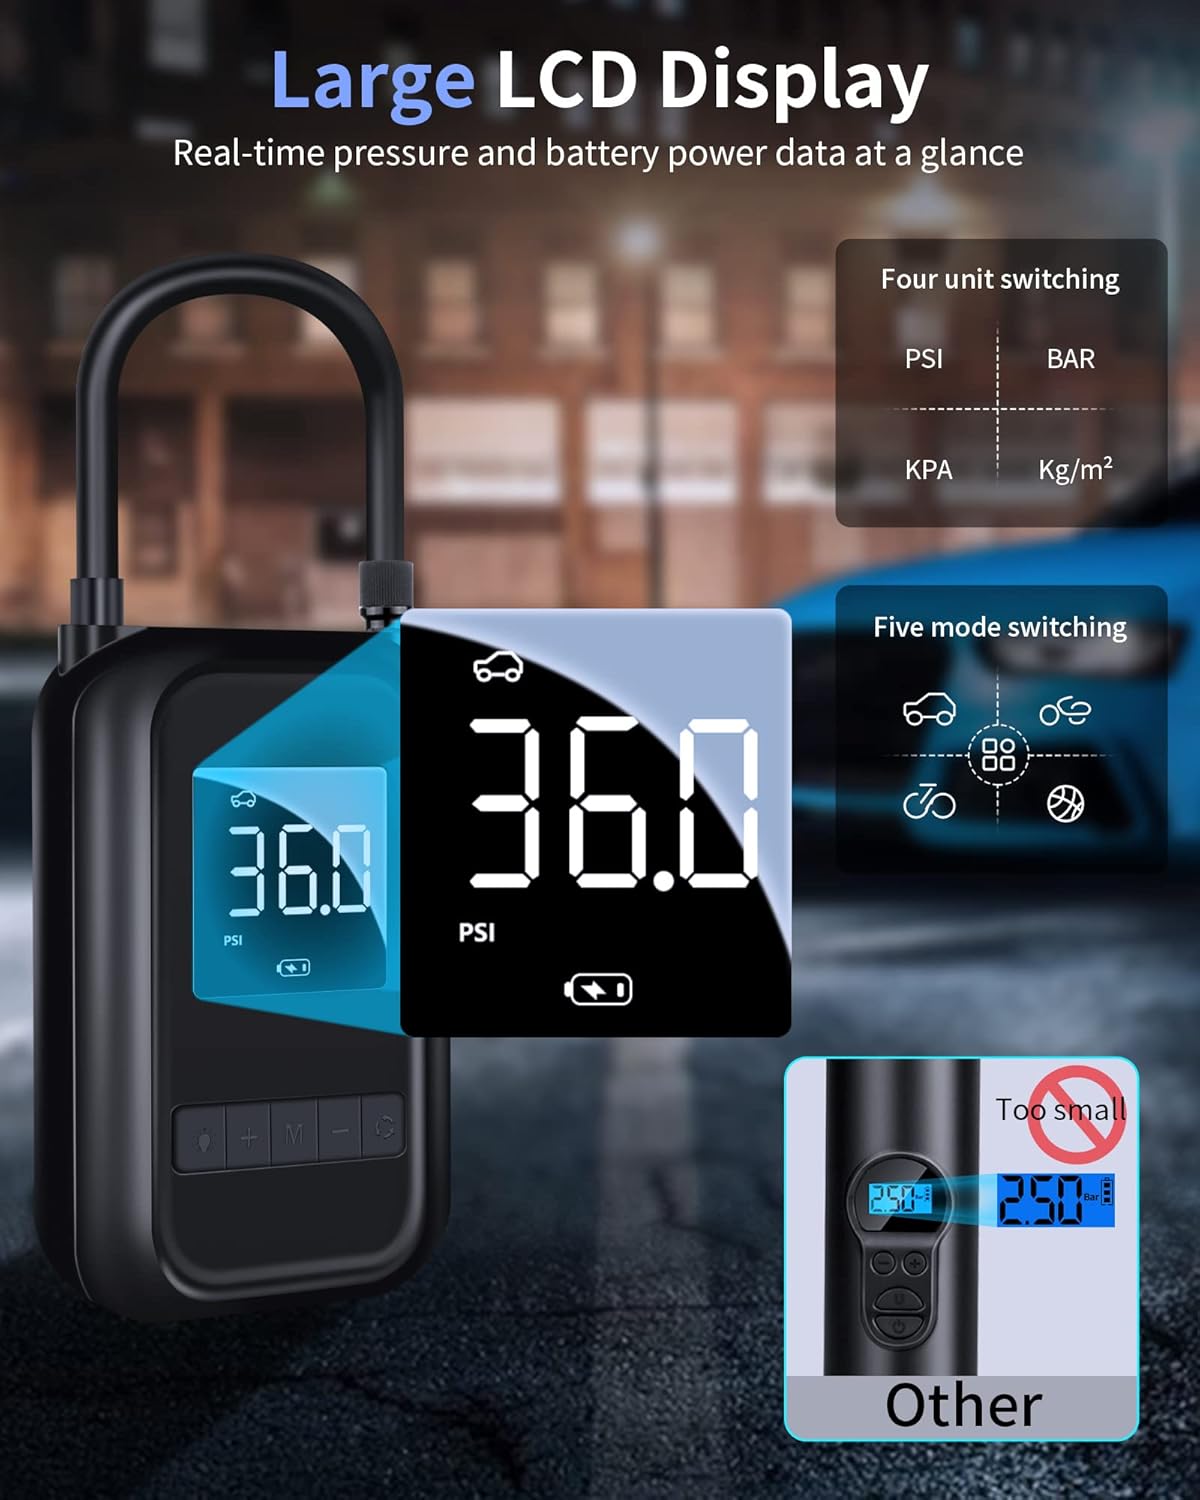
Image 3.2: Close-up of the large LCD display, showing real-time pressure readings, battery level, and icons for different inflation modes and pressure units (PSI, BAR, KPA, Kg/cm²).

Image 3.3: Visual representation of the pump's compact size (140mm x 89mm x 48mm) and how it can be easily carried in a bag or attached to a bicycle.
4. Setup and Charging
4.1 Initial Charge
Before first use, fully charge the air pump. Connect the provided USB-C charging cable to the pump's charging port and the other end to a compatible USB power adapter (not included). The battery indicator on the LCD screen will show charging status. A full charge typically takes approximately 3 hours.

Image 4.1: The electric air pump connected to a USB-C charging cable, highlighting its fast-charging capability and high-efficiency lithium battery.
4.2 Attaching the Inflation Hose and Nozzle
- Screw the inflation hose securely into the air outlet port on the top of the pump.
- Select the appropriate nozzle adapter for the item you wish to inflate.
- Screw the selected nozzle adapter onto the free end of the inflation hose.

Image 4.2: The pump comes with five different nozzle adapters, suitable for car tires, motorcycle tires, bicycle tires (Presta and Schrader), sports balls, and various inflatable toys.
5. Operating Instructions
5.1 Power On/Off
- To power on, press and hold the power button (usually marked with a power symbol or 'M').
- To power off, press and hold the power button again. The pump will also automatically power off after a period of inactivity.
5.2 Selecting Inflation Mode and Pressure Unit
- After powering on, press the 'M' button to cycle through the five pre-set inflation modes: Car, Motorcycle, Bicycle, Ball, and Custom.
- To change the pressure unit (PSI, BAR, KPA, Kg/cm²), press and hold the 'M' button until the unit changes.
5.3 Setting Desired Pressure
- Once a mode is selected, the default pressure for that mode will be displayed and blinking.
- Use the '+' and '-' buttons to adjust the desired target pressure.
- After setting the pressure, wait a few seconds for the numbers to stop blinking. This confirms the setting.
5.4 Starting and Stopping Inflation
- Connect the nozzle adapter firmly to the valve of the item you wish to inflate. The LCD will display the current pressure.
- Press the power button (or inflation button, often 'M' or a play/pause symbol) to start inflation.
- The pump will automatically stop when the preset pressure is reached.
- To manually stop inflation at any time, press the power button again.
- Carefully disconnect the nozzle from the valve.

Image 5.1: A visual step-by-step guide demonstrating how to connect the hose, select a mode, set the pressure, and begin inflation.

Image 5.2: The pump inflating a car tire, illustrating its quick inflation speed, capable of increasing pressure from 22 PSI to 31 PSI in approximately one minute.
6. Maintenance and Storage
6.1 Cleaning
Wipe the pump's exterior with a soft, damp cloth. Do not use harsh chemicals or abrasive cleaners. Ensure the device is completely dry before storage or next use.
6.2 Storage
- Store the pump in a cool, dry place, away from direct sunlight and extreme temperatures.
- Ensure the battery is partially charged (around 50%) before long-term storage to preserve battery health. Recharge every 3-6 months if not in use.
- Keep all accessories, such as the inflation hose and nozzle adapters, together with the pump to prevent loss.

Image 6.1: The pump's design featuring numerous cooling holes, which contribute to faster heat dissipation and prolonged operational life.
7. Troubleshooting
| Problem | Possible Cause | Solution |
|---|---|---|
| Pump does not turn on. | Battery is depleted. | Charge the pump fully. |
| Pump inflates slowly or not at all. | Hose or nozzle not securely attached; Leak in hose/valve; Incorrect mode selected. | Ensure all connections are tight. Check for damage. Select appropriate mode. |
| Pump stops unexpectedly. | Preset pressure reached; Overheat protection activated; Low battery. | Check display for pressure. Allow pump to cool down. Recharge battery. |
| Inaccurate pressure reading. | Loose connection; Sensor malfunction. | Ensure hose is tightly connected. If issue persists, contact support. |
8. Specifications
| Feature | Detail |
|---|---|
| Model Number | JM-TC17-EU2 |
| Brand | Jansite |
| Battery Capacity | 4000 mAh (2 x 2000 mAh Lithium-polymer) |
| Max Pressure | 150 PSI |
| Airflow Capacity | 30 Liters per minute |
| Power Source | Battery Powered (Type-C charging) |
| Dimensions (L x W x H) | 14 x 4.8 x 14 cm (5.51 x 1.89 x 5.51 inches) |
| Weight | 530 Grams (1.17 lbs) |
| Color | Black |
| Display | Large LCD Digital Display |
| LED Light | High-intensity LED for emergency lighting |
9. Warranty and Support
The Jansite Electric Air Pump comes with a two-year warranty, as stated in the product description. This warranty covers manufacturing defects and ensures peace of mind regarding product quality.
For technical support, warranty claims, or any questions regarding your Jansite Electric Air Pump, please contact our customer service team. Refer to the contact information provided with your purchase or visit the official Jansite website for assistance.
We are committed to providing excellent customer service and support.


