1. Product Overview
The ARCTIC Freezer 36 CO is a high-performance single-tower CPU cooler designed for efficient heat dissipation. It features a push-pull configuration with two pressure-optimized 120 mm P-fans, a fluid dynamic bearing for extended lifespan, and four heatpipes for rapid heat transfer. The cooler includes ARCTIC MX-6 thermal compound for optimal contact.

Image 1.1: The ARCTIC Freezer 36 CO CPU Cooler, showcasing its single-tower design with two fans.
Key Features:
- Single-Tower Design: Efficiently dissipates heat from the CPU.
- Push-Pull Fan Configuration: Two 120 mm P-fans work in tandem for enhanced airflow and cooling performance.
- Fluid Dynamic Bearing: Ensures a longer service life and increased reliability for the fans.
- 4 Offset Heatpipes: Facilitate fast heat transfer from the CPU to the heatsink.
- Included MX-6 Thermal Compound: High-performance thermal paste for optimal thermal conductivity.
- Innovative Fan Mounting: Click installation system simplifies fan attachment and replacement.
2. Package Contents
Verify that all components are present in the package before proceeding with installation.
- ARCTIC Freezer 36 CO CPU Cooler (Heatsink with pre-installed fans)
- Mounting hardware for Intel LGA1851/LGA1700 and AMD AM5/AM4 sockets
- ARCTIC MX-6 Thermal Compound
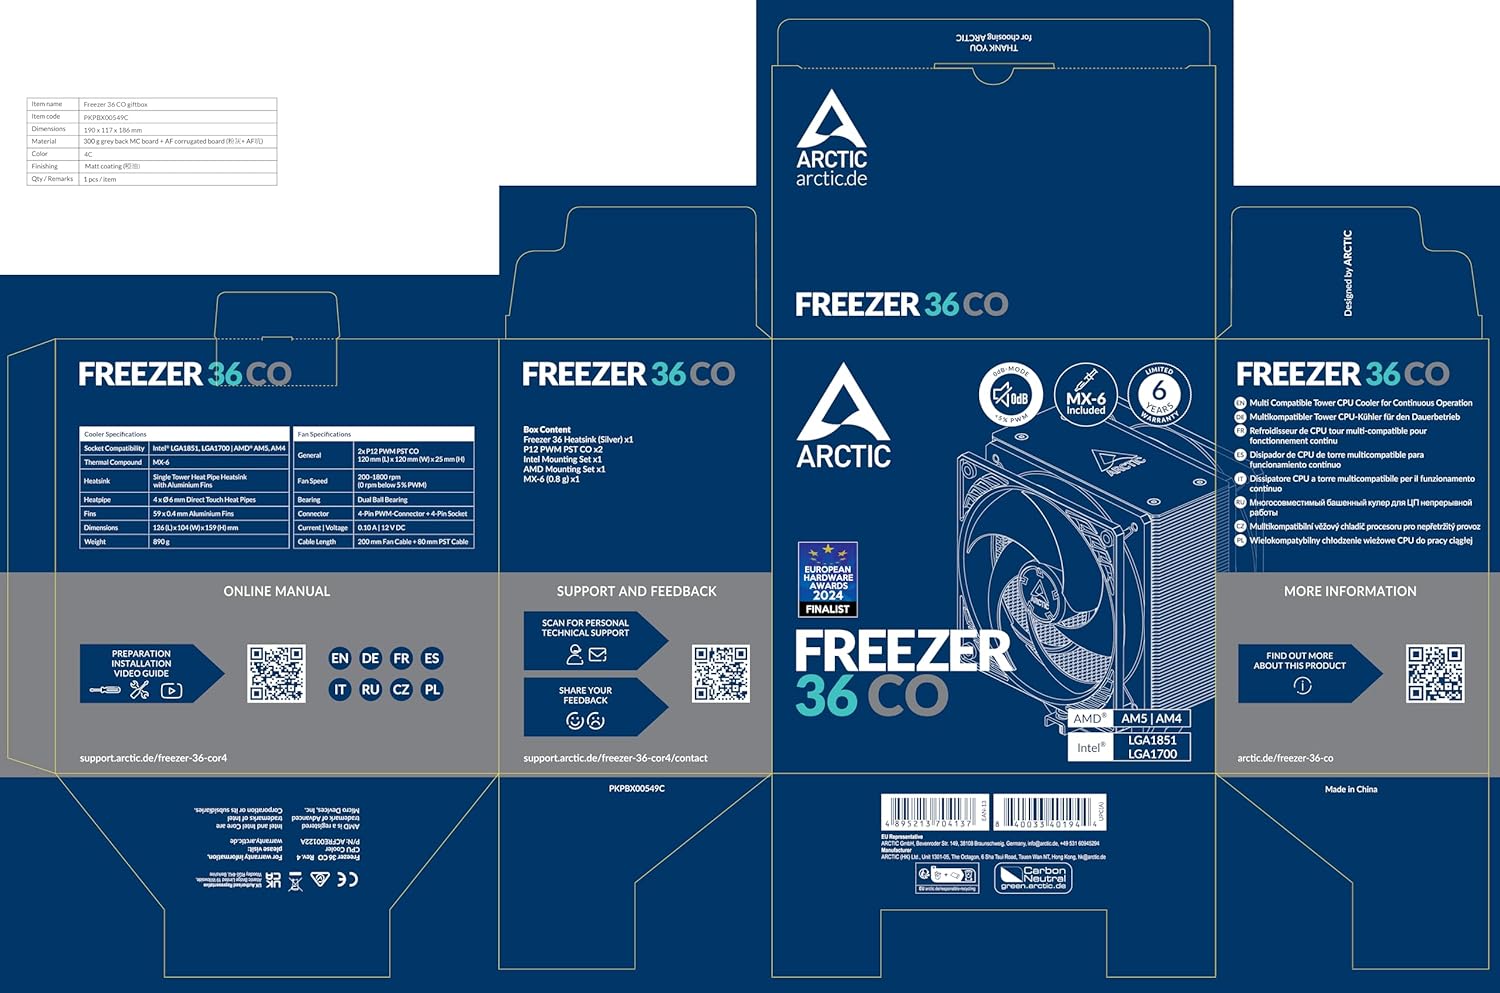
Image 2.1: The retail packaging for the ARCTIC Freezer 36 CO, indicating included components and compatibility.
3. Setup and Installation
This section provides general guidelines for installing your ARCTIC Freezer 36 CO. For detailed, step-by-step instructions, please refer to the official online manual or video guides provided by ARCTIC, as installation procedures can vary slightly depending on your motherboard and CPU socket type.
3.1. Preparation
- Power Off: Ensure your computer is completely powered off and disconnected from the power source.
- Access Motherboard: Open your computer case to access the motherboard and CPU area.
- Remove Old Cooler: If replacing an existing cooler, carefully remove it and clean any old thermal paste from the CPU surface using an appropriate cleaner.
3.2. Mounting the Backplate and Brackets
Attach the appropriate backplate and mounting brackets to your motherboard according to your CPU socket (Intel LGA1851/LGA1700 or AMD AM5/AM4). Ensure the backplate is securely positioned behind the motherboard.
Important Note for Intel LGA Sockets:
When installing on Intel LGA sockets, be cautious when handling the backplate. If all four mounting brackets are removed simultaneously, the threaded backplate may drop below the reach of the screws, potentially requiring the removal of the motherboard to re-secure it. It is recommended to secure the backplate or ensure it remains in place during bracket installation to avoid this issue.

Image 3.1: Illustration of the Intel LGA contact frame, designed for improved pressure distribution.
3.3. Applying Thermal Compound
Apply a small amount of the included ARCTIC MX-6 thermal compound to the center of your CPU's integrated heat spreader (IHS). A pea-sized dot is generally sufficient. The pressure from the cooler will spread it evenly.
3.4. Installing the Cooler
- Carefully place the heatsink onto the CPU, aligning the mounting holes with the installed brackets.
- Secure the heatsink using the provided screws, tightening them in a cross pattern to ensure even pressure.
- Connect the 4-pin fan cables from the cooler to the CPU_FAN header(s) on your motherboard.

Image 3.2: The ARCTIC Freezer 36 CO CPU cooler installed within a computer case.
3.5. Fan Mounting
The Freezer 36 CO features an innovative click installation system for its fans, making attachment and replacement straightforward. The cooler is compatible with most 120 mm fans.

Image 3.3: Close-up view of the innovative click installation system for the fans on the Freezer 36 CO.
4. Operating Instructions
Once installed, the ARCTIC Freezer 36 CO operates automatically, with fan speeds controlled by your motherboard's CPU fan header based on CPU temperature. Ensure your BIOS/UEFI settings are configured to manage CPU fan speeds effectively.
4.1. Cooling Performance
The cooler's design, including its 4 offset heatpipes and pressure-optimized 120 mm P-fans, ensures efficient heat dissipation, even for high-end CPUs. The side-flow heatsink design further optimizes ventilation by drawing additional cool air through the fins.
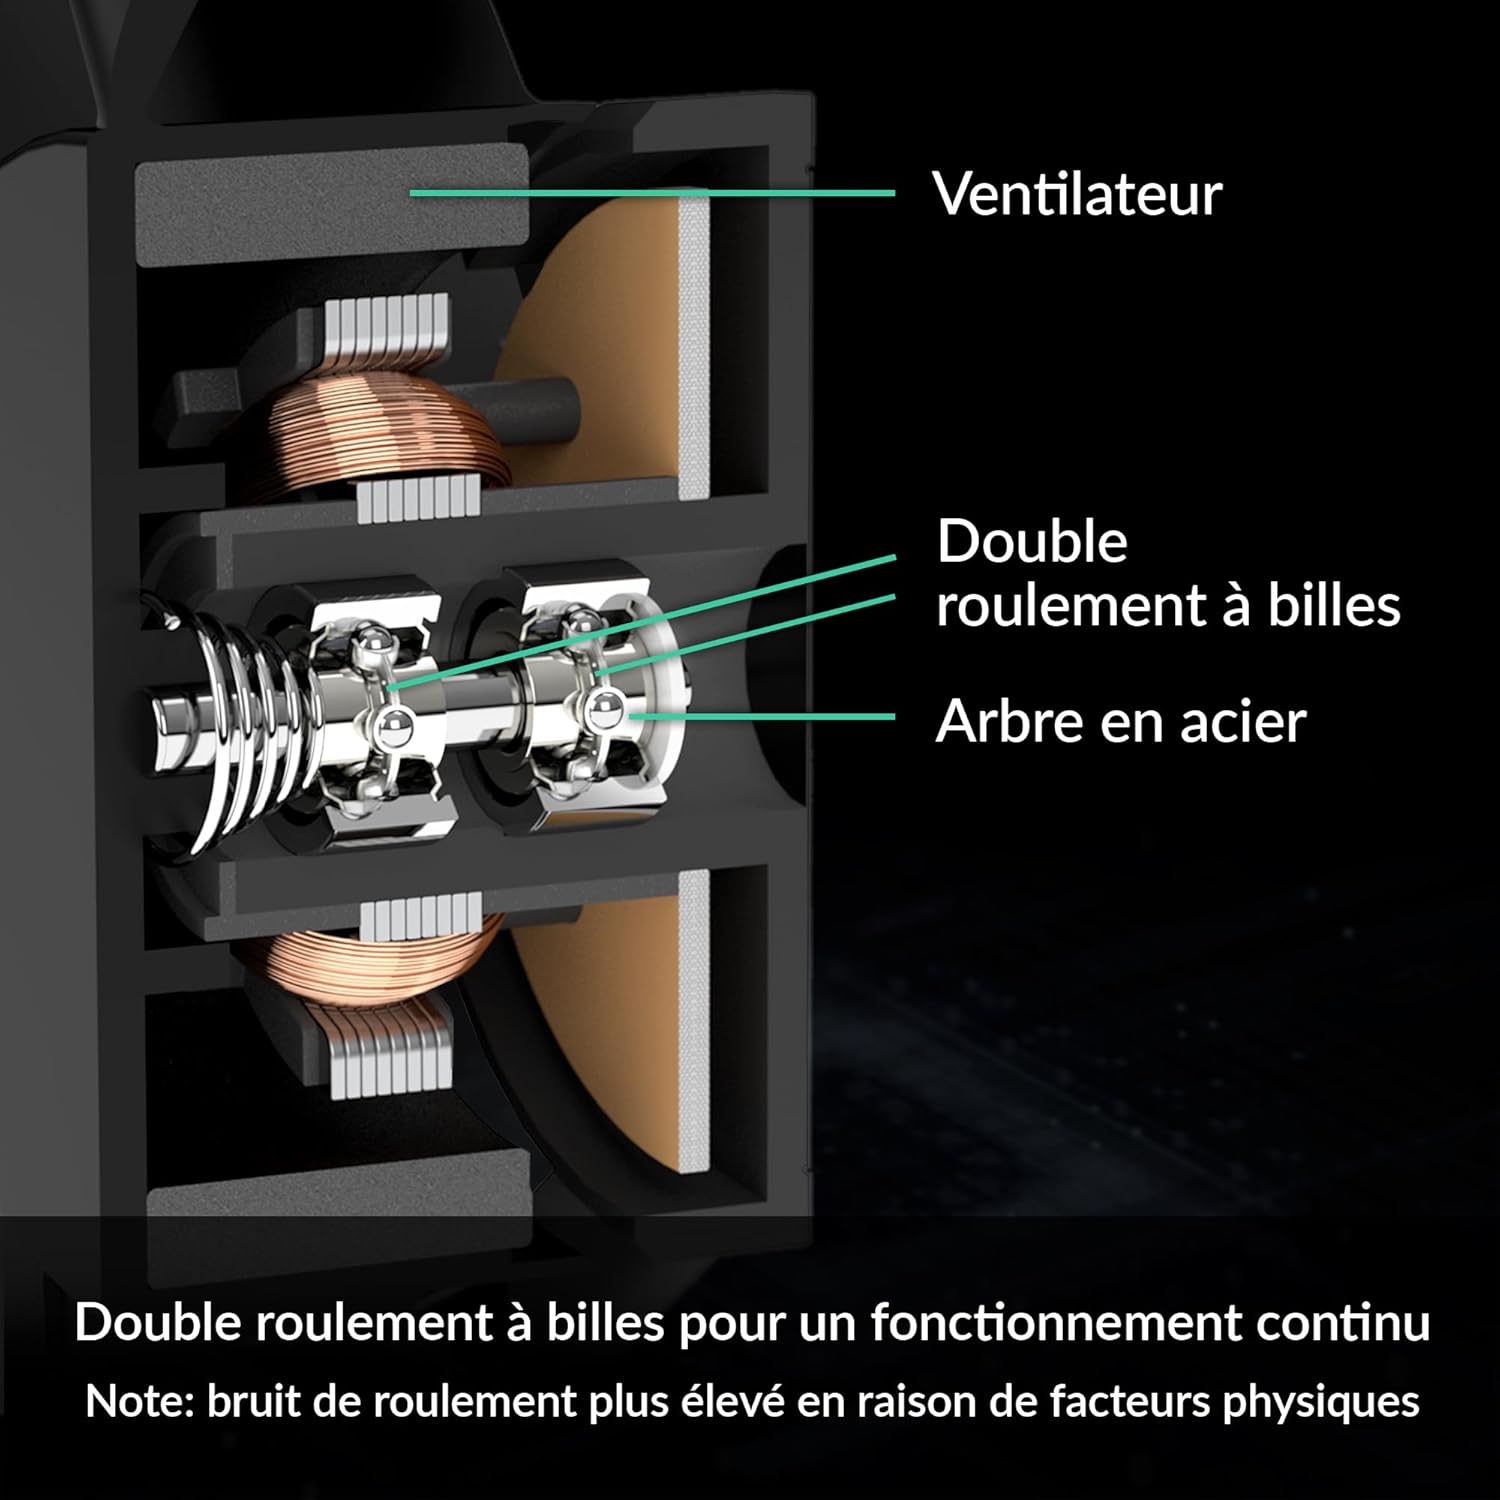
Image 4.1: Diagram illustrating the side-flow heatsink design, which enhances cooling efficiency.
4.2. Fan Technology
The included ARCTIC P-fans utilize a fluid dynamic bearing, contributing to a longer operational lifespan and increased reliability. This bearing type is more resistant to heat and dust compared to traditional bearings.

Image 4.2: Cross-section diagram detailing the dual ball bearing structure within the fan, highlighting its robust design.

Image 4.3: Close-up of the ARCTIC P-fans, optimized for high static pressure.
5. Maintenance
Regular maintenance helps ensure optimal performance and longevity of your ARCTIC Freezer 36 CO.
5.1. Dust Cleaning
- Periodically inspect the heatsink fins and fan blades for dust accumulation.
- Use compressed air or a soft brush to gently remove dust from the heatsink and fans. Ensure the fans are held stationary when using compressed air to prevent over-spinning and potential damage.
5.2. Fan Replacement
Thanks to the innovative click installation system, fans can be easily removed and replaced if necessary. Ensure any replacement fans are 120 mm in size and compatible with the cooler's mounting mechanism.
5.3. Thermal Compound Reapplication
Over time, thermal compound can dry out or degrade. If you notice a significant increase in CPU temperatures, consider reapplying thermal compound. This involves carefully removing the cooler, cleaning both the CPU and cooler base thoroughly, and applying fresh thermal compound.
6. Troubleshooting
This section addresses common issues you might encounter with your CPU cooler.
6.1. Fan Not Spinning or Noisy
- Check Connections: Ensure the fan cables are securely connected to the CPU_FAN header(s) on your motherboard.
- BIOS/UEFI Settings: Verify that your motherboard's BIOS/UEFI settings are correctly configured for CPU fan control. Ensure fan control is enabled and not set to a very low RPM profile that might prevent spinning at low temperatures.
- Obstructions: Check for any cables or debris obstructing the fan blades.
- Defective Fan: If a fan does not work at all despite correct connections and settings, it may be defective. Contact support for assistance or consider replacing the fan using the easy click-installation system.
6.2. High CPU Temperatures
- Thermal Paste Application: Ensure thermal paste was applied correctly and evenly. Insufficient or improperly applied thermal paste can severely hinder cooling performance.
- Cooler Mounting Pressure: Verify that the cooler is securely mounted and applying even pressure to the CPU. Loose mounting can lead to poor contact and high temperatures.
- Case Airflow: Ensure adequate airflow within your computer case. Poor case ventilation can lead to heat buildup, affecting cooler performance.
- Dust Accumulation: Clean any dust from the heatsink and fans as described in the Maintenance section.
6.3. Installation Difficulties (Intel LGA)
If you encounter issues with the Intel LGA backplate dropping during installation, consider the following:
- Pre-install Backplate: If possible, secure the backplate to the motherboard with tape or by partially threading one screw before installing the motherboard into the case.
- Support Backplate: Have a second person support the backplate from behind the motherboard during installation, or use a non-conductive tool to hold it in place.
7. Specifications
| Feature | Specification |
|---|---|
| Model Number | ACFRE00122A |
| Product Dimensions (L x W x H) | 4.09" x 4.96" x 6.26" (10.39 cm x 12.60 cm x 15.90 cm) |
| Weight | 1.94 Pounds (0.88 kg) |
| Cooling Method | Air |
| Compatible Sockets | Intel LGA1851, LGA1700; AMD AM5, AM4 |
| Fan Type | 2 x 120 mm P-Fans |
| Fan Bearing | Fluid Dynamic Bearing |
| Fan Speed | 200–1800 RPM |
| Air Flow Capacity | 122 Cubic Feet Per Minute (CFM) |
| Power Connector | 4-Pin PWM |
| Voltage | 12 Volts |
| Wattage | 1.2 watts |
| Heatsink Material | Copper (Heatpipes), Aluminium (Fin Stack) |
| Included Thermal Compound | ARCTIC MX-6 |
| Date First Available | November 23, 2023 |

Image 7.1: Overview of the ARCTIC Freezer 36 series, showing various models and their features.
8. Warranty Information
ARCTIC products are manufactured with high-quality standards. For specific warranty terms and conditions applicable to your Freezer 36 CO CPU cooler, please refer to the official ARCTIC website or contact ARCTIC customer support directly. Keep your proof of purchase for warranty claims.
9. Support and Contact
For further assistance, technical support, or to access the latest version of the manual, please visit the official ARCTIC support resources:
- Official Product Page: arctic.de/freezer-36-co
- Online Manual: support.arctic.de/freezer-36-cor4
- Contact Support: support.arctic.de/freezer-36-cor4/contact
- ARCTIC Store on Amazon: Visit the ARCTIC Store