Product Overview
The LumiTek™ R/C Drift King is a 2.4 GHz 1:16 scale remote control car designed for high-speed driving and drifting. It features customizable LED lighting, allowing users to personalize the vehicle's appearance. The car is equipped with a steady chassis and a strong power motor for optimal performance.

Image: The LumiTek R/C Drift King car, its remote control, and the USB charging cable. The car is black with red LED piping, and the remote is a standard pistol-grip design.
Key Features:
- High-speed performance with slick rear wheels for drifting.
- Equipped with a steady chassis and strong power motor.
- 2.4 GHz remote control for responsive operation.
- Customizable LED piping for personalized light designs.
- Designed for ages 8 and up.
What's in the Box
Upon opening the package, ensure all components are present and in good condition.
- 1 x LumiTek™ R/C Drift King Car
- 1 x Remote Control
- 1 x USB Charging Cable
- Additional LED piping for customization
- Small screwdriver (for battery compartments)
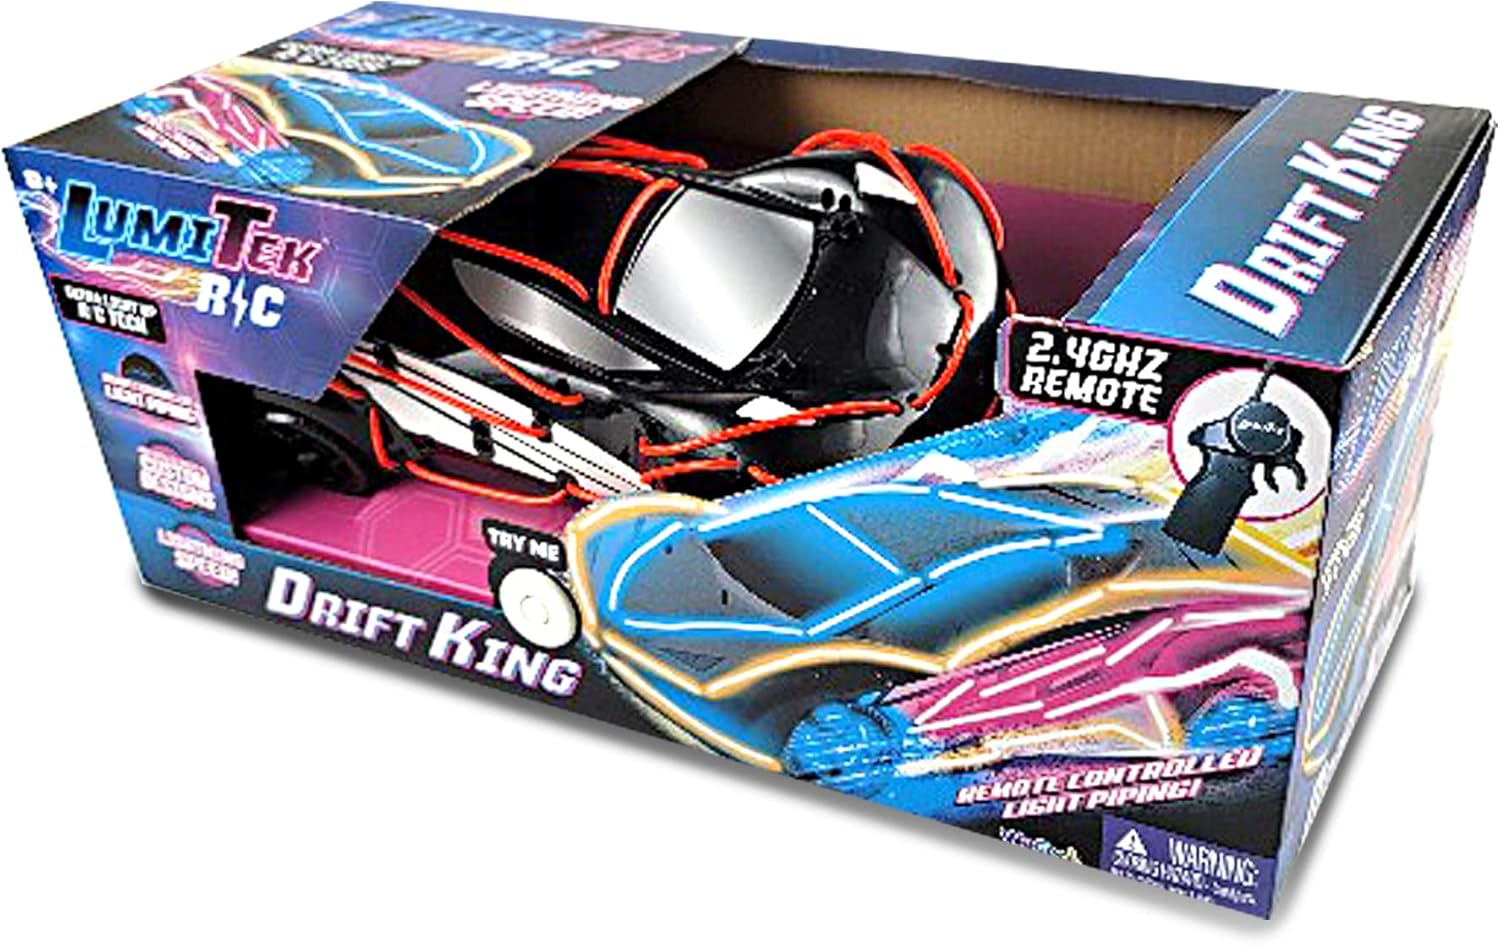
Image: The LumiTek R/C Drift King car inside its retail packaging, showcasing the product and its features.
Setup
1. Car Battery Installation and Charging
The LumiTek™ R/C Drift King car comes with a built-in rechargeable battery. Before first use, fully charge the car's battery using the provided USB charging cable.
- Locate the battery compartment on the underside of the car. Use the included screwdriver to open the battery cover.
- Connect the car's battery to the USB charging cable.
- Plug the USB charging cable into a standard USB power adapter (not included) or a computer USB port.
- The charging indicator light on the cable will illuminate during charging and turn off or change color when fully charged. Charging typically takes approximately 90 minutes.
- Once charged, disconnect the cable and securely close the battery compartment.
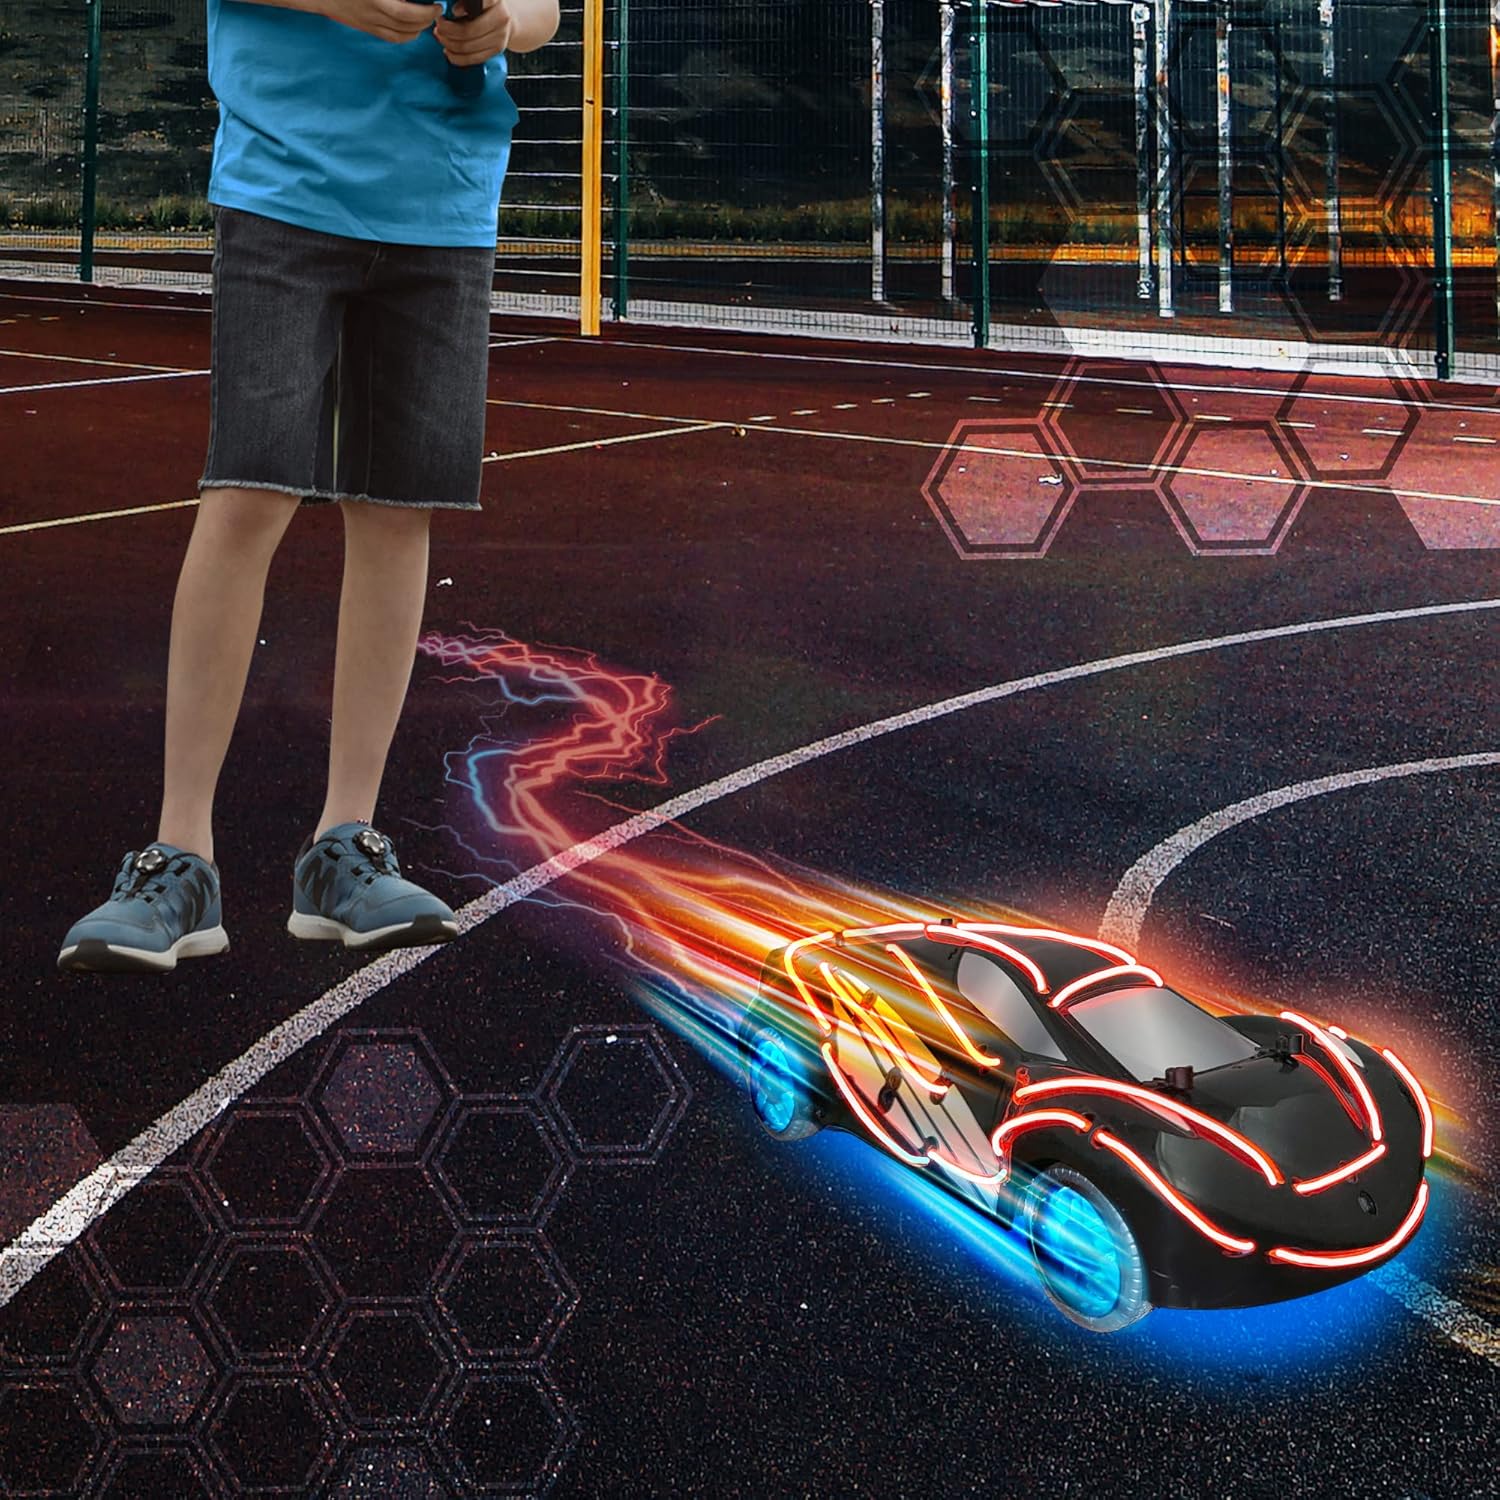
Image: The underside of the LumiTek R/C Drift King car, revealing the battery compartment and internal wiring. This area is where the rechargeable battery is accessed for charging.
2. Remote Control Battery Installation
The remote control requires 2 x AA batteries (not included).
- Locate the battery compartment on the back of the remote control.
- Use the included screwdriver to open the battery cover.
- Insert 2 x AA batteries, ensuring correct polarity (+/-).
- Replace the battery cover and secure it with the screw.
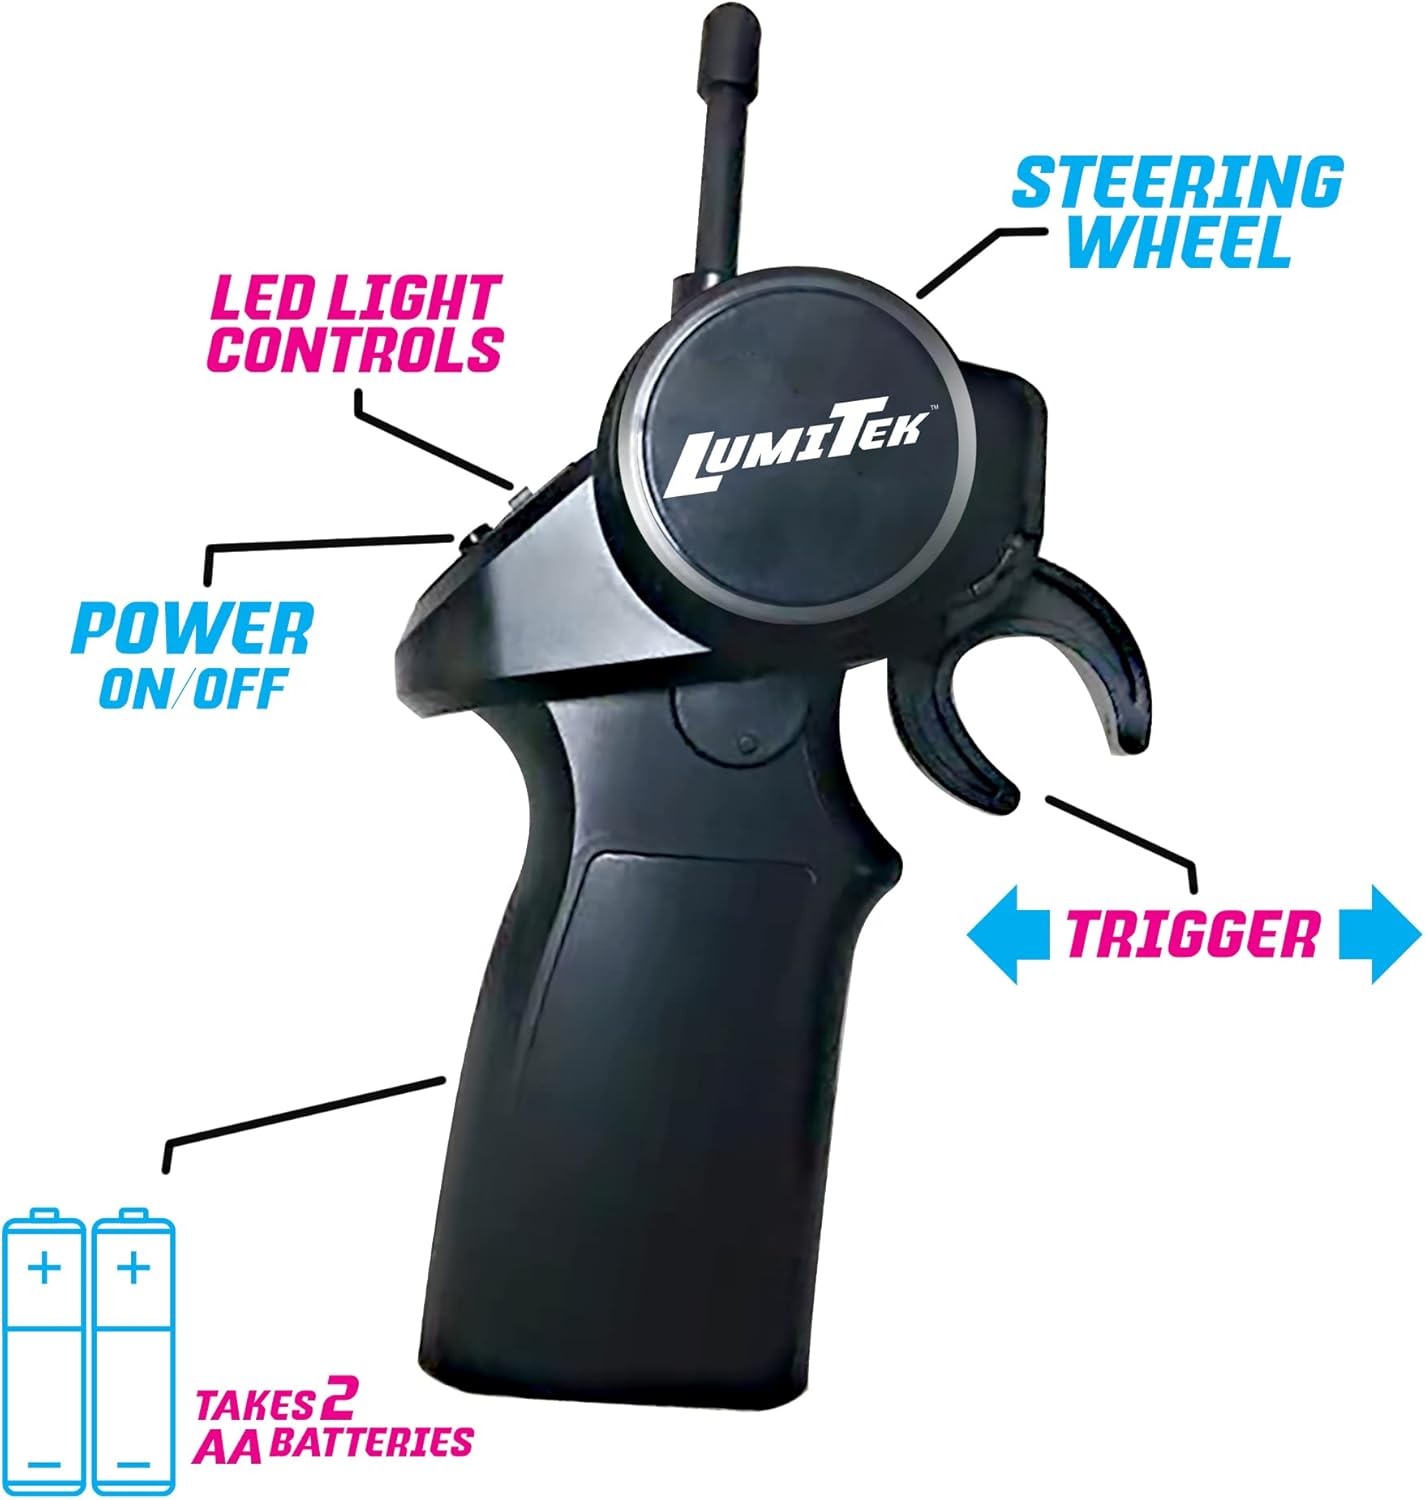
Image: The LumiTek R/C remote control, highlighting the battery compartment at the base and labels for the steering wheel, trigger, power on/off button, and LED light controls.
3. Customizable LED Piping Installation
The Drift King comes with additional LED piping that can be used to customize the car's appearance.
- Carefully remove the car's body shell if necessary to access the internal structure.
- Plan your desired LED design on the car's chassis or body.
- Secure the LED piping in place using adhesive tape or clips (not included, or use existing attachment points).
- Ensure the LED piping is securely connected to the car's internal power source for the lights.
- Replace the car's body shell.

Image: A child's hands are shown carefully installing or adjusting the red LED piping on the underside of the LumiTek R/C Drift King car, which has its body shell removed.
Operating Instructions
1. Power On and Pairing
- Turn on the power switch on the car (usually located on the underside or side).
- Turn on the power switch on the remote control.
- The car and remote will automatically pair. A light on the remote or car may indicate successful pairing.
2. Controls
Familiarize yourself with the remote control's functions:
- Steering Wheel: Rotate left or right to steer the car.
- Trigger: Pull the trigger towards you to move the car forward. Push the trigger away from you to brake or reverse.
- LED Light Controls: Use the dedicated buttons on the remote to turn the car's LED lights on or off, or to cycle through different light modes if available.
- Power ON/OFF: Turns the remote control on or off.
Image: The LumiTek R/C remote control, clearly showing the steering wheel, trigger, power switch, and LED light control buttons, each labeled for easy identification.
3. Driving Tips
- For optimal drifting performance, operate the car on smooth, hard surfaces.
- Practice gentle steering and throttle inputs to master drifting techniques.
- Avoid operating the car in wet conditions or on rough terrain to prevent damage.
Image: The LumiTek R/C Drift King car in motion on an outdoor court, with its LED lights illuminated and glowing blue wheels, creating light trails behind it, suggesting speed and dynamic movement.
Maintenance
- Cleaning: Use a soft, dry cloth to wipe down the car and remote control after use. Do not use water or chemical cleaners.
- Battery Care:
- Always fully charge the car's battery before storage.
- Remove AA batteries from the remote control if not in use for extended periods to prevent leakage.
- Storage: Store the car and remote in a cool, dry place away from direct sunlight and extreme temperatures.
- Inspection: Periodically check wheels, axles, and steering components for any debris or damage.
Troubleshooting
| Problem | Possible Cause | Solution |
|---|---|---|
| Car does not respond to remote. |
|
|
| Car's steering is not working correctly (e.g., not turning, turning poorly). |
|
|
| Short operating time / Poor battery life. |
|
|
| LED lights are not working. |
|
|
Specifications
| Feature | Detail |
|---|---|
| Model Number | 600121 |
| Scale | 1:16 (Note: Product description states 1:10, but title and keywords imply 1:16. Using 1:16 from title for consistency with product name.) |
| Frequency | 2.4 GHz |
| Car Battery | Rechargeable (included) |
| Remote Control Batteries | 2 x AA batteries (not included) |
| Recommended Age | 8 years and up |
| Item Weight | 1.8 pounds |
| Package Dimensions | 15.1 x 6.5 x 6 inches |
| Manufacturer | WeCool Toys |
Warranty and Support
This product is manufactured by WeCool Toys. For any product-related inquiries, technical support, or warranty claims, please contact the manufacturer directly.
Specific warranty details and contact information may be provided on the product packaging or the manufacturer's official website. Please retain your proof of purchase for warranty purposes.
Note: No specific warranty period or direct support contact information is provided in this manual.


