
Product Overview
The Essl MB20 is a facial biometric time and attendance device designed for efficient workforce management. It integrates advanced facial recognition, fingerprint scanning, and card identification technologies to provide secure and accurate attendance tracking. This device is suitable for various environments, offering robust performance and user-friendly operation.
- User Capacity: 1,000
- Finger Capacity: 500
- Face Capacity: 200
- Transaction Capacity: 50,000
- Communication: TCP/IP, USB2.0 HOST
- Data Transfer: Push Data functionality supported
- Display: Color LCD
- Audio: Stereo Speaker

Image: Front view of the Essl MB20 device, showing the color LCD screen, keypad, and fingerprint scanner.
Setup Guide
1. Unboxing and Initial Inspection
- Carefully open the packaging and remove the device and all accessories.
- Verify that all components listed in the packing list are present.
- Inspect the device for any visible damage. If damage is found, contact your supplier immediately.
2. Hardware Installation
- Choose a suitable location for installation, ensuring it is stable, dry, and away from direct sunlight or extreme temperatures.
- Mount the device securely to a wall using the provided mounting bracket and screws. Ensure it is at an appropriate height for users to comfortably access the facial scanner and fingerprint sensor.
- Connect the power adapter to the device's power input port and then plug it into a standard electrical outlet.
3. Network Connection (TCP/IP)
- Connect an Ethernet cable from your network router/switch to the LAN port on the device.
- On the device's menu, navigate to Communication > Network Settings.
- Configure the IP Address, Subnet Mask, Gateway, and DNS settings according to your network configuration. You may use DHCP if your network supports it.
- Verify network connectivity by pinging the device's IP address from a computer on the same network.
Operating Instructions
1. User Enrollment
Before users can record attendance, they must be enrolled in the device's system.
- Access the device's main menu (usually by pressing 'M/OK' and entering administrator credentials).
- Navigate to User Management > New User.
- Enter the User ID and User Name.
- Enroll Face: Select 'Enroll Face' and position the user's face within the camera's frame as instructed by the device. Ensure good lighting and a neutral expression.
- Enroll Fingerprint: Select 'Enroll Finger' and place the user's finger on the scanner. Repeat the process multiple times (typically 3 times) for accurate registration.
- Enroll Card (if applicable): Select 'Enroll Card' and present the proximity card to the device's card reader.
- Set the user's role (e.g., Normal User, Administrator).
- Save the user information.
2. Time & Attendance Recording
Users can record their attendance using their enrolled credentials.
- Approach the device.
- Present your face to the camera, place your enrolled finger on the scanner, or present your enrolled card to the reader.
- The device will confirm successful verification with an audible prompt and display a confirmation message on the screen.
- The transaction (e.g., Check-in, Check-out) will be automatically recorded.
3. Data Management
Transaction data can be retrieved from the device for reporting and payroll processing.
- USB Data Download: Insert a USB flash drive into the device's USB HOST port. Navigate to Data Management > Download Attendance Log to transfer data to the USB drive.
- Software Download (TCP/IP): Use the provided time attendance management software (e.g., eSSL BioTime) on a networked computer to connect to the device via TCP/IP and download attendance records.
Maintenance
- Cleaning: Regularly clean the device's screen, camera lens, and fingerprint sensor with a soft, dry, lint-free cloth. Do not use abrasive cleaners or solvents.
- Software Updates: Periodically check the eSSL official website for firmware updates. Keeping the firmware updated ensures optimal performance and security.
- Data Backup: Regularly back up attendance data to an external storage device or computer to prevent data loss.
- Environmental Conditions: Ensure the device operates within its specified temperature and humidity ranges to prolong its lifespan.
Troubleshooting
| Issue | Possible Cause | Solution |
|---|---|---|
| Device not powering on | No power supply; faulty adapter/cable | Check power connection; test power adapter; ensure outlet is functional. |
| Fingerprint not recognized | Finger wet/dirty; improper placement; poor enrollment quality | Ensure finger is clean and dry; place finger flat on sensor; re-enroll fingerprint if necessary. |
| Face not recognized | Poor lighting; face too close/far; changes in appearance; poor enrollment quality | Ensure adequate lighting; maintain proper distance; re-enroll face if significant changes occurred. |
| Network connection issues | Incorrect IP settings; faulty Ethernet cable; network firewall | Verify network settings; check cable; temporarily disable firewall for testing. |
| Data transfer failure | USB drive format issue; software connection error | Ensure USB drive is FAT32 format; check software connection settings and device IP. |
Technical Specifications
| Feature | Specification |
|---|---|
| User Capacity | 1,000 |
| Finger Capacity | 500 |
| Face Capacity | 200 |
| Transaction Capacity | 50,000 |
| Communication | TCP/IP, USB2.0 HOST |
| Push Data | Yes |
| Display | Color LCD |
| Sound | Stereo Speaker |
| Model Number | MB20+ID |
| Product Dimensions (LxWxH) | 16.19 x 15.28 x 3.05 cm |
| Item Weight | 750 g |
| Manufacturer | eSSL Private Limited. |
| Country of Origin | India |
Warranty and Support
This Essl MB20 device comes with a standard manufacturer's warranty. Please refer to the warranty card included in your product packaging for specific terms and conditions, including the warranty period and coverage details. For any warranty claims or service requests, please retain your purchase receipt.
For technical assistance, software installation support, or any queries regarding the operation of your device, please contact eSSL customer support. Online support resources, including FAQs and software downloads, may also be available on the official eSSL website.
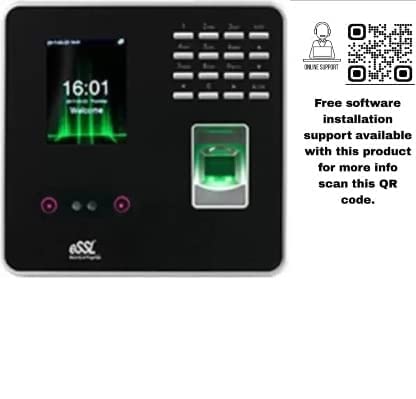
Image: Essl MB20 device displaying the time, alongside a QR code for online support.
Scan this QR code for free software installation support and more information: https://qr.page/g/1RCdIB1BFGZ