1. Introduction
This manual provides comprehensive instructions for the safe and effective operation, maintenance, and troubleshooting of your HITBOX MIG200 Synergy 5-in-1 Welder. Please read this manual thoroughly before using the equipment and retain it for future reference.
The HITBOX MIG200 Synergy (Model MIG200new) is a versatile welding machine designed for various welding processes, including MIG with gas, MIG without gas (Flux-cored), MMA (Stick), LIFT TIG, and Spot Welding. It features synergistic control for ease of use and is suitable for welding various materials including aluminum.

Figure 1: Front view of the HITBOX MIG200 Synergy Welder.
2. Safety Precautions
Always prioritize safety when operating welding equipment. Failure to follow safety guidelines can result in serious injury or death.
- Ensure proper ventilation to avoid inhaling welding fumes.
- Wear appropriate personal protective equipment (PPE), including a welding helmet, gloves, and protective clothing.
- Do not touch live electrical parts.
- Ensure the welding machine is properly grounded.
- Keep flammable materials away from the welding area.
- Disconnect power before performing any maintenance or adjustments.
- Refer to local safety regulations and standards for additional guidelines.
3. Product Overview
3.1 Key Features
- 5-in-1 Welding Modes: MIG with Gas, MIG without Gas (Flux-cored), MMA (Stick), LIFT TIG, Spot Welding.
- Synergistic Control: Simplifies parameter settings for various welding tasks by automatically adjusting wire speed to voltage.
- 2T/4T Function: Provides flexibility for torch trigger control, reducing hand fatigue during long welds.
- Digital Control Panel: Clear digital displays for voltage, current, wire speed, and weld time.
- Aluminum Welding Capability: Supports welding of aluminum materials.
- Portable Design: Compact and lightweight for easy transport.
3.2 Control Panel and Connections

Figure 2: Front control panel of the HITBOX MIG200II Welder with labeled functions.
- Display of Voltage, Weld Memory & Weld Time: Digital display for monitoring welding parameters.
- Display of Wire Speed & Current: Digital display for wire feed speed and welding current.
- Switch Button for Welding Mode: Selects between MIG, MMA, LIFT TIG, and Spot Welding modes.
- Switch Button for Spot/2T/4T: Toggles between spot welding, 2-stroke, and 4-stroke trigger modes.
- Choice for Wire Diameter: Selects appropriate wire diameter (e.g., 0.6mm, 0.8mm, 0.9mm, 1.0mm).
- Select Button for Metal: Chooses metal type (e.g., Fe CO2, Fe MIX, Flux, CrNi, AlMg) for synergistic settings.
- Voltage Knob: Adjusts welding voltage.
- Current/Wire Speed Adjust Knob: Adjusts welding current or wire feed speed, depending on mode.
- Inductive Buttons: For fine-tuning inductance.

Figure 3: Rear panel of the HITBOX MIG200 Synergy Welder.
- Power Switch: Turns the machine ON/OFF.
- Input AC 220V: Power input connection.
- Cooled Exhaust Fan: Ensures proper cooling of internal components.
- Gas Input Port: Connection for shielding gas hose.
4. Setup
4.1 Unpacking and Inspection
- Carefully remove the welder and all accessories from the packaging.
- Inspect the machine for any signs of damage during transit. Contact your supplier immediately if damage is found.
- Verify all components listed in the packing list are present.
4.2 Connecting Accessories
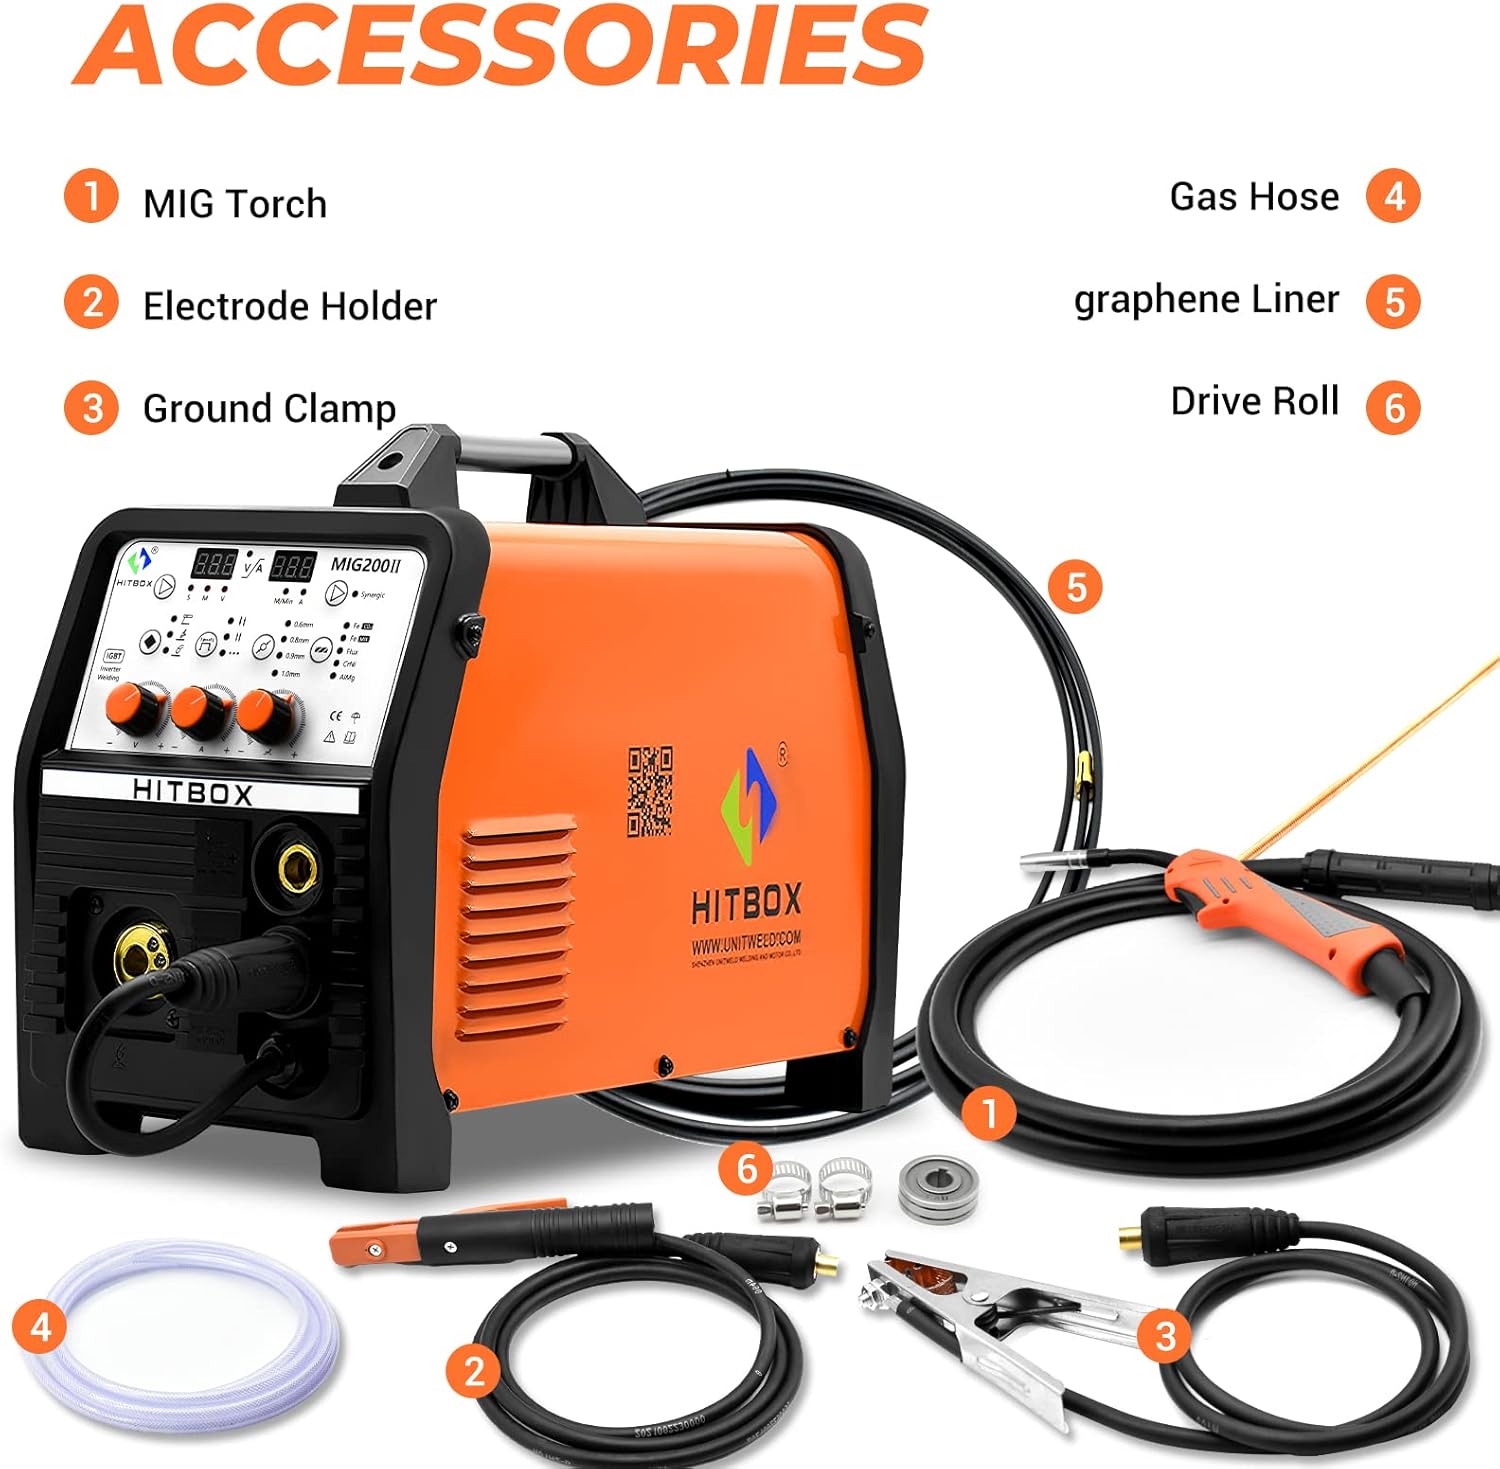
Figure 4: Included accessories for the HITBOX MIG200 Synergy Welder.
- MIG Torch: Connect the MIG torch to the appropriate front panel connector.
- Electrode Holder: For MMA welding, connect the electrode holder to the positive (+) terminal.
- Ground Clamp: Connect the ground clamp to the negative (-) terminal. Ensure a good electrical connection to the workpiece.
- Gas Hose: If using MIG with gas, connect one end of the gas hose to the gas input port on the rear panel and the other end to your shielding gas cylinder regulator.
- Graphene Liner: Ensure the correct liner is installed in the MIG torch for the wire type being used.
- Drive Roll: Install the appropriate drive roll for your wire diameter and type in the wire feeder compartment.
4.3 Installing Welding Wire

Figure 5: Wire spool compartment of the HITBOX MIG200 Synergy Welder.
- Open the wire spool compartment.
- Place the welding wire spool onto the spindle, ensuring it rotates freely.
- Feed the wire through the drive roll mechanism and into the MIG torch liner.
- Close the compartment and adjust the drive roll tension.
5. Operating Modes
The HITBOX MIG200 Synergy supports multiple welding processes. Select the desired mode using the control panel.

Figure 6: Connection diagrams for various welding modes.
5.1 MIG Welding (with Gas)
- Connect the MIG torch and ground clamp as shown in Figure 6 (MIG Gas).
- Ensure the gas hose is connected to a shielding gas cylinder (e.g., Argon, CO2, or Argon/CO2 mix).
- Select "MIG" mode on the control panel.
- Choose the appropriate wire diameter and metal type.
- Adjust voltage, wire speed, and inductance using the respective knobs. The synergistic function will assist in setting optimal parameters.
- Initiate welding by pressing the torch trigger.
5.2 Flux-Cored Welding (MIG without Gas)
- Connect the MIG torch and ground clamp. No shielding gas is required for flux-cored wire.
- Select "MIG" mode and ensure "Flux" is chosen for the metal type.
- Choose the appropriate flux-cored wire diameter.
- Adjust welding parameters.
- Initiate welding.
5.3 MMA (Stick) Welding
- Connect the electrode holder to the positive (+) terminal and the ground clamp to the negative (-) terminal (or vice-versa depending on electrode polarity requirements). Refer to Figure 6 (ARC).
- Select "MMA" mode.
- Adjust the welding current.
- Strike the electrode against the workpiece to initiate the arc.
5.4 LIFT TIG Welding
- Connect a TIG torch (not included) to the negative (-) terminal and the ground clamp to the positive (+) terminal. Connect a gas hose to an Argon cylinder. Refer to Figure 6 (LIFT TIG).
- Select "LIFT TIG" mode.
- Adjust the welding current.
- Touch the tungsten electrode to the workpiece and then lift it slightly to initiate the arc.
5.5 Spot Welding
- This mode is typically used with MIG setup.
- Select "Spot" function using the dedicated button on the control panel.
- Set the desired spot welding time.
- Position the torch and activate.
6. Maintenance
Regular maintenance ensures the longevity and optimal performance of your welding machine.
- Daily: Clean the MIG torch nozzle and contact tip. Check all cable connections for tightness and damage.
- Weekly: Clean the wire feeder mechanism. Inspect the drive rolls for wear. Check the cooling fan for obstructions.
- Monthly: Blow out dust and debris from inside the machine using dry, compressed air. Ensure the power is disconnected before opening the casing.
- Periodically: Inspect power cables and welding leads for cuts or damage. Replace any damaged components immediately.
7. Troubleshooting
| Problem | Possible Cause | Solution |
|---|---|---|
| No power | Power switch off, circuit breaker tripped, loose power cable. | Turn on power switch, reset breaker, check power cable connection. |
| No arc in MIG mode | No wire feed, poor ground connection, wrong settings, clogged contact tip. | Check wire spool, tension, and feed path. Ensure ground clamp is secure. Verify settings. Clean/replace contact tip. |
| Poor weld quality | Incorrect parameters, improper technique, contaminated workpiece, insufficient gas flow (MIG). | Adjust voltage/wire speed. Practice technique. Clean workpiece. Check gas cylinder and flow rate. |
| Overheating protection activated | Exceeded duty cycle, blocked cooling fan. | Allow machine to cool down. Ensure cooling fan is clear and functional. |
8. Specifications
| Feature | Detail |
|---|---|
| Model Number | MIG200new |
| Product Dimensions | 54 x 29 x 45 cm |
| Item Weight | 14.64 kg |
| Power Source | Electric_with_cord (AC 220V) |
| Welding Processes | MIG with Gas, MIG without Gas (Flux-cored), MMA, LIFT TIG, Spot Welding |
| Manufacturer | SHEN ZHEN UNITWELD WELDING AND MOTOR.,LTD |
| ASIN | B09V2NVHLJ |
Note: Detailed electrical specifications (e.g., input current, output current, duty cycle) are typically found on the machine's rating plate.
9. Warranty and Support
9.1 Warranty Information
The HITBOX MIG200 Synergy Welder comes with a 3-year warranty. Please retain your proof of purchase for warranty claims. For specific warranty terms and conditions, refer to the warranty card included with your product or contact customer support.
9.2 Customer Support
For technical assistance, troubleshooting, or warranty inquiries, please contact HITBOX customer support. You can find more information and contact details on the official HITBOX store page: