Introduction
This manual provides detailed instructions for the installation, operation, and maintenance of your FreedConn FX Motorcycle Bluetooth Headset. Please read this manual thoroughly before using the device to ensure proper function and safety.

Image: FreedConn FX Helmet Communication system mounted on a motorcycle helmet, highlighting its sleek design and integration.
Product Overview
The FreedConn FX is a versatile motorcycle Bluetooth headset designed for group communication, music sharing, and hands-free calling. It features Bluetooth 5.0, IP67 water repellency, and a long-lasting battery.
Key Features:
- 10-Way Group Intercom: Communicate with up to 10 riders simultaneously over a distance of 400 meters between two FX units.
- BT5.0 Universal Bluetooth: Compatible with most intercom brands and can connect to 2 mobile phones concurrently.
- 2-Way Music Sharing: Share music with a second headset within 10-50 meters, featuring D6 Hi-Res bass high-resolution sound quality.
- IP67 Water Repellency: Fully waterproof and dustproof, ensuring reliable operation in various weather conditions.
- Ultra-Long Working Life: 1100mAh battery with Type-C fast charging, providing 30 hours of intercom, 25 hours of music playback, and 720 hours of standby time.
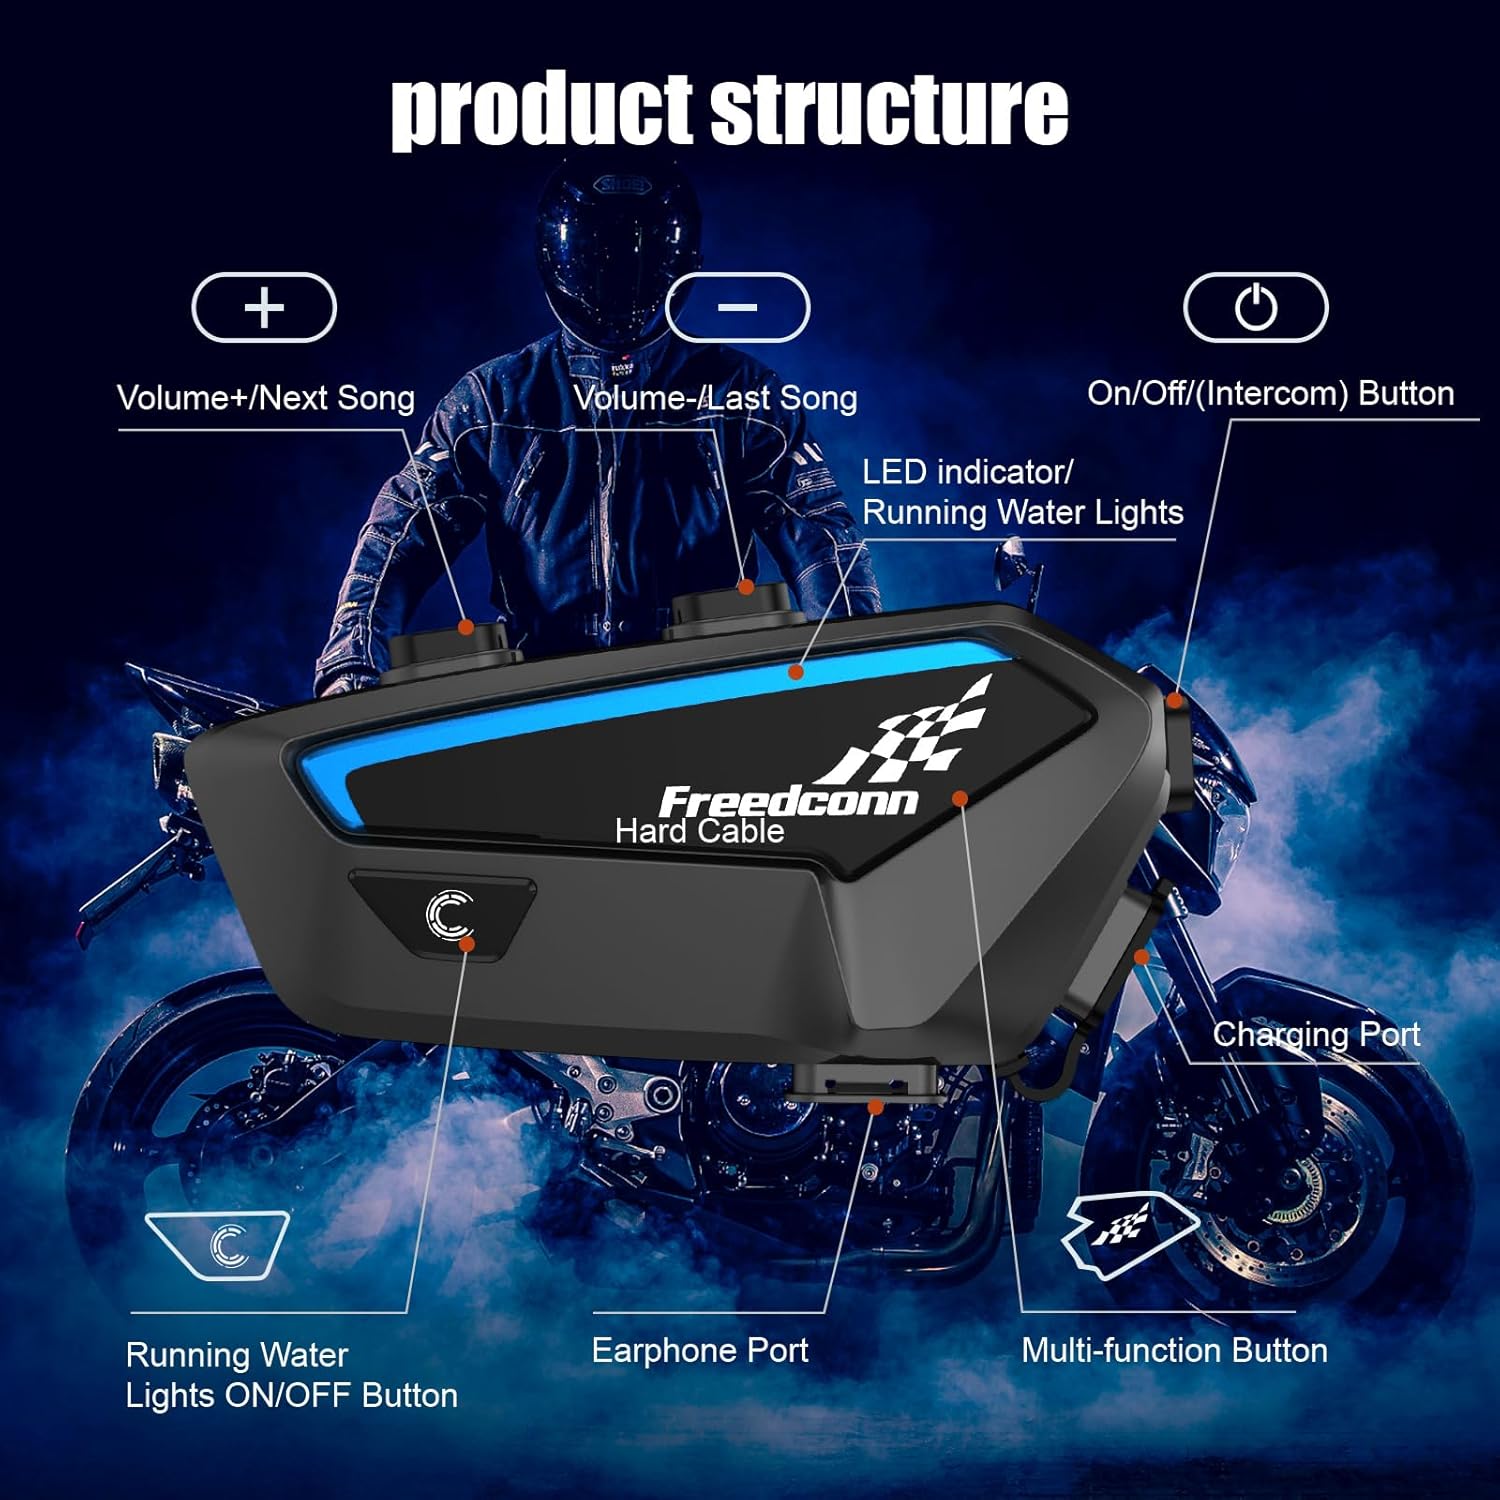
Image: Detailed diagram illustrating the buttons and ports on the FreedConn FX unit, including volume controls, multi-function button, charging port, and earphone port.
Setup and Installation
Follow these steps to properly install your FreedConn FX headset onto your helmet.
Package Contents:
Ensure all components are present before beginning installation.
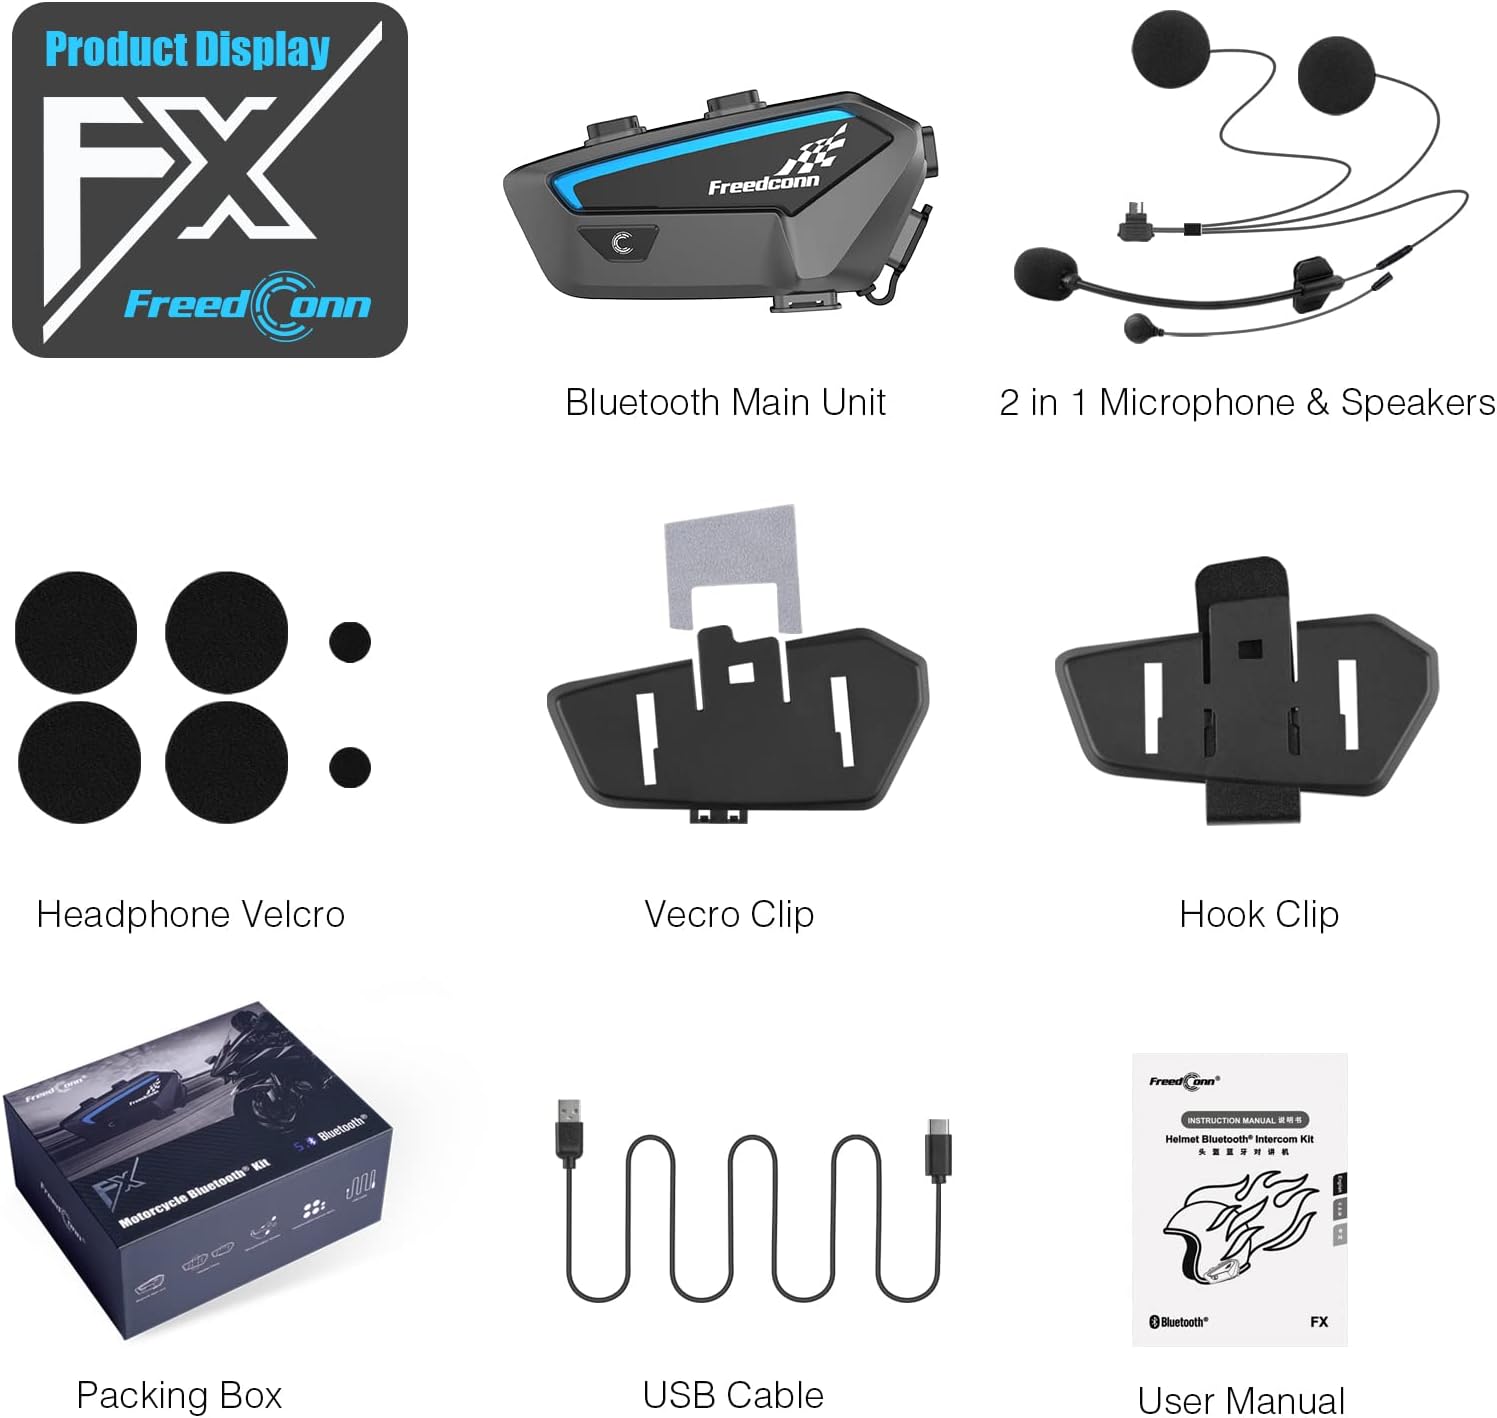
Image: Contents of the FreedConn FX package, including the main unit, speakers, microphones, mounting clips, and charging cable.
Installation Steps:
- Prepare Helmet: Remove the helmet's inner lining and cheek pads if possible to access the ear pockets.
- Attach Speaker Velcro: Peel the adhesive backing from the circular Velcro pads and firmly attach them inside the helmet's ear pockets.
- Install Speakers: Press the speakers onto the attached Velcro pads, ensuring they are positioned directly over your ears for optimal sound.
- Mount Microphone: Choose between the boom microphone (for open-face helmets) or the wired microphone (for full-face helmets). Attach the microphone using its adhesive or clip, positioning it close to your mouth.
- Route Wires: Carefully route all speaker and microphone wires under the helmet's lining to prevent discomfort and ensure they are not exposed.
- Install Main Unit Mount: Select either the clamp mount or the adhesive mount based on your helmet type and preference. Securely attach it to the left side of your helmet.
- Attach Main Unit: Slide the FreedConn FX main unit onto the installed mount until it clicks securely into place.
- Connect Cables: Plug the speaker/microphone cable into the designated port on the main unit.
- Reinstall Helmet Lining: Replace the helmet's inner lining and cheek pads, ensuring no wires are pinched.
Visual Installation Guide:
Video: Step-by-step guide on installing the FreedConn FX-S (similar model) headset components into a helmet, including speaker and microphone placement.
Video: Instructions for installing and removing the main host device from its helmet mount.
Operating Instructions
Basic Operations:
- Power On/Off: Press and hold the power button for 2 seconds to power on (blue light flashes quickly then slowly). Press and hold for 3 seconds to power off (red light on).
- Language Switching: In standby or music pause state, short press the multi-function button and the on/off button simultaneously.
- Running Water Indicator Light: In power on state, press the "C" button once to turn on/off the running-water indicator light.
- Delete Pairing Information: In power on state, press the on/off button for 8 seconds. The red LED indicator light will remain on and then flash twice quickly.
- Automatic Phone Call Answer: Short press the on/off button and the volume up button simultaneously to enable or disable automatic answer of phone calls.
Video: Demonstrates basic Bluetooth operations including power on, language switching, indicator light control, and deleting pairing information.
Video: Overview of FreedConn FX Helmet Intercom basic operations.
Intercom Functionality:
- Pairing with Third-Party Brands: Long press the multi-function key for 8 seconds to enter third-party brand pairing state.
- Group Intercom: The FX supports up to 10 riders for group communication.
Video: Demonstrates how to interconnect FreedConn FG and F1 intercom units.
Video: Guide on pairing between four FreedConn FG Bluetooth Headset devices.
Video: Instructions for connecting the FreedConn FX Helmet Intercom with third-party brands.

Image: Illustration of 2-10 riders group intercom communication, showing multiple motorcyclists on a road.
Music and Radio:
- Volume Adjustment: Long press the volume up button to increase volume; long press the volume down button to decrease volume.
- FM Radio On/Off: In standby state, double click the multi-function button to turn on/off the radio mode.
- FM Channel Switching: Short press the volume up button for the next channel; short press the volume down button for the previous channel.
- Switching between Music and Radio: In music mode, press the multi-function button twice to switch to frequency modulation (FM radio), and press twice again to return to music mode.
Video: Demonstrates the FM function operation of the FreedConn FX Helmet Intercom.

Image: Two motorcyclists sharing and enjoying the same music wirelessly via their FreedConn FX headsets.
Voice Assistant:
- Trigger Voice Assistant: Refer to the instruction video for specific steps on how to activate your phone's voice assistant through the headset.
Video: Explains how to trigger the voice assistant function on the FreedConn FX intercom.
Maintenance
- Water and Dust Protection: The FreedConn FX is IP67 rated, making it fully waterproof and dustproof. It can withstand heavy rain, snow, and even submersion up to one meter. Ensure all ports are securely closed when not in use to maintain water resistance.
- Battery Care: The 1100mAh battery provides extended usage. For optimal battery life, charge the device fully before first use and avoid completely draining the battery regularly. Use the provided Type-C fast charging cable.
- Cleaning: Wipe the unit with a soft, damp cloth. Avoid using harsh chemicals or abrasive cleaners.

Image: The FreedConn FX headset is shown to be IP67 waterproof and dustproof, functioning reliably in rain, snow, and muddy conditions.

Image: The FreedConn FX headset highlighting its 1100mAh large-capacity battery, with details on 2.5 hours charging time, 30 hours talking time, and 720 hours standby time.
Troubleshooting
- Pairing Issues: If devices fail to pair, ensure all previous pairing records are cleared from both units. Refer to the "Delete Pairing Information" section or the basic operation video for instructions.
- Intercom Connection Problems: For group intercom, ensure all devices have cleared previous pairing records before attempting to connect. Follow the specific pairing sequence for multiple devices.
- Audio Quality: Ensure speakers are correctly positioned directly over your ears. Adjust volume levels as needed. Check microphone placement to ensure it is close to your mouth and facing the correct direction (yellow triangle on boom mic).
- No Power: Ensure the battery is charged. Connect the device to a power source using the Type-C cable.
Specifications
| Model Name | FX |
| Connectivity Technology | Bluetooth 5.0 |
| Noise Control | Sound Isolation |
| Water Resistance Level | IP67 Waterproof |
| Battery Life | 30 Hours (Intercom), 25 Hours (Music) |
| Standby Time | 720 Hours |
| Charging Time | 2.5 Hours (Type-C) |
| Item Weight | 10.6 ounces (0.3 Kilograms) |
| Product Dimensions | 3.3 x 1.6 x 0.8 inches |
| Control Type | Media Control, Voice, Button |
| Included Components | Cable (USB Type-C) |
Warranty and Support
For any product inquiries, technical support, or warranty claims, please contact FreedConn customer service. Additional protection plans are available for purchase to extend coverage beyond the standard warranty period.
Available Protection Plans:
- 2-Year Protection Plan: Extends coverage for 24 months.
- 3-Year Protection Plan: Extends coverage for 36 months.
- Complete Protect: A monthly plan covering all eligible past and future purchases.
For more details on protection plans, please refer to the product listing or contact your retailer.