1. Introduction
This manual provides detailed instructions for the installation, operation, and maintenance of your DIYHD 43" Bi-Folding Sliding Barn Door Hardware. This kit is designed to facilitate the smooth and efficient movement of two bi-folding door panels. Please note that this product includes the hardware kit only; door panels are sold separately.
2. Safety Information
- Always wear appropriate safety gear, including eye protection and gloves, during installation.
- Ensure the mounting surface (wall or header) is structurally sound and capable of supporting the combined weight of the hardware and door panels. Professional assessment of the mounting surface is recommended.
- Use appropriate fasteners for your wall type. The provided lag screws may not be suitable for all wall constructions (e.g., drywall without studs). Longer, more robust lag screws may be required to anchor into wall studs or a solid header.
- Do not exceed the maximum load capacity of 180 lbs for the hardware system.
- Keep children and pets away from the installation area.
- Verify all components are securely fastened before operating the doors.
3. Package Contents
Carefully unpack all components and verify against the list below. If any parts are missing or damaged, contact DIYHD customer support.
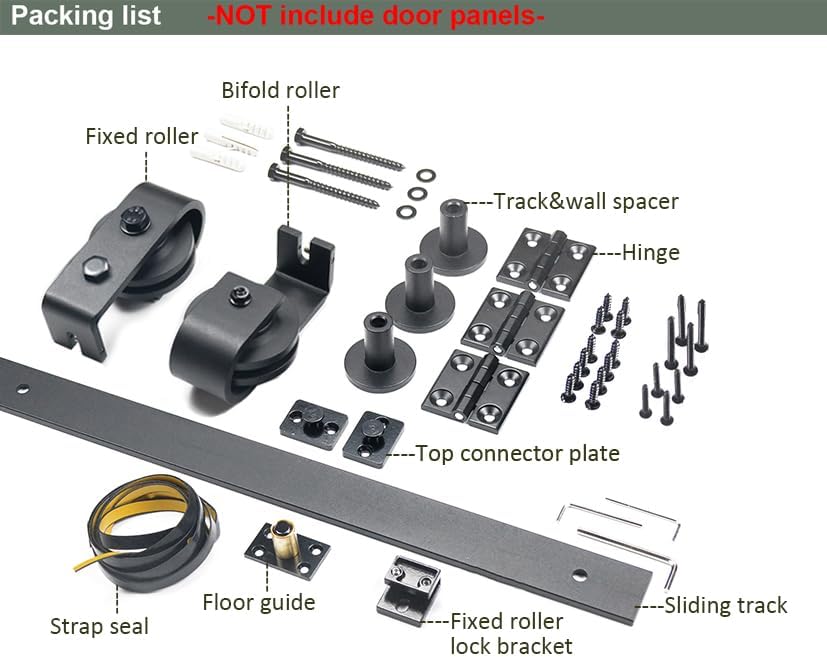
Figure 3.1: Overview of the hardware components included in the kit.
- 1x Sliding Track (43 1/4" length)
- 2x Track Stops
- 2x Track & Wall Connectors (Spacers)
- 1x Floor Guide
- 3x Hinges
- 2x Rollers (one fixed, one bi-fold)
- 1x Strap Seal
- 1x Fixed Roller Lock Bracket
- Mounting Screws and Anchors
- Top Connector Plate
4. Specifications
| Brand | DIYHD |
| Model Number | TYL707 |
| Track Length | 43 1/4 inches |
| Max Door Leaf Width (per door) | 19 5/8 inches |
| Fit Door Thickness | 1-3/8" to 1-3/4" |
| Height from Top of Door to Top of Roller | 5 5/16 inches |
| Gap between Door and Wall (Closed) | 1" to 1 3/16" |
| Gap between Door and Wall (Opened) | 1/4" to 3/8" |
| Material | Metal |
| Color | Black |
| Item Weight (Hardware Only) | 10 Pounds |
| Maximum Load Capacity | 180 lbs |

Figure 4.1: Key dimensions and specifications for the hardware system.
5. Installation and Setup
Installation requires careful measurement and secure mounting. It is recommended to have at least two people for certain steps. Refer to the provided diagrams for visual guidance.
5.1 Pre-Installation Checks
- Ensure your door panels meet the specified thickness and width requirements.
- Locate wall studs or install a solid header board above the door opening for secure track mounting.
- Gather necessary tools: drill, level, measuring tape, pencil, screwdriver, wrench.
5.2 Mounting the Sliding Track
- Determine the desired height for the track. The top of the door will be 5 5/16 inches below the top of the roller.
- Mark the center of the door opening on the wall.
- Position the track on the wall, ensuring it is level. Mark the drilling points for the track and wall connectors.
- Drill pilot holes. For optimal security, ensure these holes align with wall studs or a robust header. If mounting into drywall without studs, use heavy-duty toggle anchors (not included) or install a header board.
- Attach the track to the wall using the track and wall connectors and appropriate screws. Ensure it is firmly secured.
5.3 Preparing Door Panels
- Install the hinges to connect the two door panels, allowing them to fold.
- Attach the rollers to the top edge of the door panels as indicated in the diagrams.
- Install the top connector plate to the door panels.
5.4 Installing Floor Guide and Stops
- Temporarily hang the door panels on the track.
- Position the floor guide to ensure smooth operation and prevent the doors from swinging out. Mark its location.
- Remove the doors and securely fasten the floor guide to the floor.
- Re-hang the doors and install the track stops at the desired positions to limit door travel.

Figure 5.1: Installed hardware with door panel.
6. Operation
The DIYHD bi-folding sliding barn door hardware allows for smooth horizontal movement and folding of door panels. To operate, gently push or pull the door panels along the track. The bi-fold mechanism enables the doors to fold inward, minimizing the space required for opening.

Figure 6.1: Door operation showing closed, half-folded, and fully folded states.
7. Maintenance
Regular maintenance ensures the longevity and smooth operation of your hardware.
- Cleaning: Wipe the track and rollers periodically with a soft, damp cloth to remove dust and debris. Avoid abrasive cleaners.
- Lubrication: Apply a silicone-based lubricant to the rollers and track occasionally to maintain smooth gliding.
- Fastener Check: Periodically inspect all mounting screws and fasteners for tightness. Re-tighten if necessary to prevent sagging or instability.
- Hinge Inspection: Check the door hinges for any signs of wear or looseness and address as needed.
8. Troubleshooting
| Problem | Possible Cause | Solution |
|---|---|---|
| Doors do not slide smoothly or are stiff. | Dust or debris on track; lack of lubrication; misaligned track or rollers. | Clean the track and rollers. Apply silicone lubricant. Check track for levelness and roller alignment. |
| Doors sag or feel unstable. | Loose mounting screws; inadequate wall support. | Tighten all mounting screws. Ensure the track is securely fastened to wall studs or a solid header. Consider reinforcing the mounting area if necessary. |
| Doors do not fold correctly. | Hinges are loose or misaligned; floor guide is incorrectly positioned. | Check and tighten hinges. Verify the floor guide is correctly installed and aligned with the door's path. |
| Gap between door and wall is incorrect. | Incorrect installation of track spacers or door thickness. | Review installation steps for track and wall connector placement. Ensure door thickness is within specifications. |
9. Warranty and Support
For specific warranty information, please refer to the product packaging or contact the seller directly. For further assistance or to purchase replacement parts, please visit the official DIYHD store or contact their customer service.
DIYHD Store: https://www.amazon.com/stores/DIYHD/page/C3B4D820-44ED-4354-8AE6-4B1A5E9E554F