
Beurer HA 55
Contents
Beurer HA 55 Pair Hearing Amplifiers
User Manual
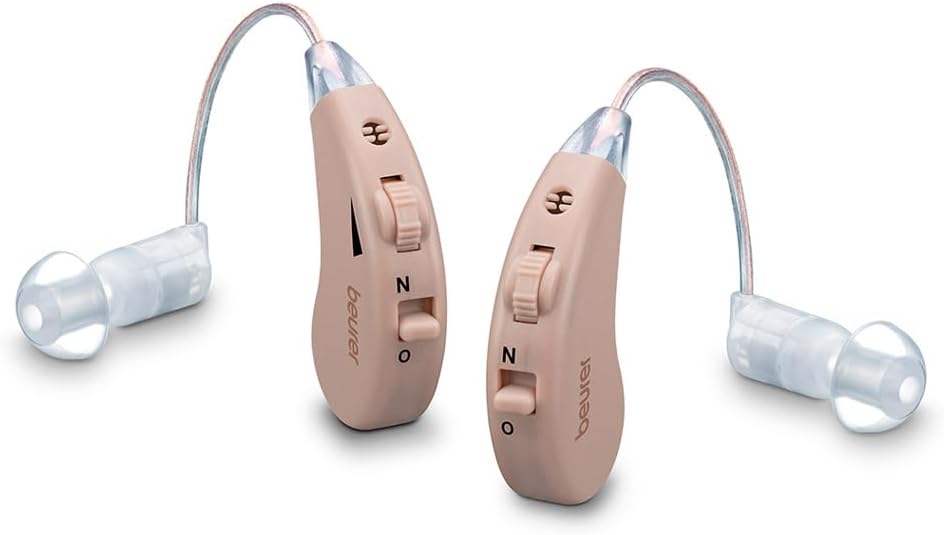
Image: A pair of Beurer HA 55 hearing amplifiers, beige in color, with clear ear tips and thin wires, shown against a white background.
Introduction
The Beurer HA 55 hearing amplifiers are designed to enhance sound perception for individuals with restricted hearing. These devices amplify all sounds and tones, enabling users to engage more fully in daily activities and enjoy their environment. The ergonomic design ensures a comfortable fit behind the ear, and the included accessories allow for personalized adjustment.
Product Overview and Components
Your Beurer HA 55 package includes the following items:
- 2 Beurer HA 55 Hearing Amplifiers
- 6 Earplugs in various sizes (3 pairs)
- USB Charging Station
- Cleaning Brush
- Drying Capsule
- Storage Box
Each hearing amplifier features a volume control and a program selection button. The design is intended to sit discreetly and comfortably behind the ear.
Setup
1. Charging the Devices
Before first use, fully charge both hearing amplifiers using the provided USB charging station. Place the amplifiers into the designated slots on the charging station. The indicator lights on the station will show the charging status.

Image: The Beurer HA 55 storage box, open and containing the hearing amplifiers, next to the compact USB charging station.

Image: Two views of the Beurer HA 55 hearing amplifiers in the USB charging station, illustrating the 'ON' state with green indicator lights and the 'OFF' state.
2. Selecting and Fitting Ear Tips
Choose the ear tip size that provides the most comfortable and secure fit within your ear canal. The package includes three different sizes to ensure an individual fit for both ears. Gently push the selected ear tip onto the sound outlet of the amplifier.

Image: A close-up of a man wearing a Beurer HA 55 hearing amplifier, with an inset showing a variety of clear silicone ear tip attachments for individual adjustment.
3. Wearing the Device
Position the hearing amplifier behind your ear, ensuring the ear tip is comfortably inserted into your ear canal. The ergonomic design allows the device to sit securely and discreetly.

Image: A man and woman conversing, with an inset showing the Beurer HA 55 hearing amplifier discreetly and ergonomically fitted behind a person's ear.
Operating Instructions
1. Power On/Off
Locate the power switch on the device. Slide it to the 'ON' position to activate the amplifier and to 'OFF' to deactivate it.
2. Volume Adjustment
The Beurer HA 55 features a steplessly adjustable volume control. Use the rotary control to increase or decrease the amplification level to your preference. Adjust the volume gradually to avoid sudden loud sounds.
3. Hearing Programmes
The device offers two distinct hearing programmes, optimized for different acoustic environments:
- Programme 1 (Normal Environment): Suitable for everyday situations with moderate background noise.
- Programme 2 (Noisy Environment): Designed to improve speech clarity and reduce background noise in louder settings.
Press the program selection button (often marked 'P') to switch between the two programmes.

Image: A single Beurer HA 55 hearing amplifier, highlighting the program selection button, with circular insets depicting a quiet forest environment and a noisy restaurant setting, illustrating the two hearing programs.
4. Sound Amplification
The primary function of the Beurer HA 55 is to amplify ambient sounds and voices, making them clearer and more audible. This allows for improved communication and awareness of your surroundings.

Image: A man and woman engaged in conversation, with a circular overlay stating "Amplifies all sounds and noises," illustrating the benefit of the hearing amplifiers.
Maintenance
1. Cleaning
Regularly clean your hearing amplifiers to ensure optimal performance and hygiene. Use the provided cleaning brush to remove any earwax or debris from the ear tips and the device's sound outlet. Wipe the body of the amplifier with a soft, dry cloth. Do not use abrasive cleaners or immerse the device in water.
2. Drying
Moisture can damage electronic components. After use, especially in humid environments, place the hearing amplifiers in the storage box with the included drying capsule. The drying capsule helps absorb moisture and prolong the lifespan of your devices. Replace the drying capsule periodically as indicated by its color change.
3. Storage
When not in use, store the hearing amplifiers in their protective storage box. This protects them from dust, dirt, and physical damage.
Troubleshooting
| Problem | Possible Cause | Solution |
|---|---|---|
| No sound or weak sound | Low battery; Ear tip clogged with earwax; Volume too low; Device not switched on. | Charge the devices; Clean the ear tip and sound outlet; Increase volume; Switch device on. |
| Whistling or feedback noise | Improperly fitted ear tip; Volume too high; Device not inserted correctly. | Ensure ear tip is securely fitted and correct size; Reduce volume; Reinsert the device properly into the ear canal. |
| Distorted sound | Ear tip clogged; Battery low. | Clean the ear tip and sound outlet thoroughly; Charge the devices. |
| Device does not charge | Charging cable or station faulty; Device not correctly placed in station. | Check connections; Ensure devices are properly seated in the charging slots; Try a different USB port or adapter. |
Specifications
- Model Number: 64132
- Brand: Beurer
- Dimensions: 2.6 x 4 x 4.2 cm (per device)
- Weight: 120 grams (total package)
- Color: Beige
- Material: Plastic or Silicone
- Style: Behind-the-ear (BTE)
- Country of Origin: China
Warranty and Support
For detailed warranty information, please refer to the warranty card included with your product or visit the official Beurer website. In case of technical issues or questions not covered in this manual, please contact Beurer customer support. Keep your purchase receipt as proof of purchase for warranty claims.
You can find contact information for Beurer support on their official website: www.beurer.com
Documents and downloads
Ask a question about this manual
Ask about setup, troubleshooting, compatibility, parts, safety, or missing instructions. Manuals+ will review the question and use this page’s manual context to help answer it.