1. Introduction
This manual provides detailed instructions for the setup, operation, and maintenance of your ASUS Business VA24DQFS Full HD Monitor. Please read this manual thoroughly before using the monitor to ensure proper and safe operation.

Image: Front view of the ASUS Business VA24DQFS Monitor, showcasing its frameless design and the ASUS Business Monitor logo.
2. Safety Information
Always observe the following safety precautions to prevent damage to the monitor and ensure your personal safety:
- Do not expose the monitor to rain or moisture.
- Do not open the monitor casing. There are no user-serviceable parts inside.
- Place the monitor on a stable, flat surface to prevent it from falling.
- Ensure proper ventilation around the monitor. Do not block ventilation openings.
- Use only the power adapter supplied with the monitor.
- Unplug the monitor from the power outlet before cleaning.
3. Package Contents
Verify that all items are present in your package. If any item is missing or damaged, contact your retailer.
- ASUS Business VA24DQFS Monitor
- Monitor Stand (Base and Neck)
- Power Cord
- HDMI Cable (optional, may vary by region)
- DisplayPort Cable (optional, may vary by region)
- VGA Cable (optional, may vary by region)
- USB Cable (optional, may vary by region)
- Audio Cable (optional, may vary by region)
- L-shaped Screwdriver (optional)
- Rubber Sticker (optional)
- Warranty Card
- Quick Start Guide
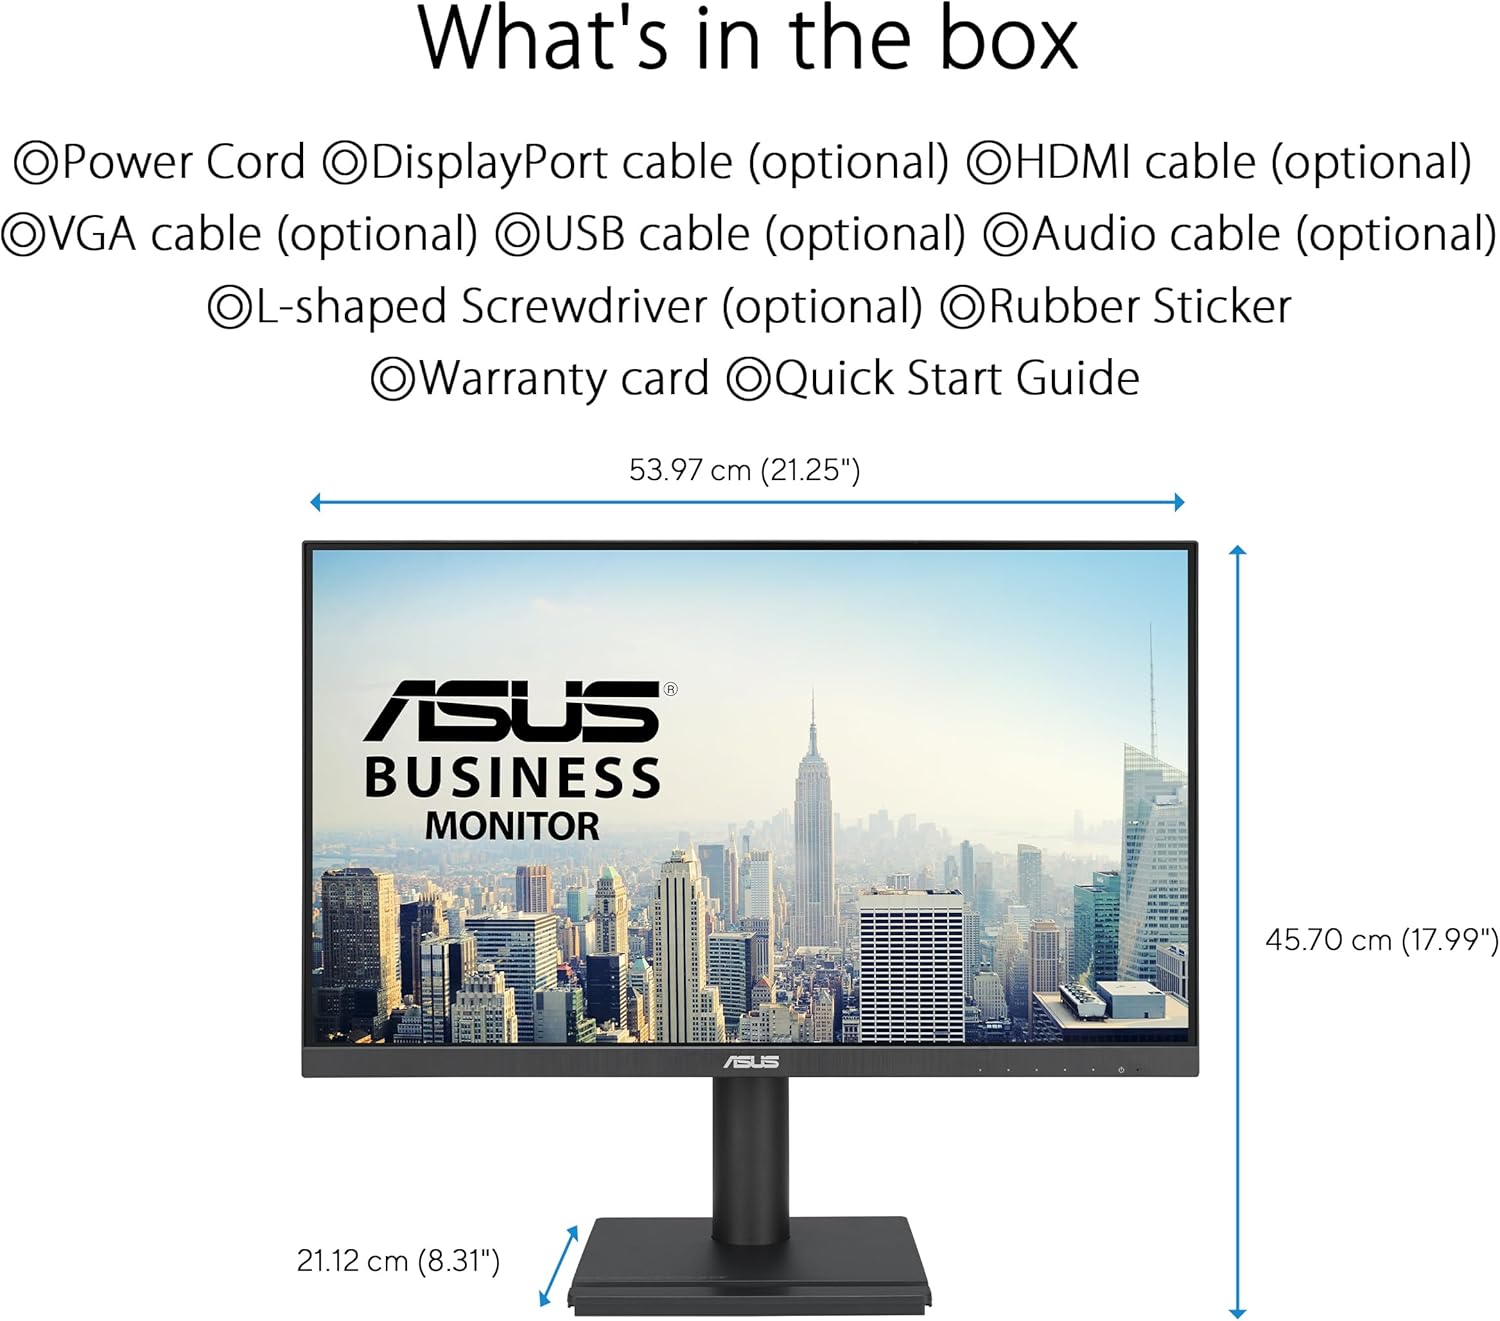
Image: Diagram illustrating the monitor's dimensions and a list of typical package contents, including various cables and accessories.
4. Setup
4.1 Assembling the Monitor Stand
- Place the monitor face down on a soft, clean cloth to prevent scratches.
- Attach the stand neck to the monitor's rear.
- Secure the stand base to the stand neck.
- Tighten any screws as necessary.
4.2 Connecting Cables
Connect the necessary cables to the corresponding ports on the monitor and your computer.
- Power Cable: Connect the power cord to the monitor's power input and then to a power outlet.
- Video Input: Connect one of the following video cables from your computer to the monitor:
- HDMI: For high-definition digital video and audio.
- DisplayPort: For high-definition digital video and audio.
- VGA (D-Sub): For analog video.
- USB Upstream Cable: If using the integrated USB hub, connect a USB upstream cable from your computer to the monitor's USB upstream port.
- Audio Cables: Connect audio input/output cables if using external speakers or headphones with the monitor's audio jacks.

Image: Rear view of the ASUS Business VA24DQFS Monitor, highlighting the various connectivity ports including HDMI, DisplayPort, VGA, USB Hub, Earphone out, and Audio in.
4.3 Initial Power-On
- Ensure all cables are securely connected.
- Press the power button on the monitor.
- Turn on your computer. The monitor should automatically detect the input signal.
- If no signal is detected, use the monitor's On-Screen Display (OSD) menu to manually select the input source.
5. Operating the Monitor
5.1 On-Screen Display (OSD) Menu Navigation
The OSD menu allows you to adjust various monitor settings. Use the buttons located on the bottom right of the monitor to navigate.
- Power Button: Turns the monitor on/off.
- Menu Button: Opens the OSD menu.
- Navigation Buttons: Used to move through menu options and adjust values.
- Select Button: Confirms a selection.
5.2 Display Settings
Adjust image quality and display characteristics through the OSD menu.
- Brightness/Contrast: Adjust the overall luminance and difference between light and dark areas.
- Color Temperature: Select predefined color modes (e.g., Warm, Cool, User Mode).
- Input Select: Manually switch between HDMI, DisplayPort, and VGA inputs.
- Aspect Ratio: Choose between Full, 4:3, or other aspect ratio modes.
- Refresh Rate: The monitor supports up to 100Hz refresh rate. Ensure your graphics card is configured to output at this rate for the smoothest experience.

Image: The ASUS monitor showcasing its 178° wide viewing angles, demonstrating minimal color shift when viewed from different perspectives.
5.3 Special Features
- Adaptive Sync: This technology synchronizes the monitor's refresh rate with your graphics card's frame rate to eliminate screen tearing and stuttering, providing a smoother visual experience. Activate this feature through the OSD menu.
- Low Blue Light Filter: Reduces harmful blue light emissions to protect your eyes during prolonged use. Multiple levels of filtering are available in the OSD.
- Flicker-Free Technology: Eliminates screen flickering, reducing eye strain and fatigue.
- USB Hub: The integrated USB hub allows you to connect USB devices directly to the monitor, providing convenient access to peripherals.
- Hands-free Convenience: The monitor base is designed to hold small items like phones or business cards, helping to keep your workspace tidy.

Image: A visual comparison demonstrating the effect of Ultra-low Blue Light Filter and Flicker-free Technology on the ASUS monitor versus a conventional monitor.

Image: The ASUS monitor on a desk, illustrating how its base can be used for hands-free convenience to hold small items like a phone or business cards, contributing to a tidier workspace.
5.4 Ergonomic Adjustments
The VA24DQFS monitor offers versatile ergonomic adjustments for a comfortable viewing experience:
- Tilt: Adjust the screen angle from +35° to -5°.
- Swivel: Rotate the monitor horizontally up to ±180°.
- Pivot: Rotate the screen vertically (portrait mode) up to ±90°.
- Height Adjustment: Adjust the screen height up to 130 mm.

Image: Diagrams illustrating the ergonomic adjustments available on the ASUS monitor stand, including swivel, tilt, pivot, and height adjustment capabilities.
6. Maintenance
Proper care ensures the longevity of your monitor:
- Cleaning the Screen: Gently wipe the screen with a soft, lint-free cloth. For stubborn marks, dampen the cloth with a small amount of non-ammonia, non-alcohol based glass cleaner. Do not spray cleaner directly onto the screen.
- Cleaning the Casing: Use a soft, dry cloth to wipe the monitor casing. Avoid abrasive cleaners.
- Ventilation: Ensure the ventilation openings are clear of dust and debris to prevent overheating.
- Power Off: Turn off the monitor when not in use for extended periods.
7. Troubleshooting
If you encounter issues with your monitor, refer to the following common problems and solutions:
| Problem | Possible Solution |
|---|---|
| No image on screen |
|
| Image is blurry or distorted |
|
| No sound from speakers/headphones |
|
| USB ports not working |
|
8. Specifications
| Feature | Detail |
|---|---|
| Model Name | VA24DQFS |
| Panel Size | 23.8 inches (24 inches standing screen display size) |
| Panel Type | IPS |
| Resolution | 1920 x 1080 (Full HD 1080p) |
| Aspect Ratio | 16:9 |
| Refresh Rate | 100 Hz |
| Response Time | 1ms MPRT |
| Viewing Angle | 178° (H)/178° (V) |
| Brightness | Not specified (typical) |
| Contrast Ratio | Not specified (typical) |
| Display Surface | Matte |
| Connectivity | 1x HDMI, 1x DisplayPort, 1x D-Sub (VGA), 2x USB (Total USB Ports), Earphone out, Audio in |
| Speakers | Integrated (details not specified) |
| Ergonomics | Tilt (+35° ~ -5°), Swivel (±180°), Pivot (±90°), Height Adjustment (0 ~ 130 mm) |
| VESA Wall Mount | 100 x 100 mm |
| Special Features | Adaptive Sync, Low Blue Light, Flicker-Free, EPEAT Gold certified |
| Product Dimensions (WxHxD) | 21.25 x 17.99 x 8.31 inches (with stand) |
| Item Weight | 11.22 pounds |
| Power Consumption | 12 kWh/1000h (Energy Class C) |

Image: EU Energy Label for the ASUS VA24DQFS monitor, indicating its energy efficiency class C and consumption of 12 kWh/1000h.
For detailed EPREL information, visit: https://eprel.ec.europa.eu/qr/2009230
9. Warranty and Support
ASUS provides a limited warranty for this product. Please refer to the warranty card included in your package for specific terms and conditions.
- Warranty Period: As per the included warranty card and local regulations.
- Technical Support: For technical assistance, troubleshooting beyond this manual, or warranty claims, please contact ASUS customer support.
- ASUS Support Website: https://www.asus.com/support/
- ASUS Official Website: https://www.asus.com/


