1. Introduction
The ELECBEE GM1356 Digital USB Sound Level Meter is designed for accurate measurement of sound pressure levels in decibels (dB). It is suitable for sound quality control in various environments, including factories, offices, homes, schools, restaurants, hospitals, and construction sites. This manual provides comprehensive instructions for the proper use and maintenance of your device.
2. Safety Information
Please read and understand all safety instructions before operating the device. Failure to do so may result in injury or damage to the meter.
- Do not attempt to open or modify the meter.
- Avoid exposing the meter to extreme temperatures, humidity, or direct sunlight.
- Remove batteries if the meter will not be used for an extended period.
- Use only the specified battery type (4x 1.5V AA batteries).
- Keep the microphone clean and free from obstructions.
3. Product Overview
3.1 Key Features
- Wide measurement range: 30~130dBA, 35~130dBC.
- Accuracy: ±1.5dB.
- Frequency weighting characteristics: A & C.
- Time-weighted properties: Fast and Slow.
- USB interface for data transfer and analysis software.
- Automatic shut-down function.
- Automatic backlight display.
- Low battery indicator.
- AC/DC output.
- Maximum reading hold.
- Equipped with sponge balls to filter out unwanted signals.
- Certified to CE/ROHS/FCC standards.
3.2 Components
Familiarize yourself with the main components of the sound level meter:
- Microphone: 1/2 inch electret condenser microphone for sound detection.
- Display: Digital display for readings and indicators.
- Control Buttons: For power, mode selection, data hold, etc.
- USB Port: For connecting to a computer.
- AC/DC Output Jacks: For external connections.
- Battery Compartment: Located at the rear of the device.
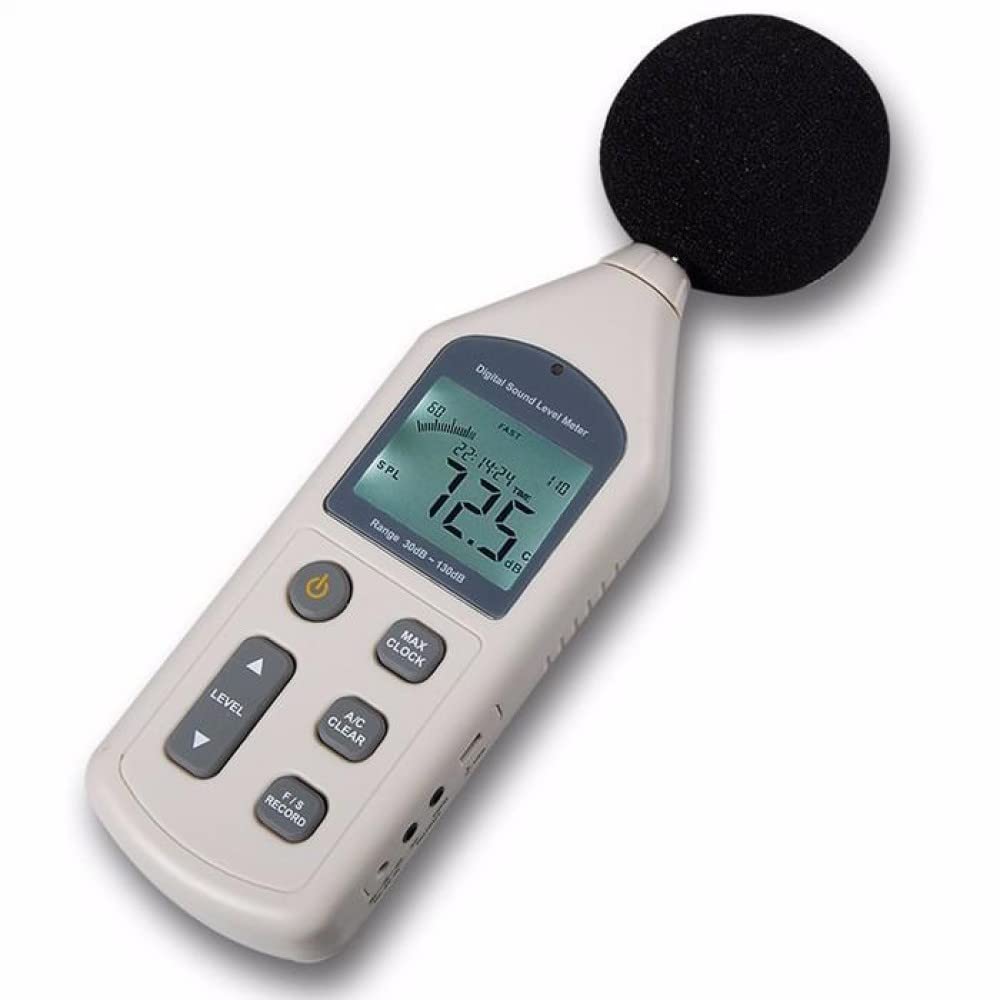
Image 1: Microphone of the GM1356 Sound Level Meter. This image shows a close-up of the microphone, which is essential for sound detection.

Image 2: Front view of the GM1356 Sound Level Meter. This image displays the device's main body, including the digital screen and various control buttons.
4. Setup
4.1 Battery Installation
- Locate the battery compartment cover on the rear of the meter.
- Slide or unclip the cover to open it.
- Insert four (4) 1.5V AA batteries, ensuring correct polarity (+/-).
- Replace the battery compartment cover securely.
4.2 Attaching the Sponge Ball
The included sponge ball helps to filter out unwanted wind noise and other extraneous signals, improving measurement accuracy. Gently push the sponge ball onto the microphone head until it is securely in place.
4.3 Connecting to a Computer (USB)
The GM1356 features a USB interface for connecting to a computer for data logging and analysis using the provided software.
- Locate the USB port on the side of the meter.
- Connect one end of the USB cable to the meter's USB port.
- Connect the other end of the USB cable to an available USB port on your computer.
- Install the analyzing software from the included media or manufacturer's website. Follow the software installation instructions.

Image 3: Side ports of the GM1356 Sound Level Meter. This image highlights the various input/output ports, including the USB connection for computer interface.

Image 4: GM1356 connected to a laptop with software. This image demonstrates the meter's USB connectivity and its use with the accompanying analysis software.
5. Operating Instructions
5.1 Powering On/Off
Press the Power button (usually marked with ⏻) to turn the meter on. Press and hold the Power button to turn it off. The meter features an automatic shut-down function to conserve battery life.
5.2 Selecting Measurement Range
The GM1356 offers different measurement levels. Use the LEVEL button to cycle through the available ranges (e.g., 30~130dB, 40~90dB, 50~100dB, 60~110dB, 80~130dB) to best suit the sound environment you are measuring. Ensure the selected range covers the expected sound level to avoid 'OVER' or 'UNDER' indications.
5.3 Frequency Weighting (A/C)
Press the A/C button to switch between A-weighting and C-weighting:
- A-Weighting (dBA): Mimics the human ear's response to sound, commonly used for environmental noise measurements and occupational health.
- C-Weighting (dBC): Provides a flatter response, measuring the actual sound pressure level across a wider frequency range, often used for machinery noise analysis.
5.4 Time Weighting (Fast/Slow)
Press the F/S button to select between Fast and Slow time weighting:
- Fast: Responds quickly to changes in sound level, suitable for measuring impulsive or rapidly changing noise.
- Slow: Provides an averaged reading, suitable for measuring steady noise levels.
5.5 Data Hold (MAX/MIN)
Press the MAX/CLOCK button briefly to toggle between current, maximum (MAX), and minimum (MIN) sound level readings. The display will show the highest or lowest recorded value since the function was activated.
5.6 Data Recording (RECORD)
The meter supports data recording. Refer to the detailed software manual for instructions on how to initiate, manage, and retrieve recorded data via the USB connection.
5.7 AC/DC Output
The AC and DC output jacks allow the meter to be connected to external devices such as recorders, data loggers, or frequency analyzers. The AC output provides a signal proportional to the instantaneous sound pressure level, while the DC output provides a signal proportional to the averaged sound pressure level (10mV/dB).
6. Maintenance
6.1 Cleaning
Wipe the meter's casing with a soft, dry cloth. Do not use abrasive cleaners or solvents. Keep the microphone clean and free from dust or debris.
6.2 Battery Replacement
When the low battery indicator appears on the display, replace all four (4) 1.5V AA batteries promptly to ensure accurate measurements and proper operation.
6.3 Storage
Store the meter in a cool, dry place, away from direct sunlight and extreme temperatures. If storing for an extended period, remove the batteries to prevent leakage.
- Storage Condition: -10℃ to 60℃ (14℉ to 140℉), 10% to 70% RH.
7. Troubleshooting
- Meter does not power on:
- Check if batteries are installed correctly with proper polarity.
- Replace old or depleted batteries with new 1.5V AA batteries.
- Display shows "OVER" or "UNDER":
- The sound level is outside the current measurement range. Adjust the measurement range using the LEVEL button.
- Inaccurate readings:
- Ensure the microphone is clean and the sponge ball is properly attached.
- Check for strong electromagnetic interference nearby.
- Verify correct frequency (A/C) and time (Fast/Slow) weighting settings for your application.
- USB connection issues:
- Ensure the USB cable is securely connected to both the meter and the computer.
- Verify that the analyzing software is correctly installed and running.
- Try a different USB port on your computer.
8. Specifications
| Parameter | Value |
|---|---|
| Measurement Range | 30dBA~130dBA, 35~130dBC |
| Accuracy | ±1.5dB |
| Frequency Range | 31.5Hz~8.5KHz |
| Frequency Weighting | A/C |
| Digital Display | 4 digits |
| Resolution | 0.1dB |
| Measurement Levels | 30~130, 40~90, 50~100, 60~110, 80~130 (dB) |
| Linear Range | 50dB/100dB |
| Sampling Rate | 2 times/second |
| AC Output | 0.707Vrms 600 ohms (FS output impedance) |
| DC Output | 10mV/dB, approx. 100 ohms (output impedance) |
| Microphone | 1/2 inch electret condenser microphone |
| Power Supply | 4 AA 1.5V batteries (not included) |
| Working Condition | 0℃ to 40℃ (32℉ to 104℉), 10% to 80% RH |
| Storage Condition | -10℃ to 60℃ (14℉ to 140℉), 10% to 70% RH |
| Weight | 308g (including battery) |
| Dimensions | 70 x 35 x 256 mm |
9. Warranty and Support
For warranty information and technical support, please refer to the documentation included with your purchase or contact ELECBEE customer service directly. You can often find support contact details on the manufacturer's official website.
Manufacturer: ELECBEE
Date First Available: February 23, 2022
