
1. Introduction
This manual provides essential information for the safe and efficient installation, operation, and maintenance of your Acquaer CJE075-1 Shallow/Deep Well Jet Pump. Please read these instructions thoroughly before installation and retain them for future reference. This pump is designed for single pipe wells (0-25 ft) or two pipe wells (26-90 ft) and includes a venturi and ejector kit.
2. Safety Information
Always disconnect power before servicing the pump. Ensure all electrical connections comply with local codes. Do not operate the pump without water, as this can cause damage. Wear appropriate personal protective equipment during installation and maintenance.
The pump features a built-in automatic thermal overload protector to prevent the motor from overheating. If the pump runs dry, it will automatically shut off to protect the motor.

Figure 2.1: Built-in Automatic Thermal Overload Protector. This feature safeguards the motor from overheating and dry-running conditions.
3. Product Overview
3.1 Key Features
- Convertible Design: Suitable for shallow wells (0-25 ft) with a single pipe or deep wells (26-90 ft) with two pipes, including venturis and ejector kit.
- Dual Voltage Motor: Operates on 115V or 230V. Factory set to 230V.
- Automatic Pressure Switch: Activates when pressure drops below 20 PSI and deactivates when pressure exceeds 40 PSI.
- Overheat Protection: Integrated thermal overload protection prevents motor damage.
- Durable Construction: Features a robust cast iron volute for longevity and performance.
3.2 Components and Dimensions
The pump body includes a 1" NPT discharge, 1-1/4" NPT suction, and a 1" NPT suction port. The ejector kit is 1-1/4".

Figure 3.1: Product Details and Ports. This image highlights the various connection points and electrical components of the pump.

Figure 3.2: Pump and Ejector Dimensions. The pump measures 14"L x 8.8"W x 8"H. The ejector measures 6"L x 3.7"W x 3.9"H.
3.3 Specifications
| Specification | Value |
|---|---|
| Model Number | CJE075-1 |
| Horsepower | 3/4 HP |
| Voltage | 115V / 230V (Factory set to 230V) |
| Amperage | 12.6 A (115V) / 6.3 A (230V) |
| Maximum Flow Rate | 24 GPM |
| Maximum Lifting Height (Head) | 157 feet |
| Pressure Switch Settings | 20 PSI (On) / 40 PSI (Off) |
| Material | Cast Iron |
| Product Dimensions (L x W x H) | 14" x 8.8" x 8" |
| Item Weight | 35 pounds |

Figure 3.3: Technical Specifications and Performance Curve. This chart illustrates the pump's flow rate (GPH) at different head heights.
4. Setup
4.1 Choosing the Right Well Type
This convertible jet pump can be configured for either shallow or deep well applications:
- Shallow Well (0-25 ft): Uses a single pipe setup.
- Deep Well (26-90 ft): Requires a two-pipe setup with the ejector kit installed in the well.

Figure 4.1: Well Type Selection Guide. This diagram helps determine the appropriate setup for your well depth.
4.2 Voltage Selection
The pump is factory-set for 230V operation. If your power supply is 115V, you must adjust the voltage switch before initial use. Failure to select the correct voltage can damage the pump.
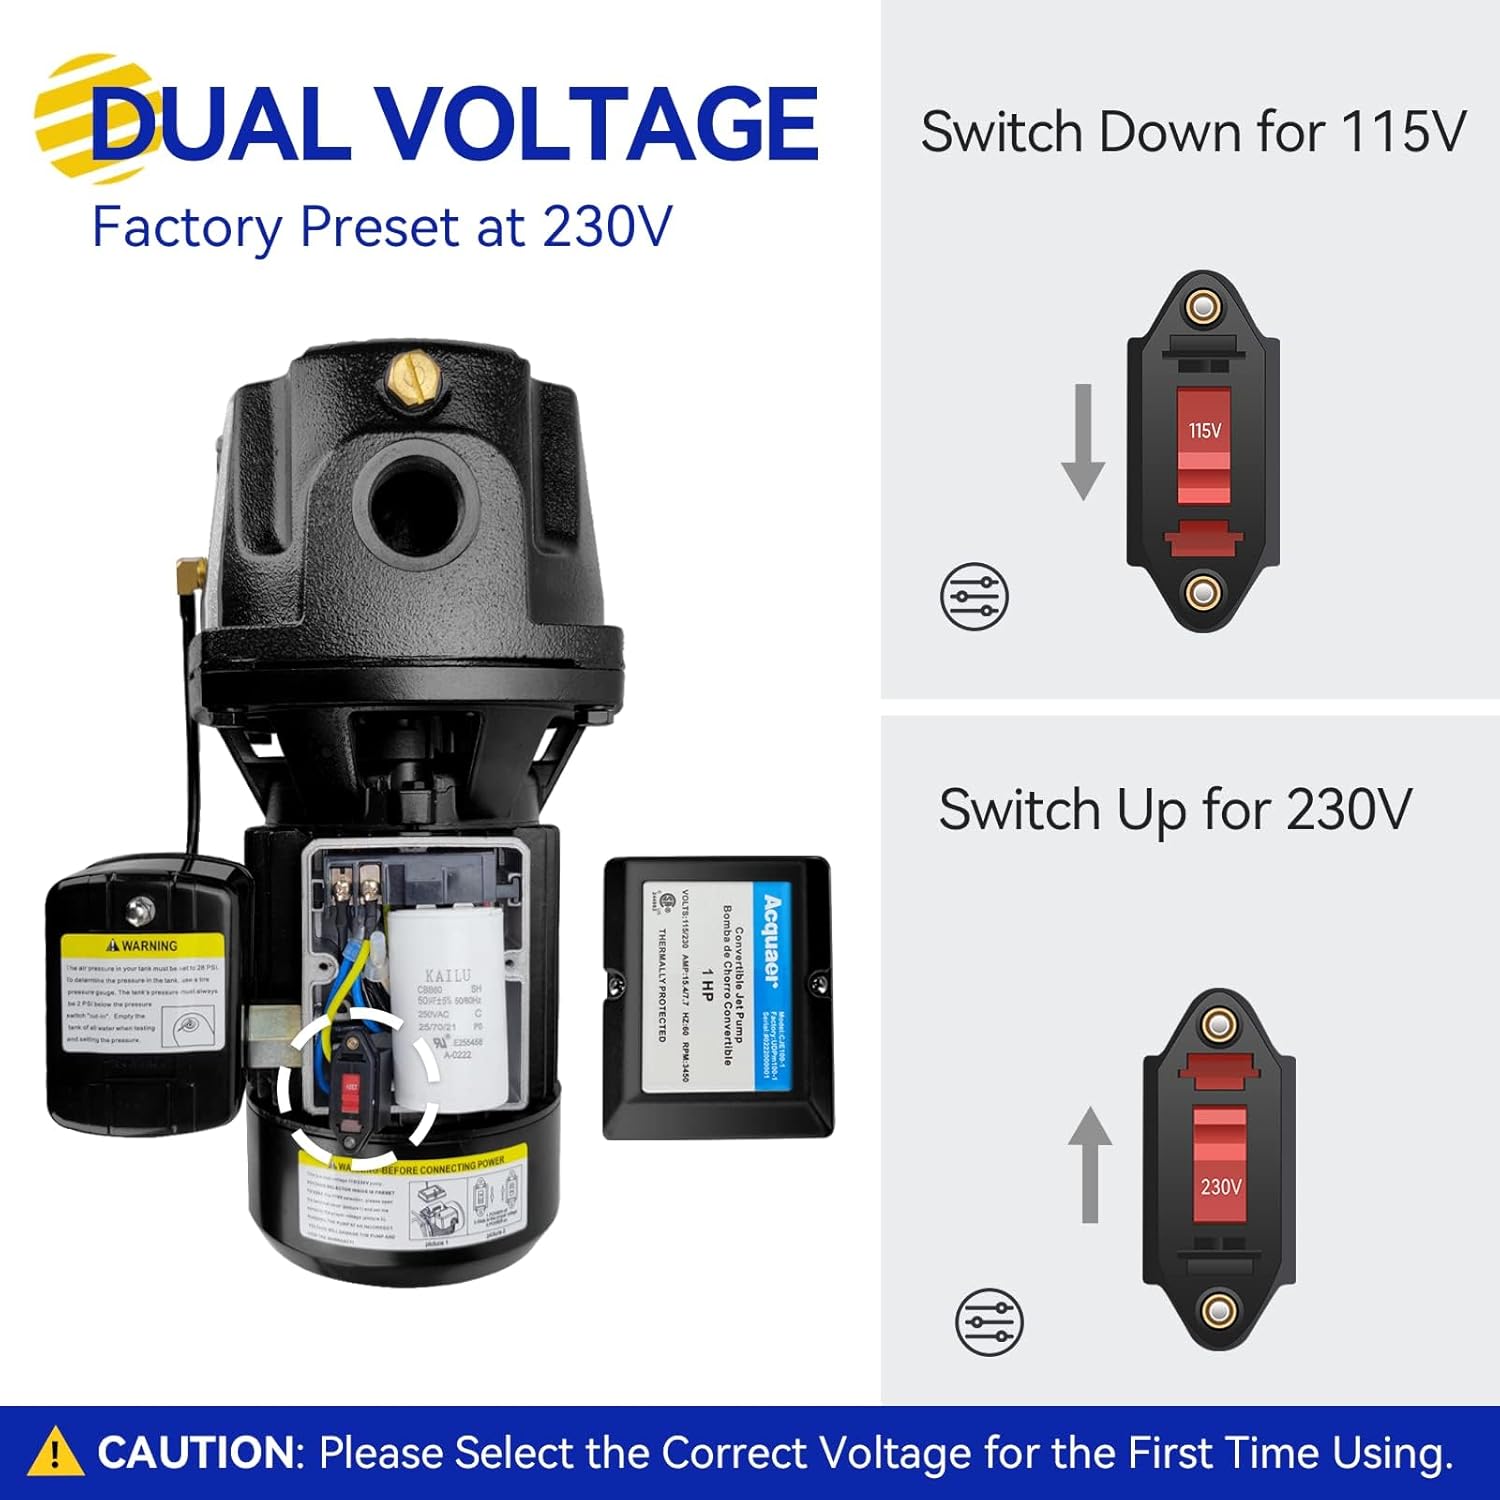
Figure 4.2: Dual Voltage Switch. Ensure the switch is set to the correct voltage (115V or 230V) for your electrical supply.

Figure 4.3: Internal Voltage Switch. The red switch inside the electrical box must be correctly positioned for 115V or 230V.
4.3 Priming the Pump
Before starting the pump for the first time or after it has been drained, it must be properly primed with water.
- Unscrew the priming port cap located on top of the pump.
- Slowly pour water into the cavity until it is completely filled.
- Reinstall the priming port cap securely. The pump is now ready for startup.

Figure 4.4: Priming Instructions. Follow these steps to ensure the pump is filled with water before operation.
5. Operating Instructions
Once installed and primed, the Acquaer jet pump operates automatically via its integrated pressure switch. The pump will activate when the system pressure drops below 20 PSI and will shut off when the pressure reaches 40 PSI. This ensures a consistent water supply for your household or irrigation needs.
The 3/4 HP electric motor provides a high flow rate and strong suction power, making it suitable for various applications including fresh water supply to gardens, lawns, and farms.

Figure 5.1: Pump Performance Overview. The pump delivers up to 1437 GPH at 40 PSI and is effective for wells up to 90 feet deep.
6. Maintenance
Regular maintenance ensures the longevity and optimal performance of your pump.
- Winterization: In freezing climates, drain the pump completely to prevent damage from ice expansion.
- Inspection: Periodically check for leaks, unusual noises, or vibrations. Address any issues promptly.
- Cleanliness: Keep the pump area clean and free from debris to ensure proper ventilation.
- Pressure Tank: If using a pressure tank, ensure its air charge is correctly maintained according to the manufacturer's instructions, typically 2 PSI below the pump's cut-in pressure.
7. Troubleshooting
If you encounter issues with your pump, refer to the following common problems and solutions:
| Problem | Possible Cause | Solution |
|---|---|---|
| Pump runs but no water | Not primed; air leak in suction line; low water level in well. | Prime the pump; check all suction connections for tightness; verify well water level. |
| Pump cycles too frequently | Water leak in system; pressure tank air charge too low or waterlogged. | Inspect plumbing for leaks; check and adjust pressure tank air charge. |
| Pump does not start | No power; incorrect voltage setting; motor overload tripped. | Check power supply and circuit breaker; verify voltage switch setting; allow motor to cool and reset thermal protector. |
| Low water pressure/flow | Clogged impeller or piping; worn pump components; insufficient well recovery. | Inspect and clean pump and piping; consult a professional for internal component inspection; allow well to recover. |
8. Warranty and Support
Acquaer provides professional advice on installation and maintenance. For warranty information or technical support, please refer to the documentation included with your purchase or contact Acquaer customer service.
Figure 8.1: Warranty Information. The pump typically comes with a 24-month warranty.


