Introduction
Welcome to the user manual for your YARD FORCE XPower 800 Robotic Lawn Mower. This guide provides essential information for the safe and efficient operation, setup, and maintenance of your robotic lawn mower. Please read this manual thoroughly before first use and keep it for future reference.
Product Overview
Key Features
- Lithium-ion battery: Powerful 20V, 2.5 Ah battery, compatible with all 20V Yard Force tools.
- Cutting Width: 160 mm.
- Cutting Height: Adjustable from 20 mm to 50 mm (3 levels).
- Edge Cutting Function: Ensures a clean and tidy garden perimeter.
- Brushless Motor: Provides quiet and powerful cutting performance.
- Mulching System: Grass clippings are finely cut and returned to the lawn as natural fertilizer.
- Spiral Cutting: Easily activated on the machine or via the app for dense areas.
- Bluetooth Control: Direct connection between the app and the mower for enhanced convenience.
- App Control: Operate the mower from up to 50 meters away.
- Rain Sensor: Automatically detects rain and returns to the charging station.
Components
The YARD FORCE XPower 800 Robotic Lawn Mower consists of the main mower unit, a charging station, boundary wire, fixing nails, power cable, and replacement blades.

Figure 1: Overview of the YARD FORCE XPower 800 Robotic Lawn Mower.

Figure 2: The battery compartment, showing the 20V Li-Ion battery.
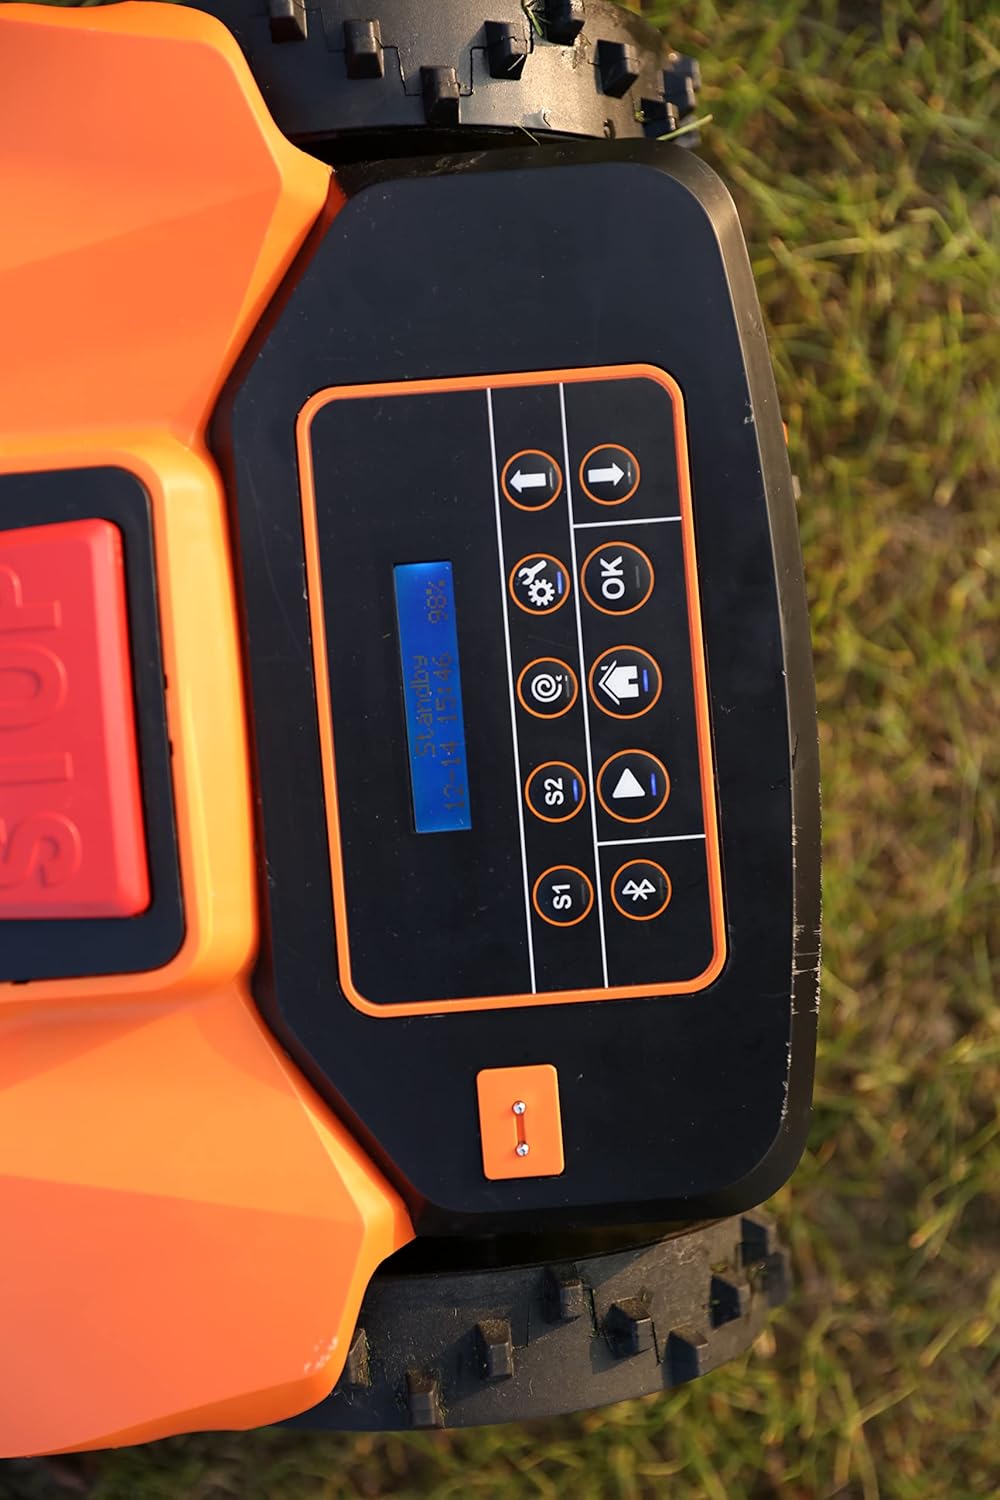
Figure 3: Close-up of the control panel with display and navigation buttons.

Figure 4: The dial for adjusting the cutting height.
Setup
1. Charging Station Placement
Place the charging station on a flat, level surface in an area with good access to a power outlet. Ensure it is not in direct sunlight or prone to water accumulation.
2. Boundary Wire Installation
Lay the provided boundary wire around the perimeter of your mowing area. Use the fixing nails to secure the wire to the ground. Ensure the wire is taut and follows the recommended distances from obstacles. Connect the ends of the boundary wire to the charging station as per the detailed instructions in the full manual.
3. Initial Charging
Place the robotic lawn mower onto the charging station. Ensure the charging contacts align. Allow the mower to fully charge before its first operation. The battery indicator on the mower or app will show the charging status.
4. App Connection
Download the Yard Force app from your device's app store. Follow the in-app instructions to connect your XPower 800 via Bluetooth. This will allow for convenient control and scheduling.
Operating Instructions
Starting the Mower
Press the 'Start' button on the control panel or initiate mowing via the Yard Force app. The mower will begin its programmed mowing cycle.
Adjusting Cutting Height
Rotate the cutting height adjustment dial located on the top of the mower to select your desired grass length (20mm to 50mm).
Using the App
The app allows you to:
- Start and stop mowing cycles.
- Set mowing schedules.
- Activate spiral cutting for dense areas.
- Monitor the mower's status and battery level.
- Control the mower manually (within Bluetooth range).
Rain Sensor
The integrated rain sensor will detect precipitation and automatically instruct the mower to return to its charging station, protecting it from adverse weather conditions. Mowing will resume once the rain stops and the grass is dry.
Maintenance
Cleaning the Mower
Regular cleaning ensures optimal performance. Turn off the mower and disconnect it from the charging station before cleaning.
- Clean the underside of the mower, especially the cutting deck and blades, to remove grass clippings and debris. A hose can be used for this purpose, as shown in Figure 5.
- Wipe down the top surface and wheels with a damp cloth.
- Ensure the charging contacts on both the mower and the station are clean.

Figure 5: Cleaning the underside of the mower with water.
Blade Replacement
For best cutting results, regularly inspect and replace the blades. The package includes 6 replacement blades and 3 replacement screws. Always use genuine Yard Force replacement parts. Refer to the full manual for detailed instructions on safe blade replacement.
Winter Storage
During winter months, clean the mower thoroughly, fully charge the battery, and store the unit in a dry, frost-free environment. Disconnect the boundary wire from the charging station.
Troubleshooting
If you encounter issues with your YARD FORCE XPower 800, please refer to the following common troubleshooting tips. For detailed error codes and solutions, consult the comprehensive user manual or the Yard Force app.
- Mower not starting: Check battery charge, ensure the safety switch is engaged, and verify the boundary wire is properly connected.
- Mower not returning to charging station: Check the charging station's power supply and ensure the boundary wire is intact and correctly laid.
- Uneven cutting: Inspect blades for damage or dullness and replace if necessary. Ensure the cutting height is set appropriately.
- Mower getting stuck: Check for obstacles in the mowing area. Ensure the boundary wire is laid correctly around flowerbeds or other features.
- App connectivity issues: Ensure Bluetooth is enabled on your device and the mower is within range. Restart both the app and the mower if necessary.
Specifications
| Feature | Detail |
|---|---|
| Model Number | XPower 800 |
| Brand | Yard Force |
| Recommended Lawn Area | Up to 800 sqm |
| Battery Type | 20V Li-Ion, 2.5 Ah |
| Cutting Width | 160 mm |
| Cutting Height | 20 mm - 50 mm (3 positions) |
| Motor Type | Brushless |
| Max. Slope | 40% |
| Connectivity | Bluetooth, App Control |
| Special Features | Rain Sensor, Edge Cutting, Mulching System, Spiral Cutting |
| Product Dimensions | 54 x 38.1 x 23.3 cm |
| Item Weight | 8.5 Kilograms |
Warranty and Support
Your YARD FORCE XPower 800 Robotic Lawn Mower comes with a manufacturer's warranty. Please refer to the warranty card included in your product packaging for specific terms and conditions.
For technical support, spare parts, or any inquiries not covered in this manual, please contact Yard Force customer service. You can find contact information on the official Yard Force website or through your retailer.
Official Website: www.yardforce.eu


