1. Important Safety Instructions
Please read all instructions carefully before using your HOMCOM Stand Mixer. Retain this manual for future reference.
- Always ensure the mixer is unplugged from the power outlet before assembly, disassembly, or cleaning.
- Do not immerse the motor unit, cord, or plug in water or other liquids.
- Keep hands, hair, clothing, as well as spatulas and other utensils away from moving beaters during operation to prevent injury and/or damage to the mixer.
- Supervise children closely when the appliance is in use. This appliance is not intended for use by persons with reduced physical, sensory, or mental capabilities, or lack of experience and knowledge, unless they have been given supervision or instruction concerning use of the appliance by a person responsible for their safety.
- Do not operate any appliance with a damaged cord or plug, or after the appliance malfunctions or has been dropped or damaged in any manner. Contact customer service for assistance.
- Use only attachments recommended or sold by the manufacturer.
- Do not use outdoors.
- Place the mixer on a stable, flat, dry surface during operation.
- Never leave the mixer unattended while it is operating.
2. Product Overview
The HOMCOM 6 Qt Stand Mixer is designed for various kitchen tasks, featuring a powerful motor and multiple attachments.
Components:
- Mixer Body: Contains the motor, speed control, and tilt-head mechanism.
- Stainless Steel Mixing Bowl (6 Qt): Large capacity bowl for various recipes.
- Dough Hook: Used for kneading yeast doughs like bread, pizza, and pasta.
- Beater: Ideal for mixing cake batter, cookie dough, frostings, and mashed potatoes.
- Whisk: Perfect for whipping cream, egg whites, and light batters.
- Splash Guard: Helps prevent ingredients from splashing out of the bowl during mixing.

Image: The HOMCOM 6 Qt Stand Mixer in black, featuring the main unit, stainless steel mixing bowl, and whisk attachment.
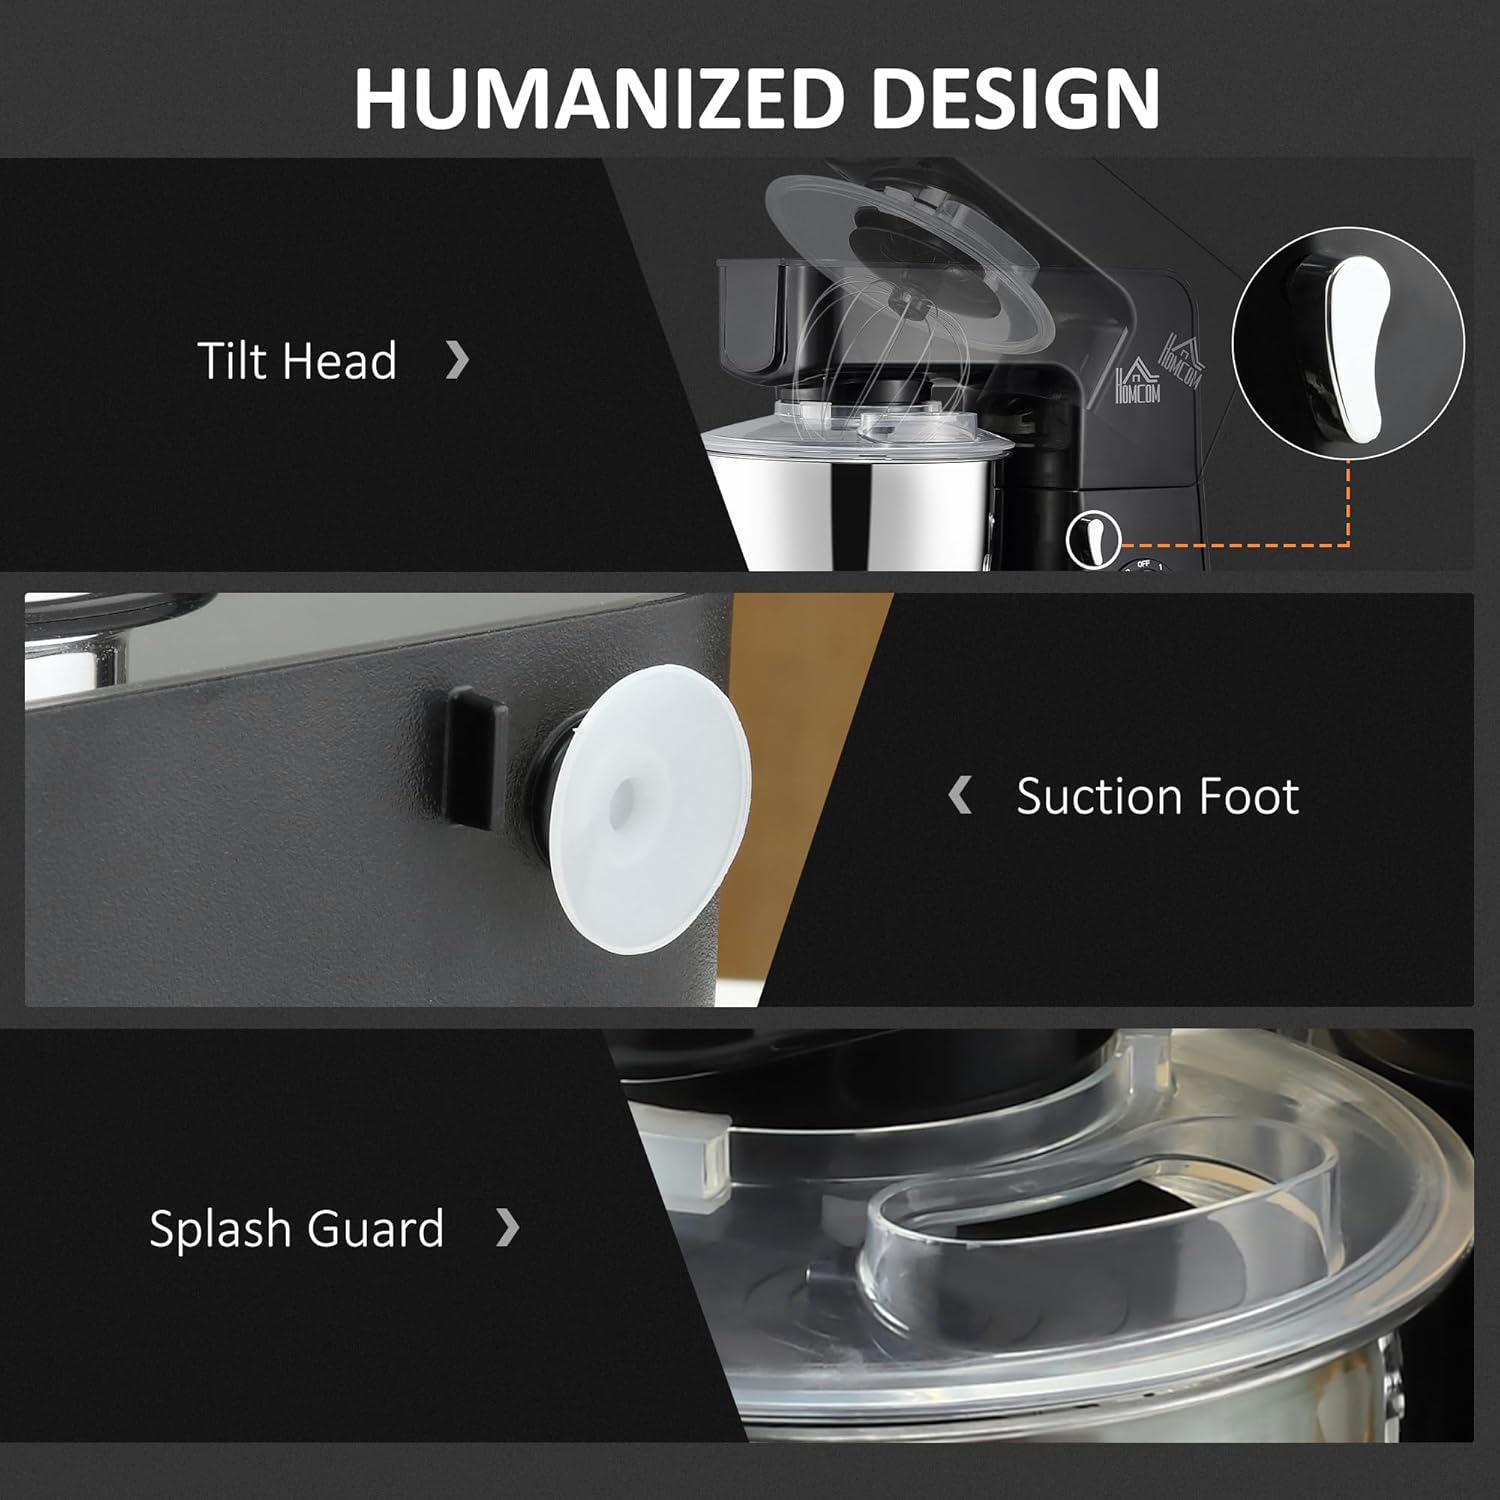
Image: Key design features including the tilt-head mechanism for easy access, suction feet for stability, and the transparent splash guard.
3. Setup and Assembly
- Unpack: Carefully remove all components from the packaging. Dispose of packaging materials responsibly.
- Clean: Before first use, wash the mixing bowl, dough hook, beater, whisk, and splash guard in warm soapy water. Rinse thoroughly and dry. Wipe the mixer body with a damp cloth.
- Placement: Place the mixer on a clean, dry, stable, and level surface. Ensure the suction feet are securely attached to the countertop for stability.
- Attach Mixing Bowl: Place the stainless steel mixing bowl onto the base and turn it clockwise until it locks securely into place.
- Install Attachment:
- Ensure the mixer is unplugged.
- Press the tilt-head release lever (located on the side of the mixer body) and lift the motor head.
- Insert the desired attachment (dough hook, beater, or whisk) into the attachment shaft. Push upwards and turn clockwise until it locks into place.
- Lower the motor head until it clicks into position.
- Attach Splash Guard: Slide the splash guard onto the motor head, ensuring the opening aligns with the attachment.
4. Operating Instructions
Speed Control:
The mixer features 6 variable speeds and a 'P' (Pulse) setting for quick bursts of power.
- Speed 1-2 (Low): Ideal for kneading dough with the dough hook.
- Speed 3-4 (Medium): Suitable for mixing cake batter, cookie dough, and mashing potatoes with the beater.
- Speed 5-6 (High): Best for whipping egg whites, cream, and light sauces with the whisk.
- 'P' (Pulse): Provides maximum speed for short intervals. Turn the knob to 'P' and release.
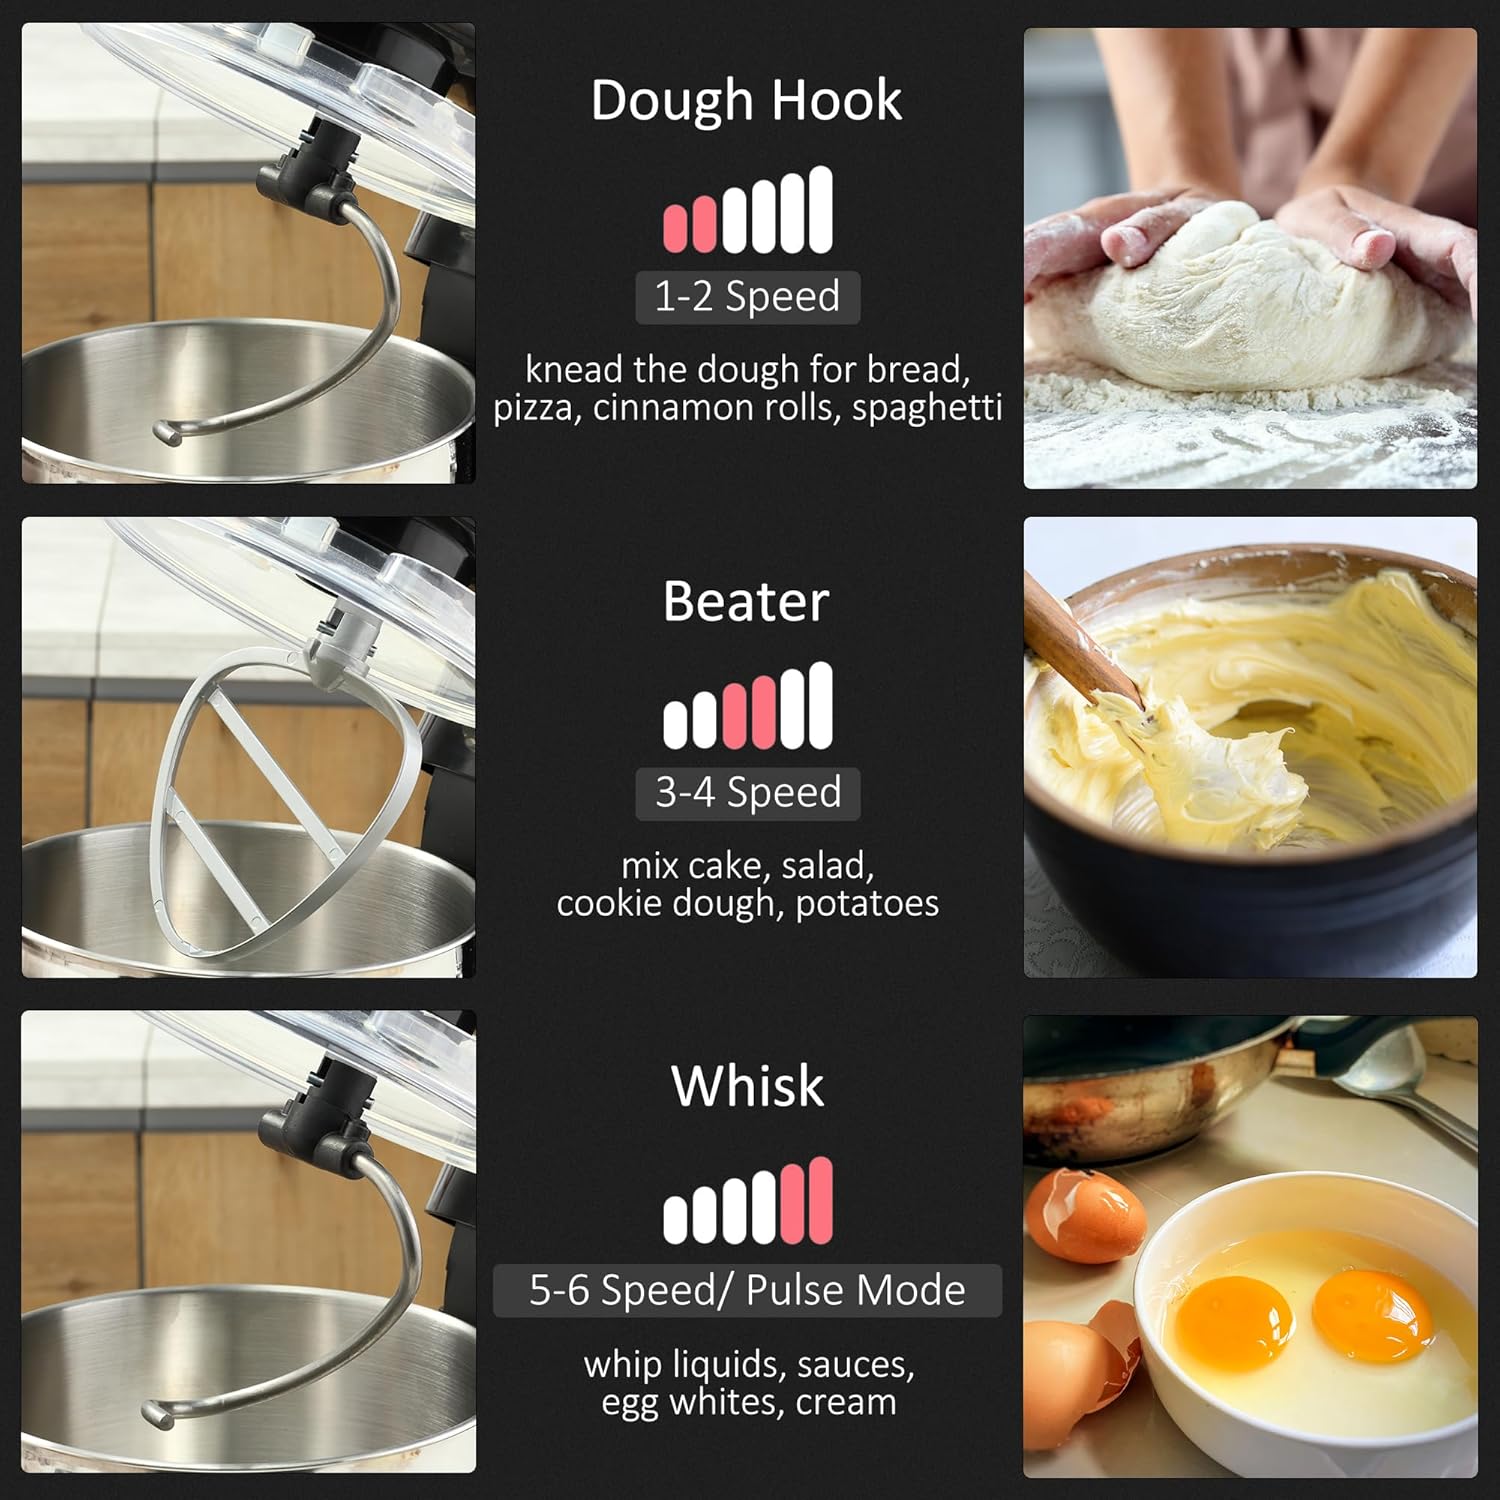
Image: Visual guide for attachment usage and recommended speed settings: Dough Hook (1-2 Speed), Beater (3-4 Speed), Whisk (5-6 Speed/Pulse Mode).
Mixing Process:
- Ensure the mixer is properly assembled and the desired attachment is installed.
- Add ingredients to the mixing bowl.
- Plug the mixer into a standard 120V AC power outlet.
- Turn the speed control knob to the desired setting. Start at a lower speed and gradually increase to prevent splashing.
- During mixing, you can add ingredients through the opening in the splash guard.
- When finished, turn the speed control knob to 'OFF' and unplug the mixer.
- Press the tilt-head release lever and lift the motor head. Remove the attachment by pushing upwards and turning counter-clockwise.
- Unlock and remove the mixing bowl by turning it counter-clockwise.
5. Maintenance and Cleaning
Regular cleaning ensures the longevity and hygiene of your stand mixer.
- Always unplug the mixer before cleaning.
- Mixing Bowl: The stainless steel mixing bowl is dishwasher safe. Alternatively, wash by hand with warm soapy water, rinse, and dry thoroughly.
- Attachments (Dough Hook, Beater, Whisk): Wash these attachments by hand with warm soapy water, rinse, and dry immediately. While the bowl is dishwasher safe, hand washing is recommended for the attachments to preserve their finish.
- Splash Guard: Wash with warm soapy water, rinse, and dry.
- Mixer Body: Wipe the exterior of the mixer body with a soft, damp cloth. Do not use abrasive cleaners or immerse the motor unit in water.
- Storage: Store the mixer and its accessories in a clean, dry place.
6. Troubleshooting
| Problem | Possible Cause | Solution |
|---|---|---|
| Mixer does not start. | Not plugged in; Power outlet malfunction; Speed knob not set. | Ensure the mixer is securely plugged into a working outlet. Turn the speed knob to a setting other than 'OFF'. |
| Attachments do not reach ingredients at the bottom of the bowl. | Incorrect attachment installation; Too little ingredients. | Ensure the attachment is fully inserted and locked. Increase the quantity of ingredients to meet minimum requirements. |
| Mixer is excessively noisy or vibrates. | Unstable surface; Overloaded; Attachment not properly secured. | Place the mixer on a stable, level surface. Reduce the load if overloaded. Ensure the attachment is securely locked. |
| Motor stops during operation. | Overheating protection activated. | Turn off and unplug the mixer. Allow it to cool down for at least 30 minutes before restarting. Reduce load for future use. |
7. Specifications
| Feature | Specification |
|---|---|
| Model Number | 800-113 |
| Power | 600W |
| Voltage | 120V (AC) |
| Capacity | 6 Quarts (5.5 Liters) |
| Dimensions (L x W x H) | 15" x 7.25" x 13.5" |
| Material | Acrylonitrile Butadiene Styrene (ABS) housing, Stainless Steel bowl |
| Noise Level | 75 Decibels |
| Special Features | 6+1P Speed, Tilt Head, Splash Guard, Suction Feet |

Image: Detailed dimensions of the HOMCOM Stand Mixer.

Image: Features of the 600W pure copper motor, highlighting low noise, high power, and durable ABS housing.
8. Warranty and Support
For warranty information or technical support, please refer to the warranty card included with your product or contact HOMCOM customer service directly. Keep your purchase receipt as proof of purchase.
Contact information can typically be found on the manufacturer's official website or on the product packaging.


