
Introduction
This manual provides detailed instructions for the installation, operation, and maintenance of the Turing TP-MFD4A4 Smart Series TwilightVision 4MP IR Dome IP Camera. This camera is designed for outdoor surveillance, featuring 4MP resolution, TwilightVision for low-light clarity, Smart IR up to 30m (98ft), and robust protection ratings (IP67, IK10).
Key Features
- Max. 4MP (2688x1520) resolution at 30/25fps.
- TwilightVision technology for optimal image clarity in low light conditions.
- Support for up to 256 GB microSD card for local storage.
- Advanced analytics including line crossing detection, enter area detection, motion detection (up to four areas), tampering alarm, and audio detection.
- Smart IR illumination up to 30 meters (98 feet).
- IP67 weather resistance and IK10 vandal resistance.
- Power over Ethernet (PoE) support for simplified installation.
- Wide Dynamic Range (WDR) for clear images in varying light conditions.
What's in the Box
Upon unpacking, verify that all items are present and in good condition:
- Turing TP-MFD4A4 Smart Series TwilightVision 4MP IR Dome IP Camera
- Mounting hardware (screws, anchors)
- Quick Start Guide (not included in this manual)
Setup
1. Physical Installation
The TP-MFD4A4 camera is designed for ceiling mount installation. Ensure the mounting surface is strong enough to support the camera's weight.
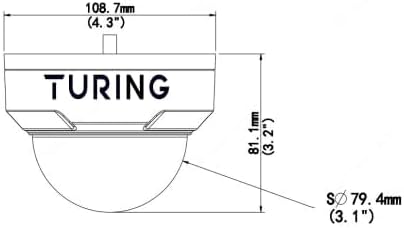
Image: Front view of the Turing TP-MFD4A4 Dome IP Camera, showing its compact design suitable for ceiling mounting.
- Select Location: Choose a suitable outdoor location for optimal surveillance coverage, considering the 4mm fixed lens angle of view (H: 83.7°, V: 44.9°, D: 89.2°).
- Mounting: Use the provided mounting template (if applicable) to drill pilot holes. Secure the camera base to the ceiling using the screws and anchors.
- Adjust Angle: Once mounted, adjust the camera's dome to achieve the desired viewing angle.
2. Power and Network Connection
The camera supports Power over Ethernet (PoE) for simplified installation, allowing both power and data transmission over a single Ethernet cable. Alternatively, it can be powered via a DC 12V power adapter (not included).

Image: A standard Ethernet cable with an RJ45 connector, used for both power (PoE) and data connection to the camera.
- PoE Connection: Connect one end of an Ethernet cable to the camera's RJ45 port and the other end to a PoE-enabled switch or NVR.
- DC Power (Optional): If not using PoE, connect a 12V DC power adapter to the camera's power input and an Ethernet cable to a standard network switch or router.
- Network Configuration: The camera will obtain an IP address automatically via DHCP. For advanced network settings, refer to the Turing Vision software or NVR manual.
3. MicroSD Card Installation (Optional)
The camera supports a microSD card up to 256 GB for onboard storage. This allows for local recording even if network connectivity is temporarily lost.
- Access Slot: Carefully open the camera housing to locate the microSD card slot. Refer to the camera's physical diagram for exact location.
- Insert Card: Insert the microSD card into the slot with the contacts facing down until it clicks into place.
- Format Card: After installation, it is recommended to format the microSD card via the camera's web interface or connected NVR for optimal performance.
Operating the Camera
The Turing TP-MFD4A4 camera integrates with Turing Smart Series NVRs and the Turing Vision Cloud platform for comprehensive surveillance management.

Image: A tablet screen showing a multi-view display of live video feeds from several surveillance cameras, demonstrating remote monitoring capabilities.
1. Accessing Live View and Recordings
- Turing Smart Series NVR: Connect the camera to a compatible Turing Smart Series NVR to view live feeds, manage recordings, and configure settings.
- Turing Vision Cloud: Utilize the Turing Vision Cloud platform for remote access, monitoring, and cloud storage features. This requires a compatible NVR, Bridge, and CORE AI license.
- Web Interface: Access the camera's web interface directly via its IP address for detailed configuration and live view.
2. Understanding Key Technologies
- TwilightVision: This technology enhances image clarity in extremely low-light environments, providing color images where traditional cameras would switch to black and white.
- Smart IR: The camera's Smart IR automatically adjusts the intensity of its infrared LEDs to prevent overexposure of objects closer to the camera, ensuring balanced night vision up to 30m (98ft).
- WDR (Wide Dynamic Range): WDR technology balances areas of high contrast in a scene, ensuring details are visible in both very bright and very dark regions simultaneously.
3. Configuring Analytics
The TP-MFD4A4 camera offers advanced onboard analytics. These features must be used with Turing Smart Series NVRs for full functionality.
- Line Crossing Detection: Triggers an alert when an object crosses a predefined virtual line.
- Enter Area Detection: Generates an alert when an object enters a specified virtual area.
- Motion Detection: Detects movement within the camera's field of view. Up to four distinct motion detection areas can be configured.
- Tampering Alarm: Alerts if the camera is obstructed, moved, or spray-painted.
- Audio Detection: Triggers an alert based on detected sound levels.
Refer to your Turing NVR or Turing Vision Cloud documentation for detailed instructions on configuring these analytics.
Maintenance
Regular maintenance ensures optimal performance and longevity of your Turing TP-MFD4A4 camera.
- Cleaning: Periodically clean the camera lens and dome cover with a soft, damp cloth. Avoid abrasive cleaners that could scratch the surface.
- Firmware Updates: Check the Turing website or your NVR/Cloud platform for available firmware updates. Keeping the firmware updated ensures the latest features and security patches.
- MicroSD Card Management: If using a microSD card for storage, regularly review and back up important footage. Consider setting up automatic overwriting for continuous recording.
- Cable Inspection: Periodically inspect all cables (Ethernet, power) for any signs of wear or damage, especially in outdoor installations.
Troubleshooting
This section addresses common issues you might encounter. For more complex problems, contact Turing technical support.
No Video Feed
- Check Power: Ensure the camera is receiving power, either via PoE or a 12V DC adapter. Verify the PoE switch or injector is functioning.
- Check Network Connection: Confirm the Ethernet cable is securely connected at both ends and that the network switch/router is operational.
- IP Address Conflict: Ensure the camera has a unique IP address on your network. Check your router's DHCP client list.
- NVR/Software Connection: Verify the camera is properly added and configured within your Turing NVR or Turing Vision Cloud platform.
Poor Image Quality
- Clean Lens: Ensure the camera lens and dome cover are clean and free from dirt, dust, or smudges.
- Lighting Conditions: While TwilightVision and WDR improve image quality, extreme lighting conditions can still affect performance. Adjust camera placement if possible.
- Network Bandwidth: Insufficient network bandwidth can lead to pixelated or choppy video. Ensure your network can handle the 4MP video stream.
- Focus Adjustment: Although it has a fixed lens, ensure the camera is correctly positioned for the desired focal area.
Recording Issues
- MicroSD Card: Verify the microSD card is correctly inserted, formatted, and has sufficient free space. Check if it's corrupted.
- Recording Schedule: Ensure recording schedules are correctly configured on the NVR or through the camera's web interface.
- Motion Detection Settings: If recording is motion-triggered, check the sensitivity and area settings for motion detection.
Specifications
Detailed technical specifications for the Turing TP-MFD4A4 Smart Series TwilightVision 4MP IR Dome IP Camera.
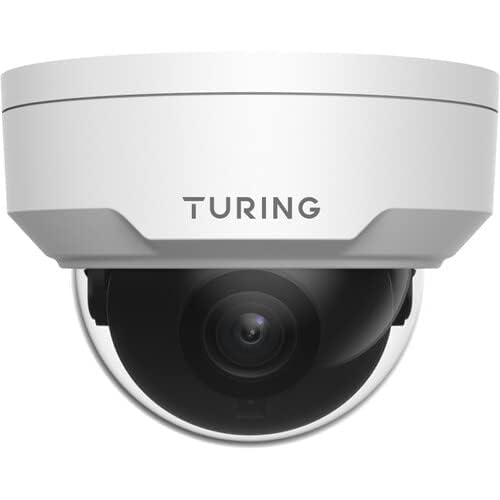
Image: Technical diagram showing the dimensions of the Turing TP-MFD4A4 Dome IP Camera, including height (81.1mm / 3.2") and diameter (108.7mm / 4.3").
| Feature | Specification |
|---|---|
| Model | TP-MFD4A4 |
| Sensor | 1/3-inch 4MP 16:9 Progressive Scan CMOS |
| Lens | 4 mm fixed lens |
| Angle of View | H: 83.7°; V: 44.9°; D: 89.2° |
| Minimum Illumination | Color: 0.002 Lux (F1.6, AGC on); 0 Lux with IR on |
| IR Range | Smart IR up to 30m (98ft) |
| Video Resolution | Max. 4MP (2688x1520) at 30/25fps |
| Video Encoding | Ultra 265, H.265, H.264, MJPEG |
| Digital Processing | 120 dB WDR; 2D/3D DNR; Defog |
| Audio | G.711; 64 Kbps; 8 KHz; noise suppression |
| Onboard Storage | microSD (not included), up to 256 GB |
| Power | DC 12V+/-25% PoE (IEEE 802.3af); up to 4.5W |
| Protection Ratings | IP67, IK10, 4KV Surge Protection |
| Dimensions (D x H) | 4.3 x 3.2 inches (108.7 x 81.1 mm) |
| Weight | 0.93 lbs (0.42 kg) |
| Compatible Devices | Turing SMART Series NVRs, Turing Vision Cloud platform |
| NDAA Compliant | Yes |
Warranty Information
The Turing TP-MFD4A4 Smart Series TwilightVision 4MP IR Dome IP Camera comes with a 3-year warranty from the date of purchase. This warranty covers defects in materials and workmanship under normal use. Please retain your proof of purchase for warranty claims.
For detailed warranty terms and conditions, please refer to the official Turing website or contact customer support.
Support
For technical assistance, product inquiries, or warranty service, please contact Turing customer support through their official website or the contact information provided with your product packaging.
Online Resources: Visit the Turing official website for FAQs, software downloads, and additional documentation.


